Anatomic Gracilis Autograft Reconstruction for Chronic Lateral Ankle Instability: A Masterclass
Key Takeaway
Join us in the OR for an immersive masterclass on anatomic lateral ankle ligament reconstruction. We'll meticulously guide you through gracilis autograft harvest, precise fibular and talar tunnel creation, graft tensioning, and fixation for chronic instability. This comprehensive session emphasizes critical anatomy, intraoperative pearls, and detailed post-operative management.
Comprehensive Introduction and Patho-Epidemiology
Welcome to the operating theater, colleagues. The management of lateral ankle instability has undergone a profound evolution over the past several decades, transitioning from non-anatomic tenodesis procedures to highly sophisticated, biomechanically precise anatomic reconstructions. Today, we are tackling a challenging but highly rewarding clinical scenario: chronic lateral ankle instability (CLAI) requiring an anatomic reconstruction utilizing a gracilis autograft. This patient has exhausted exhaustive nonoperative measures, and our objective is to definitively restore both mechanical stability and physiologic kinematics. This procedure demands exacting precision, a deep understanding of ankle and subtalar biomechanics, and meticulous soft-tissue handling.
Lateral ankle sprains are among the most ubiquitous injuries encountered in both the general population and athletic cohorts, accounting for up to 85% of all ankle injuries. While the majority of these inversion injuries resolve with functional rehabilitation, a significant subset—estimated between 15% and 48%—progress to chronic, debilitating instability. This chronicity is not merely a nuisance; it is a profound functional impairment that alters gait mechanics, diminishes athletic performance, and, if left unaddressed, inexorably leads to asymmetric joint loading and early-onset post-traumatic osteoarthritis of the tibiotalar and subtalar joints.
It is paramount to differentiate between mechanical instability and functional instability, though they frequently coexist. Mechanical instability refers to objective hypermobility of the joint beyond its physiologic limits, directly attributable to the structural attenuation or gross rupture of the lateral ligamentous complex—specifically the anterior talofibular ligament (ATFL) and the calcaneofibular ligament (CFL). Functional instability, conversely, is characterized by the subjective sensation of the ankle "giving way" during dynamic activities, often driven by proprioceptive deafferentation, impaired neuromuscular control, and secondary peroneal muscle weakness resulting from the initial trauma.
The pathophysiology of CLAI is characterized by a vicious cycle of repetitive microtrauma. Following an initial grade II or III sprain, the healing process often results in a lengthened, disorganized, and mechanically inferior scar tissue matrix rather than a restitution of the native ligamentous architecture. Subsequent minor inversion events further stretch this incompetent tissue. Furthermore, lateral ligament disruption rarely occurs in an isolated vacuum. As orthopedic surgeons, we must actively seek out and concurrently address associated pathoanatomy, including osteochondral lesions of the talus (OLTs), occult syndesmotic instability, peroneal tendinopathy or longitudinal split tears, and underlying osseous malalignment such as a forefoot-driven cavovarus foot. Failure to recognize and correct these concomitant pathologies is the leading cause of recurrent instability and catastrophic failure of any lateral ankle reconstruction.
Detailed Surgical Anatomy and Biomechanics
A masterful reconstruction is predicated entirely upon an intimate, three-dimensional understanding of the lateral ankle ligamentous complex. This complex functions as a synergistic network of dynamic and static restraints. The static restraints are primarily capsuloligamentous, comprising the ATFL, the CFL, and the posterior talofibular ligament (PTFL). These structures are not merely distinct cords but are complex condensations within the lateral joint capsule, functioning in concert to guide the talus through its complex, multi-planar arc of motion within the mortise.
The Anterior Talofibular Ligament (ATFL) is the most frequently injured ligament in the human body and the primary restraint to anterior translation and internal rotation of the talus relative to the tibia. Originating from the anterior margin of the distal fibula—typically 10 to 15 millimeters proximal to the distal tip—it courses anteromedially to insert onto the lateral articular facet of the talar body and neck. Crucially, the ATFL is composed of two distinct bands (superior and inferior) in the majority of patients. It is most taut in plantarflexion, which explains why the classic inversion injury mechanism, occurring when the foot is plantarflexed and inverted, selectively loads and ruptures this ligament first. Consequently, the anterior drawer test is most sensitive when performed in 10 to 20 degrees of plantarflexion.
The Calcaneofibular Ligament (CFL) is a robust, extra-articular structure that originates from the anterior aspect of the distal fibular tip, just distal to the ATFL footprint. It courses posteroinferiorly, deep to the peroneal tendon sheath, to insert via a broad footprint onto the lateral wall of the calcaneus. The CFL is unique as it crosses two joints: the tibiotalar (ankle) and the talocalcaneal (subtalar) joints. It serves as the primary restraint to inversion of both the calcaneus and the talus, particularly when the ankle is in neutral or dorsiflexion. Understanding the CFL's intimate relationship with the peroneal tendons is critical; it forms the floor of the peroneal tendon sheath, and severe CFL injuries are frequently accompanied by peroneal tendon pathology or superior peroneal retinaculum avulsions.
Navigating the neurovascular landscape of the lateral ankle requires extreme vigilance. The Superficial Peroneal Nerve (SPN) is the structure at greatest risk during the anterolateral approach. The SPN typically pierces the deep crural fascia in the distal third of the leg, approximately 10 to 15 centimeters proximal to the lateral malleolus. It then bifurcates into the medial dorsal cutaneous nerve and the intermediate dorsal cutaneous nerve, coursing directly over the operative field. These branches must be identified, mobilized, and meticulously protected throughout the procedure, as iatrogenic injury can lead to debilitating neuromas or complex regional pain syndrome (CRPS). Additionally, the Sural Nerve, located more posteriorly and supplying the lateral margin of the foot, must be considered, particularly during the preparation of the calcaneal tunnel and the routing of the CFL graft limb.
Exhaustive Indications and Contraindications
The decision to proceed with operative intervention for lateral ankle instability should never be made precipitously. The primary indication for surgical management is chronic, symptomatic lateral ligament instability that has proven recalcitrant to a comprehensive, diligently executed nonoperative regimen. This regimen must include a minimum of three to six months of aggressive physiotherapy focused on peroneal strengthening, proprioceptive retraining, Achilles tendon stretching, and the use of functional bracing or taping during high-risk activities. Surgery is indicated when the patient continues to experience recurrent "giving way" episodes, persistent pain, and an unacceptable limitation in their quality of life or athletic participation despite these measures.
When surgery is indicated, the surgeon must decide between an anatomic repair (e.g., the modified Broström-Gould procedure) and an anatomic reconstruction using an autograft or allograft. Anatomic repair remains the gold standard for the majority of primary instability cases. However, anatomic reconstruction utilizing a gracilis autograft is explicitly indicated in scenarios where the native ligamentous tissue is profoundly attenuated, friable, or altogether absent. Specific indications for reconstruction include revision surgery following a failed prior Broström procedure, long-standing chronic instability (typically greater than 10 years) where native tissue quality is poor, generalized ligamentous hyperlaxity (e.g., Ehlers-Danlos syndrome or a high Beighton score), morbid obesity, and elite-level athletes or heavy manual laborers who demand a supranormal biomechanical construct.
Contraindications to this procedure must be strictly respected to avoid catastrophic outcomes. Absolute contraindications include active local or systemic infection, severe peripheral vascular disease, and the presence of complex regional pain syndrome (CRPS). Relative contraindications include profound, uncorrected osseous malalignment. Performing a soft-tissue ligament reconstruction in the presence of a rigid, uncorrected cavovarus foot deformity is a recipe for guaranteed failure; the abnormal biomechanical vectors will inevitably stretch out and rupture the graft. In such cases, a concurrent calcaneal osteotomy (e.g., a lateralizing calcaneal osteotomy) or first metatarsal dorsiflexion osteotomy is an absolute prerequisite. Advanced, bone-on-bone tibiotalar or subtalar osteoarthritis is also a contraindication, as restoring stability to a severely arthritic joint will often exacerbate pain; these patients are better served by arthrodesis.
| Category | Indications for Anatomic Gracilis Reconstruction | Contraindications |
|---|---|---|
| Primary | Failed exhaustive conservative management (>6 months) | Active local or systemic infection |
| Tissue Quality | Attenuated, friable, or deficient native ATFL/CFL tissue | Complex Regional Pain Syndrome (CRPS) |
| Patient Factors | Generalized hyperlaxity (high Beighton score), high BMI | Severe peripheral vascular disease |
| Clinical History | Revision of failed prior lateral ankle stabilization (e.g., failed Broström) | Advanced tibiotalar or subtalar osteoarthritis |
| Deformity | Elite athletes requiring robust biomechanical augmentation | Uncorrected, rigid cavovarus foot deformity |
Pre-Operative Planning, Templating, and Patient Positioning
Preoperative planning begins with a meticulous clinical examination. We actively assess for the "peek-a-boo" heel sign indicative of hindfoot varus. If a cavus foot is identified, the Coleman block test is mandatory. By placing the patient's heel and lateral foot on a 1-inch block while allowing the first metatarsal to drop off the edge, we can determine if the hindfoot varus is flexible (driven by a plantarflexed first ray) or rigid. A flexible deformity may only require soft-tissue balancing or a first metatarsal osteotomy, whereas a rigid deformity necessitates a calcaneal osteotomy. We also perform the anterior drawer and talar tilt tests, comparing the excursion and endpoint to the contralateral, uninjured ankle.
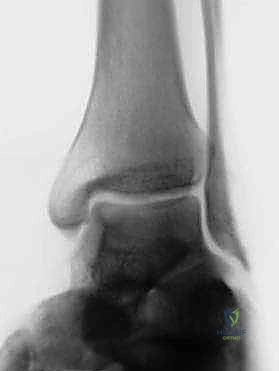
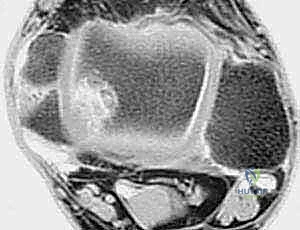
Comprehensive imaging is non-negotiable. Routine weight-bearing anteroposterior (AP), lateral, and mortise radiographs of the ankle are obtained to evaluate joint space narrowing, the presence of anterior tibial osteophytes (impingement), and overall osseous alignment. A calcaneal axial view (Saltzman view) is critical for quantifying hindfoot alignment. Magnetic Resonance Imaging (MRI) without contrast is our gold standard for evaluating the soft tissues. The MRI allows us to definitively assess the integrity of the ATFL, CFL, and peroneal tendons, and, crucially, to identify osteochondral lesions of the talus (OLTs) or occult chondral damage that must be addressed concurrently.
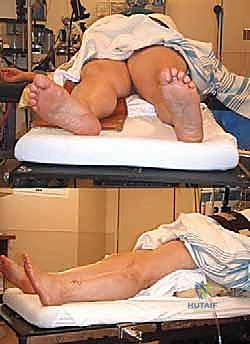
Patient positioning and operating room setup are critical for the seamless execution of this complex procedure. The patient is positioned supine on the operating table. We utilize a large beanbag or a substantial bump placed under the ipsilateral hip. This maneuver internally rotates the pelvis, allowing the naturally externally rotated lower extremity to rest in a neutral position, thereby providing unencumbered, direct orthogonal access to the lateral aspect of the ankle. We explicitly avoid a full lateral decubitus position, as it severely restricts access to the medial aspect of the proximal tibia, which is required for the gracilis tendon harvest.
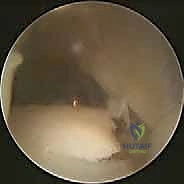
Prior to prepping and draping, a wide pneumatic tourniquet is applied to the proximal thigh to ensure a bloodless surgical field, which is essential for meticulous dissection and identification of delicate neurovascular structures. The entire lower extremity, from the mid-thigh down to the toes, is prepped and draped in a standard sterile fashion. Once the patient is fully relaxed under general or regional anesthesia, we perform a final, definitive stress examination (Exam Under Anesthesia - EUA). This eliminates muscular guarding and provides the truest assessment of mechanical instability. If preoperative imaging or the clinical picture suggests intra-articular pathology, we will invariably begin the case with a diagnostic and therapeutic ankle arthroscopy to debride OLTs, resect impingement lesions, and remove loose bodies before proceeding to the open reconstruction.
Step-by-Step Surgical Approach and Fixation Technique
Gracilis Autograft Harvest and Preparation
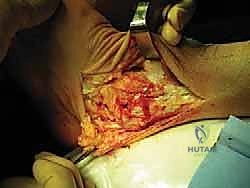
The procedure commences with the harvest of the gracilis autograft. A 3-centimeter longitudinal incision is made over the anteromedial aspect of the proximal tibia, centered approximately 4 centimeters distal to the joint line and 2 centimeters medial to the tibial tubercle. Dissection is carried down through the subcutaneous tissue to identify the sartorial fascia. The fascia is incised in line with its fibers, revealing the pes anserinus tendons. The gracilis tendon is identified; it is the more superior and slightly more anterior of the two distinct tendinous structures (the semitendinosus being inferior and more robust).
Once isolated, the gracilis is secured with a heavy non-absorbable suture. It is critical to meticulously dissect and release any fascial bands connecting the gracilis to the medial head of the gastrocnemius or the semitendinosus, as failure to do so will result in premature amputation of the graft during stripping. An open-ended tendon stripper is then advanced proximally, parallel to the tendon's line of pull, to harvest the full length of the graft. The harvest site is irrigated, and the sartorial fascia and skin are closed in layers.
The harvested gracilis tendon is transferred to the back table for preparation. Muscle belly remnants are meticulously debrided using a blunt elevator or the back of a scalpel blade. The graft is typically folded in half to create a robust, double-stranded construct, though a single strand may be used depending on the specific tunnel configuration and the patient's anatomy. The ends of the graft are whip-stitched using a high-strength, non-absorbable #2 suture (e.g., FiberWire or Orthocord). The prepared graft is then sized using a sizing block to determine the exact diameter required for the osseous tunnels, typically ranging from 4.5 to 5.5 millimeters.
Lateral Ankle Exposure and Tunnel Preparation
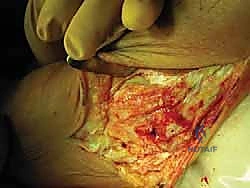
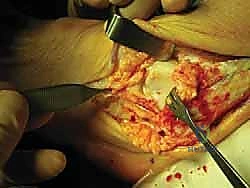
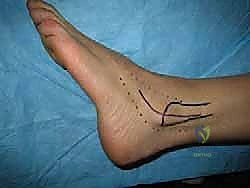
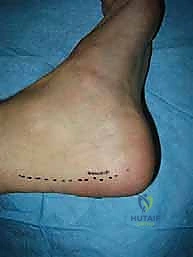
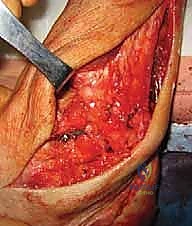
Attention is then directed to the lateral ankle. A curvilinear incision is made, beginning 2 centimeters proximal to the tip of the lateral malleolus, curving distally and anteriorly toward the sinus tarsi. Dissection is carried carefully through the subcutaneous tissues. The intermediate dorsal cutaneous branch of the superficial peroneal nerve is frequently encountered in the proximal extent of the incision; it must be identified, mobilized, and gently retracted using vessel loops. The inferior extensor retinaculum is identified and incised, exposing the underlying lateral capsule and the remnants of the ATFL and CFL.
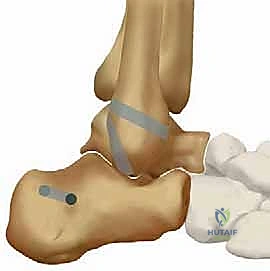
The anatomic footprints of the ATFL and CFL must be precisely identified. The fibular footprint is located on the anterior margin of the distal fibula. The talar footprint of the ATFL is identified on the lateral aspect of the talar neck, just anterior to the articular cartilage. The calcaneal footprint of the CFL is located on the lateral calcaneal wall, deep to the peroneal tendons. The peroneal tendon sheath is carefully opened, and the tendons are retracted posteriorly to expose the calcaneal insertion site.
Tunnel preparation is the most critical technical step. A blind tunnel (socket) is drilled into the talar neck at the precise isometric point of the ATFL insertion, typically using a 4.5mm or 4.75mm cannulated reamer over a guide pin. The trajectory must be directed medially and slightly plantarly to avoid penetrating the subtalar joint or the talar dome cartilage. Next, the fibular tunnel is created. Depending on the surgeon's preference and bone quality, this can be a transosseous tunnel connecting the ATFL and CFL footprints, or two separate blind sockets. Finally, the calcaneal tunnel is drilled at the CFL footprint, directing the drill medially and slightly anteriorly to avoid the posterior facet of the subtalar joint and the sural nerve medially.

Graft Passage and Tensioning
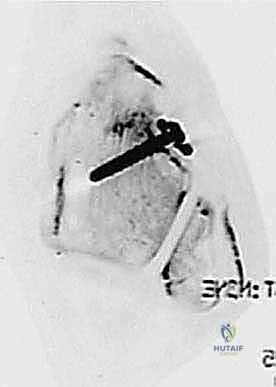
With the tunnels prepared, the graft is introduced into the surgical field. The standard sequence involves docking the graft into the talus first. One end of the prepared gracilis graft is inserted into the talar socket. Fixation is achieved using a bioabsorbable or PEEK biotenodesis interference screw, typically matched to the diameter of the tunnel (e.g., a 4.75mm screw for a 4.75mm tunnel). Excellent purchase must be confirmed before proceeding.
The graft is then routed to the fibula to reconstruct the ATFL. The ankle is held in neutral dorsiflexion and slight eversion to ensure the talus is properly reduced within the mortise. The graft is tensioned into the fibular tunnel. If a transosseous fibular tunnel is used, the graft is passed through; if a blind socket is used, it is docked and secured with a second biotenodesis screw. It is imperative not to over-tension the graft, as this will severely restrict subtalar and tibiotalar kinematics, leading to a stiff, painful joint. The native ATFL is a stabilizing check-rein, not a rigid strut.

The remaining limb of the graft is then utilized to reconstruct the CFL. Crucially, the graft must be routed deep to the peroneal tendons to accurately replicate the native anatomy of the CFL. The graft is passed inferiorly and posteriorly, guided into the calcaneal tunnel. The ankle is maintained in neutral dorsiflexion and maximum eversion to tension the CFL limb appropriately. Final fixation is achieved with a third biotenodesis screw in the calcaneus.
Following final fixation, a thorough examination of joint stability and range of motion is performed. The anterior drawer and talar tilt tests should demonstrate a firm, physiologic endpoint comparable to a normal ankle, without restricting native plantarflexion or dorsiflexion. The peroneal tendons are allowed to fall back into their anatomic position, and the superior peroneal retinaculum is meticulously repaired over them to prevent postoperative subluxation. The incision is irrigated copiously, and the extensor retinaculum, subcutaneous tissue, and skin are closed in a layered fashion.

Complications, Incidence Rates, and Salvage Management
While anatomic gracilis reconstruction yields excellent outcomes in appropriately selected patients, the procedure is technically demanding and carries a distinct complication profile. The most frequent and potentially devastating complication is iatrogenic nerve injury. The superficial peroneal nerve (SPN) and its branches are at the highest risk during the anterolateral approach. Neuropraxia occurs in roughly 5% to 10% of cases, primarily due to aggressive retraction, while frank transection is rare but catastrophic, leading to painful neuromas. Meticulous dissection and the use of protective vessel loops are mandatory. Sural nerve injury can also occur during calcaneal tunnel preparation if the drill trajectory is excessively posterior or medial.
Postoperative joint stiffness is another significant complication, often resulting from non-anatomic tunnel placement or excessive graft tensioning. If the fibular tunnel is placed too far proximally or anteriorly, the graft will not be isometric, causing it to tighten excessively during plantarflexion or dorsiflexion, thereby restricting motion. Treatment for stiffness begins with aggressive, prolonged physical therapy. If recalcitrant, arthroscopic arthrolysis and capsular release may be required, though this risks destabilizing the reconstruction.
Recurrent instability, while less common with autograft reconstructions compared to primary repairs, can still occur (estimated at 3% to 7%). This is almost universally due to a failure to recognize and correct underlying osseous malalignment (e.g., a missed cavovarus foot) or a failure of biologic incorporation of the graft within the osseous tunnels. Salvage management for recurrent instability is highly complex and may necessitate revision reconstruction with allograft, concurrent osteotomies to correct alignment, or, in end-stage cases with secondary arthritic changes, a subtalar or triple arthrodesis.
Hardware-related complications, such as prominent biotenodesis screws or localized osteolysis/cyst formation around bioabsorbable screws, occur in a small percentage of patients. If a screw becomes prominent and causes symptomatic soft-tissue irritation, particularly over the lateral fibula, hardware
