Masterclass in Forefoot Equinus and Cavus Correction: Tendon Transfers and Osteotomies
Key Takeaway
Forefoot equinus and cavus deformities present complex biomechanical challenges requiring precise surgical intervention. This comprehensive guide details three foundational procedures: the Hibbs extensor tendon transfer, the Jahss tarsometatarsal truncated-wedge arthrodesis, and the Cole anterior tarsal wedge osteotomy. Mastering these techniques ensures optimal restoration of plantigrade alignment, preservation of midtarsal stability, and mitigation of severe metatarsalgia in both neuromuscular and idiopathic presentations.
INTRODUCTION TO FOREFOOT EQUINUS AND CAVUS DEFORMITIES
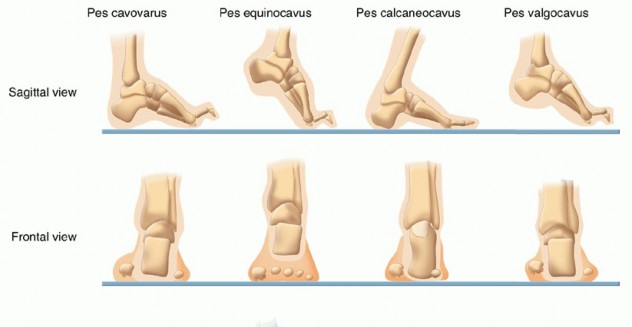
The management of forefoot equinus and pes cavus requires a profound understanding of foot and ankle biomechanics, muscle balancing, and structural alignment. These deformities, often sequelae of neuromuscular disorders (such as Charcot-Marie-Tooth disease, poliomyelitis, or cerebral palsy), compartment syndromes, or idiopathic causes, present with a spectrum of rigidity.
Surgical intervention is dictated by the flexibility of the deformity, the presence of muscle imbalance, and the integrity of the articular surfaces. Soft tissue procedures, such as tendon transfers, are reserved for flexible deformities or as adjuncts to bony work. Conversely, rigid deformities with fixed metatarsalgia, plantar keratoses, or severe cavus require structural realignment through osteotomies or arthrodeses. This masterclass meticulously details three cornerstone surgical techniques: the Hibbs Extensor Tendon Transfer, the Jahss Tarsometatarsal Truncated-Wedge Arthrodesis, and the Cole Anterior Tarsal Wedge Osteotomy.
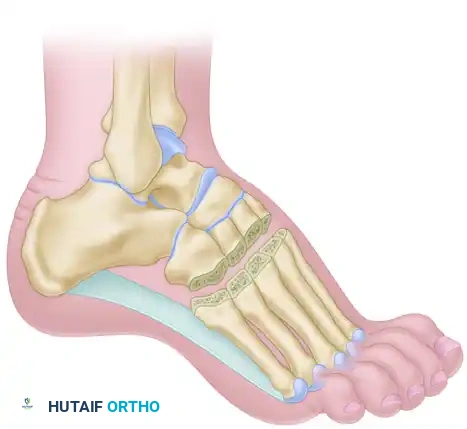
EXTENSOR TENDON TRANSFER (HIBBS TECHNIQUE)
The Hibbs procedure is a classic tendon transfer designed to address flexible claw toe deformities and assist in the elevation of the forefoot. By transferring the common extensor tendons (Extensor Digitorum Longus - EDL) to the midfoot, the deforming dorsiflexion force at the metatarsophalangeal (MTP) joints is eliminated, allowing the toes to relax into a neutral position, while the transferred tendons actively dorsiflex the midfoot and forefoot.
Indications and Biomechanics
- Flexible clawing of the lesser toes.
- Forefoot equinus driven by extensor substitution or muscle imbalance.
- Often performed concomitantly with plantar fascial release or structural osteotomies in cavovarus foot reconstruction.
SURGICAL WARNING: The Hibbs transfer relies on the flexibility of the interphalangeal and MTP joints. If fixed contractures are present, concomitant interphalangeal joint arthrodeses (e.g., Girdlestone-Taylor or standard PIP fusions) and MTP capsulotomies must be performed.
Surgical Technique (Step-by-Step)
- Patient Positioning and Anesthesia: The patient is placed supine on the operating table. A thigh or calf tourniquet is applied following exsanguination of the limb.
- Incision and Exposure: Make a curved incision, approximately 7.5 to 10 cm in length, on the dorsum of the foot, positioned lateral to the midline.
- Tendon Identification: Carefully dissect through the subcutaneous tissues, protecting the branches of the superficial peroneal nerve. Expose the common extensor tendons (EDL) as they course toward the lesser toes.
- Tendon Harvest: Divide the EDL tendons as far distally as feasible (typically at the level of the MTP joints) to ensure adequate length for the transfer.
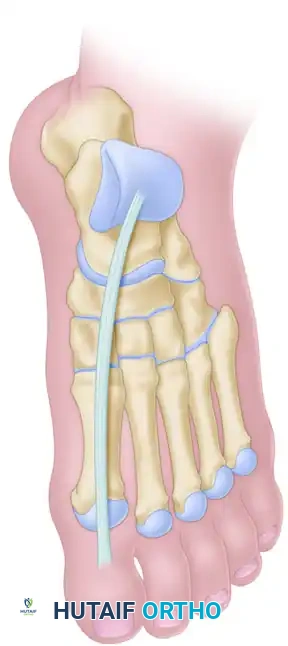
- Preparation of the Recipient Site: Identify the third (lateral) cuneiform. Create a bony tunnel through the substance of the third cuneiform using a cannulated drill or burr.
- Tendon Routing and Fixation: Draw the proximal ends of the divided EDL tendons through the prepared tunnel in the third cuneiform.
- Primary Fixation: Secure the tendons to the periosteum and adjacent soft tissues using a heavy nonabsorbable suture (e.g., #0 or #1 braided polyester).
- Alternative Fixation: Utilize a plantar button and felt pad with a Bunnell pull-out stitch technique, passing the suture through the plantar aspect of the foot.
- Closure: Irrigate the wound copiously. Close the extensor retinaculum if possible to prevent bowstringing, followed by standard subcutaneous and skin closure.
Postoperative Protocol
- Immobilization: Apply a well-padded plaster boot cast with the foot held in the corrected, plantigrade position (neutral dorsiflexion).
- Hardware Removal: If a plantar button and pull-out stitch were utilized, they are removed at 6 weeks postoperatively in the clinic.
- Weight-Bearing: The patient is transitioned to a walking cast or controlled ankle motion (CAM) boot for an additional 3 weeks, allowing progressive weight-bearing.
- Rehabilitation: Active and passive range of motion exercises for the ankle and toes commence at 9 weeks postoperatively.
TARSOMETATARSAL TRUNCATED-WEDGE ARTHRODESIS (JAHSS TECHNIQUE)
Advocated by Jahss, this powerful procedure addresses severe, rigid forefoot equinus by fusing all tarsometatarsal (Lisfranc) joints. The biomechanical genius of this technique lies in the resection of a truncated (rather than triangular) dorsal wedge. This specific geometry lowers the longitudinal arch without excessively shortening the foot, and uniquely utilizes the intact, shortened plantar fascia as a tension band to stabilize the osteotomies, thereby eliminating the need for internal fixation.
Indications
- Rigid Forefoot Equinus: Deformity with persistent, painful metatarsalgia and associated plantar keratoses that have failed conservative management. Patients typically present with greater than 10 degrees of fixed equinus angulation.
- Pes Cavus: Deformity with normal muscle balance and preservation of the metatarsal fat pad.
- Equinovarus/Equinoadductovarus: Forefoot deformities where the hindfoot (heel) remains in a neutral or near-neutral position. This includes residual clubfoot deformities and sequelae of compartment syndromes. (Note: If the etiology is neuromuscular, such as poliomyelitis, the hindfoot must be stable).
- Tissue Integrity: The patient must have normal vascular status and adequate, healthy skin coverage over the dorsum of the foot.
- Timing: Preferably performed at an early stage. If associated hammertoes remain flexible, the dorsal wedge closure will automatically straighten the toes via tenodesis effect, negating the need for separate digital surgery.
Contraindications
- Poor dorsal skin coverage from previous surgeries or questionable vascularity.
- Skeletal immaturity (open physes).
CLINICAL PEARL: Jahss explicitly recommended against performing a separate plantar fascial release. The shortened plantar fascia is critical; when the forefoot is dorsiflexed to close the dorsal wedge, the fascia tightens, providing robust plantar tension-band stability to the osteotomies.
Surgical Technique (Step-by-Step)
- Preparation: Prepare and drape the lower extremity in the standard sterile fashion. Do not use a tourniquet. Jahss advocated for a tourniquet-free approach to continuously monitor skin flap viability during the procedure.
- First Incision (Medial): Palpate the indentation of the first metatarsal-medial cuneiform joint. Make a 3.8-cm vertical skin incision on the dorsum of the foot, approximately 0.6 cm medial to the extensor hallucis longus (EHL) tendon. Center the incision over the joint, extending proximally and medially as needed.
- Medial Exposure: Using a thin, sharp, curved 4.8-mm chisel, perform subperiosteal exposure of the resection area. Crucial: Stay deep to the dorsalis pedis artery to preserve forefoot perfusion.
- First Ray Osteotomy:
- Using a thin, flat, sharp 2.5-cm osteotome, make the distal cut through the base of the first metatarsal. The osteotome must be as wide as the bone to avoid piecemeal resection and step-cutting, ensuring flush apposition for rapid union.
- Make the proximal osteotomy through the medial cuneiform to remove a dorsal truncated wedge. Avoid removing a medial wedge, which would exacerbate forefoot adductus.
- Second Incision (Central): Make a second vertical skin incision, equal in length to the first, between the bases of the second and third metatarsals (slightly closer to the third) and their respective cuneiforms. Note that the base of the second metatarsal is recessed proximally compared to the others.
- Central Exposure: Expose the second metatarsal-middle cuneiform joint via subperiosteal stripping, connecting to the first incision to create a medial longitudinal skin flap. Handle flaps with extreme care; avoid aggressive retraction.
- Central Osteotomies: Remove a dorsal truncated wedge from the second metatarsal-middle cuneiform joint. Working laterally through the same incision, expose and resect the third metatarsal-lateral cuneiform joint.
- Third Incision (Lateral): Make a third vertical incision just medial to the base of the fifth metatarsal. Take corresponding wedges from the fourth and fifth metatarsocuboid joints. This leaves a second lateral skin flap.
- Wedge Closure and Reduction: Dorsiflex the forefoot to close the dorsal wedges. Palpate all wounds to ensure no small bone fragments are blocking reduction.
- Metatarsal Alignment Check: With the osteotomies closed and the ankle in maximal dorsiflexion, palpate the plantar surface of each metatarsal head. They must be absolutely level. If any head remains depressed, more bone must be resected proximally.
- Correction Parameters: The amount of bone removed depends on the equinus angulation, fixed depression of the metatarsal heads, and compensatory hindfoot laxity. Typically, ~19 mm is removed from the 2nd/3rd joints, slightly less from the 1st, and progressively less from the 4th/5th.
- Goal: The plantar surface of the foot should form a 90-degree angle to the tibia with the knee extended. (Aim for 90 degrees, as 5 degrees of dorsiflexion may be lost post-anesthesia).

- Closure: Irrigate thoroughly. Close the skin without subcutaneous sutures to minimize tension.
Postoperative Protocol and Complications
- Immobilization: Apply a short-leg cast with the foot held strictly at a right angle to the tibia. Ensure the metatarsals are plantigrade. Warning: Do not let the base of the fifth metatarsal slip plantarward, as this creates a lateral rocker-bottom deformity.
- Acute Care: Elevate the limb strictly for 4 to 6 days to manage swelling.
- Follow-up: Suture removal and cast change occur at 2 to 3 weeks. Minor adjustments to forefoot alignment (especially residual adductus) can be made at this stage while the callus is soft.
- Weight-Bearing: Non-weight-bearing crutch ambulation begins at 10 days. Full weight-bearing in the cast is permitted at 2 months.
- Cast Removal: The cast is typically removed at 10 to 12 weeks (Note: standard orthopedic timeline for arthrodesis consolidation), followed by 2 to 3 weeks in a removable CAM boot. Active ankle and subtalar exercises commence immediately upon cast removal.
- Complications: Jahss reported complications including rotatory valgus deformity (requiring compensatory 1st metatarsal dorsal wedge osteotomy), incomplete correction, rocker-bottom deformity (from excessive wedge resection), nonunion, and unintended 5th metatarsal-cuboid arthrodesis.
ANTERIOR TARSAL WEDGE OSTEOTOMY (COLE TECHNIQUE)
The Cole anterior tarsal wedge osteotomy is a powerful structural procedure for correcting severe cavus deformities. Unlike the Jahss procedure which fuses the Lisfranc joint, the Cole procedure removes a dorsal wedge directly through the midtarsal bones (navicular and cuboid). This preserves the tarsometatarsal articulations while effectively elevating the forefoot and flattening the longitudinal arch.
Indications and Biomechanics
- Rigid anterior cavus deformity where the apex of the deformity is at the midtarsal joint.
- Often combined with a plantar fascial release (Steindler stripping) if the plantar soft tissues are rigidly contracted.
- By preserving the Lisfranc joint and the posterior subtalar/talonavicular joints, it maintains a degree of foot suppleness compared to a traditional triple arthrodesis.
Surgical Technique (Step-by-Step)
- Exposure: A dorsal longitudinal incision is made. The extensor tendons are separated, typically finding an internervous/intertendinous plane between the tendons of the third and fourth toes.
- Periosteal Flaps: Incise the periosteum longitudinally over the midtarsus and elevate it meticulously both medially and laterally to expose the navicular and cuboid.
- Bone Identification: Identify the tarsal bones with absolute certainty using fluoroscopy if necessary.
- Osteotomy Cuts:
- Make an almost vertical, transverse osteotomy cut starting near the center of the navicular and cuboid, directing it toward the inferior (plantar) surface of the tarsus.
- Make a second osteotomy cut distal to the first. This cut should angle proximally to intersect the first cut at the inferior cortex of the tarsus, creating a dorsal wedge.
- Sizing: The distance between the proximal and distal cuts (the width of the dorsal wedge) is dictated by the severity of the cavus deformity.
- Deformity Correction: Elevate the forefoot forcefully to close the bony defect created by the wedge resection. Ensure bony apposition is flush.
- Tendon Transfer (Optional): If extensor substitution is present, the extensor tendons may be transferred and anchored into the osteotomy site at the midline of the foot. However, if the clawing is flexible, it will often correct spontaneously once the cavus is reduced.
- Closure: Close the periosteum robustly with interrupted sutures to stabilize the osteotomy. Close the subcutaneous tissue and skin.
Postoperative Protocol
- Immobilization: Apply a well-molded plaster cast from the toes to the knee, holding the foot in the corrected position.
- Acute Care: Elevate the limb continuously for 4 to 6 days. Postoperative pain and swelling are typically manageable but require strict elevation.
- Follow-up: Sutures are removed, and the cast is changed at 2 weeks. As with the Jahss procedure, minor adjustments to forefoot alignment can be made during this cast change.
- Weight-Bearing: Non-weight-bearing crutch walking is allowed at 10 days. Progressive full weight-bearing in the cast is permitted at 2 months.
- Cast Removal: The cast is discontinued at 2.5 months (10 weeks) postoperatively, provided radiographic union is evident. Full weight-bearing in standard footwear and active ankle/subtalar rehabilitation begin immediately.
SURGICAL WARNING: When performing the Cole osteotomy, extreme care must be taken not to over-resect the dorsal wedge. Over-correction will result in a devastating rocker-bottom deformity, shifting weight-bearing forces to the fragile midfoot plantar structures. Always err on the side of a slightly under-corrected, stable plantigrade foot.
You Might Also Like