Mastering Cavovarus Foot Reconstruction: An Intraoperative Guide to Multiplanar Deformity Correction
Key Takeaway
Welcome to the operating theater, fellows, for a deep dive into cavovarus foot reconstruction. We'll meticulously cover preoperative planning, patient positioning, and the granular execution of key procedures like gastrocnemius recession, calcaneal osteotomy, and first metatarsal dorsiflexion osteotomy. Expect extensive anatomical insights, critical pearls, and comprehensive postoperative care strategies for optimal patient outcomes.
Introduction to Cavovarus Foot Reconstruction: A Masterclass
Alright, fellows, gather 'round. We're about to embark on a comprehensive journey through the surgical correction of cavovarus foot deformity. This is a complex, multiplanar problem, and successful outcomes demand meticulous planning, precise execution, and a deep understanding of foot and ankle biomechanics. Today, we'll walk through this case as if you're scrubbed in right beside me, anticipating every move, understanding every rationale.
Preoperative Planning: The Blueprint for Success
Before we even touch the patient, our battle plan is forged. This isn't just about looking at X-rays; it's about synthesizing clinical findings, imaging, and patient-specific goals into a cohesive strategy.
-
Clinical Assessment:
- Rigidity vs. Flexibility: This is paramount. We'll perform a thorough physical examination to assess the flexibility of the deformity. Can we passively correct the hindfoot varus? Is the forefoot pronation reducible? The Coleman block test is crucial here. Remember, a flexible deformity might respond to soft tissue releases and tendon transfers, while a rigid deformity often necessitates osteotomies or even arthrodesis.
- Muscle Imbalance: Assess individual muscle strength and contracture. A tight Achilles or gastrocnemius, weak dorsiflexors, or an overactive peroneus longus can all contribute.
- Concurrent Problems: Look for lateral ankle instability, claw toes, or hallux rigidus, as these must be addressed concurrently.
-
Imaging Studies Review:
- Plain Radiographs: We'll scrutinize standard weight-bearing AP, lateral, and oblique views, along with a hindfoot alignment view. We're looking for:
- Calcaneal Pitch: Often increased in cavus feet.
- Meary's Angle: Talus-first metatarsal angle, typically elevated in cavus.
- Hibbs Angle: Calcaneus-first metatarsal angle, also often increased.
- Tarsometatarsal (TMT) Joint Alignment: To identify forefoot plantarflexion.
- Arthritic Changes: Especially in the subtalar or midfoot joints. If severe, rigid deformity with significant arthritis is present, a triple arthrodesis might be our ultimate recourse.
- CT Scanning: In cases where plain radiographs are equivocal, particularly concerning subtalar or midfoot arthritis, a CT scan provides invaluable detail, allowing us to accurately map out joint degeneration and bone morphology.
- MRI: Less frequently used for primary deformity planning, but useful for evaluating soft tissue pathology, such as peroneal tendon tears or stress fractures, if suspected.
- Plain Radiographs: We'll scrutinize standard weight-bearing AP, lateral, and oblique views, along with a hindfoot alignment view. We're looking for:
-
Templating and Fluoroscopy Setup:
- We'll template our osteotomies on the radiographs, estimating the amount of wedge resection or translation needed. This guides our intraoperative decision-making.
- Our C-arm will be draped and positioned for immediate access to both lateral and AP views of the foot and ankle, ensuring precise osteotomy cuts and hardware placement.
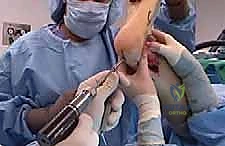
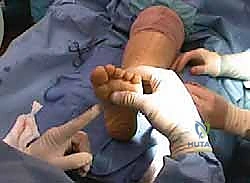
Patient Positioning: Setting the Stage
Patient positioning is critical for optimal exposure and surgical efficiency.
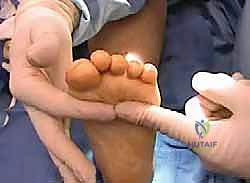
- Supine Position: The patient is positioned supine on the operating table.
- Heel at Bed End: Crucially, the heel will rest just at the very end of the bed. This allows for unrestricted ankle dorsiflexion and plantarflexion, essential for assessing Achilles tightness and achieving full correction.
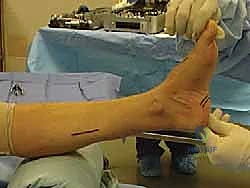
- Ipsilateral Hip Bump: We'll place a small bump or pillow beneath the ipsilateral hip. This slight internal rotation of the leg brings the foot perpendicular to the table, facilitating both medial and lateral exposures of the foot and ankle without excessive manipulation during the case.
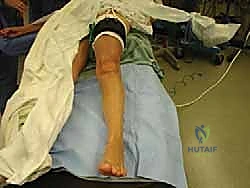
FIG 1 • Positioning for cavovarus reconstruction. The patient is supine with a bump under the ipsilateral hip. The foot is placed perpendicular to the floor to facilitate medial and lateral foot access.
* Thigh Tourniquet: A well-padded pneumatic thigh tourniquet will be applied. Proper padding is essential to prevent nerve compression or skin injury. We'll inflate it to the appropriate pressure (typically 100 mmHg above systolic blood pressure) after exsanguination of the limb.
* Leg Prep: The entire leg is prepped and draped circumferentially from the knee down to the toes, providing ample sterile field for all potential incisions.
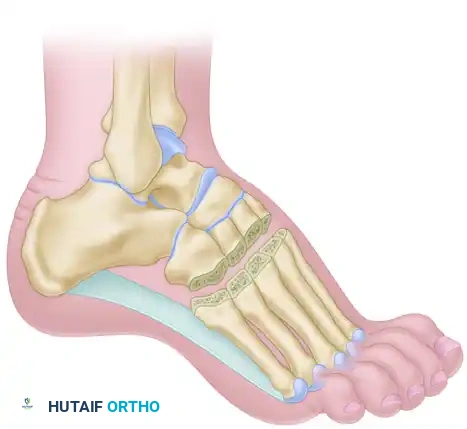
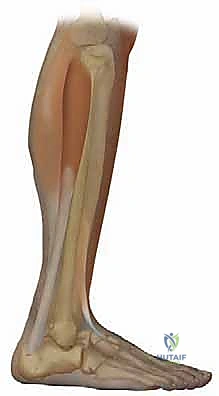
Comprehensive Surgical Anatomy: Navigating the Landscape
Throughout this procedure, we'll constantly be mindful of the intricate neurovascular and tendinous anatomy.
- Sural Nerve: A critical structure, typically found laterally, posterior to the lateral malleolus, running along the lateral border of the Achilles tendon. It supplies sensation to the lateral aspect of the foot and ankle.
- Peroneal Tendons: Peroneus longus and brevis run posterior to the lateral malleolus, within a common synovial sheath, beneath the superior peroneal retinaculum. The brevis inserts onto the fifth metatarsal base, while the longus courses beneath the cuboid to insert on the first metatarsal and medial cuneiform.
- Tibial Nerve and Medial Calcaneal Branch: The tibial nerve courses posterior to the medial malleolus, giving off the medial calcaneal nerve branches which supply sensation to the heel pad. These are particularly vulnerable during plantar fasciotomy.
- Extensor Hallucis Longus (EHL): Originates from the fibula, runs dorsally to the great toe, and is a key player in the Jones procedure.
- Dorsal Neurovascular Structures: On the dorsum of the foot, the superficial peroneal nerve branches and dorsal metatarsal arteries are at risk during dorsal incisions for forefoot osteotomies.
Step-by-Step Intraoperative Execution: The Operating Surgeon's Viewpoint
Now, let's get scrubbed in. We'll proceed systematically, addressing components of the deformity from proximal to distal, or as dictated by the specific pathology.
A. Gastrocnemius Recession (or Achilles Lengthening)
This is often our first step, especially when a tight heel cord contributes to the cavus. Addressing this minimizes the deforming force on the heel and improves ankle dorsiflexion.
- Incision: "Scalpel, please. We'll make a longitudinal incision, approximately 5-6 cm in length, just distal to the musculotendinous junction of the gastrocnemius on the medial side of the leg. This places us directly over the gastrocnemius fascia."
- Anatomy: At this level, the sural nerve typically lies more laterally, but careful retraction is always warranted. The medial gastrocnemius belly is readily palpable.
- Dissection: "Deepen the dissection through the subcutaneous fat. We'll then use a pediatric vaginal speculum – an excellent tool here, fellows, as it provides wide, controlled retraction with minimal tissue trauma – to isolate the gastrocnemius fascia. Alternatively, standard army-navy retractors can be used."
- Surgical Warning:
> Surgical Warning: Always be mindful of the sural nerve, which often lies adjacent to the gastrocnemius, particularly near the midline. Maintain gentle retraction to protect it.
- Surgical Warning:
- Fascia Identification and Incision: "Identify the deep fascia of the leg. This is the aponeurosis of the gastrocnemius. We'll incise it transversely, using tenotomy scissors, across its entire width. Feel the tension release as you cut."
- Technique: Ensure the cut is truly transverse and complete to achieve effective lengthening.
- Blunt Dissection: "Now, use blunt dissection to separate the superficial gastrocnemius from the deeper soleus muscle. You'll feel the distinct fascial plane between them."
- Plantaris Tendon: "The plantaris tendon, if present, will often be visible along the medial border of the Achilles complex. It's a thin, delicate tendon. If encountered, it may be cut without consequence."
- Assess Correction: "With the knee extended, dorsiflex the ankle. We should now gain approximately 15 to 20 degrees of increased ankle dorsiflexion, confirming adequate release."
- Closure: "We'll reapproximate the deep fascia loosely with a few interrupted 3-0 absorbable sutures to prevent herniation, then close the subcutaneous tissue and skin in layers."
B. Lateral Displacement Calcaneal Osteotomy and Peroneus Longus to Brevis Transfer
This is a cornerstone procedure for correcting rigid hindfoot varus and addressing muscle imbalance. We'll often combine these two procedures through a single lateral incision.
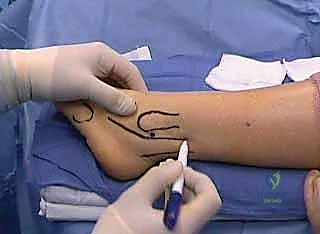
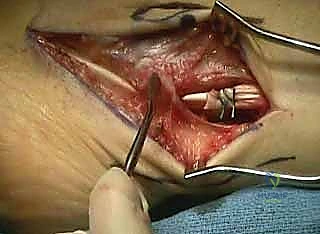
- Incision: "For both the calcaneal osteotomy and the tendon transfer, we'll make a curvilinear incision, approximately 8-10 cm in length, inferior to but parallel to the course of the peroneal tendons, just proximal to the calcaneal tuberosity. This allows excellent access to both the calcaneus and the peroneal sheath."
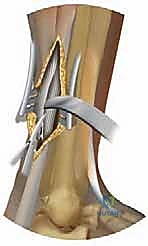
TECH FIG 2 • Lateral displacement calcaneal osteotomy and peroneus longus to brevis transfer. A. Lateral incision over hindfoot just posterior to peroneal tendons.
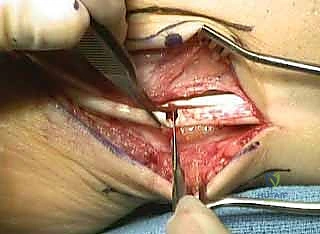
2. Dissection to Peroneal Tendons: "Carefully deepen the dissection through the subcutaneous fat. The sural nerve lies just inferior to our incision, so we'll meticulously identify and protect it. Use blunt dissection to trace its course and retract it gently inferiorly."
* Anatomy: The sural nerve runs with the short saphenous vein, superficial to the deep fascia.
TECH FIG 2 • Lateral displacement calcaneal osteotomy and peroneus longus to brevis transfer. E. Sural nerve is identified as dissection is carried inferior.
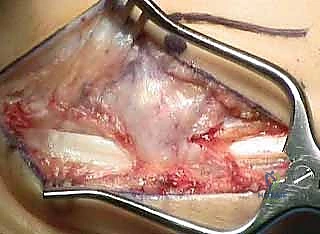
3. Peroneal Sheath Exposure: "Once the sural nerve is safely retracted, we'll identify the peroneal tendons – the longus and brevis – lying within their common sheath, deep to the superior peroneal retinaculum (SPR)."
TECH FIG 2 • Lateral displacement calcaneal osteotomy and peroneus longus to brevis transfer. B. Dissection carried down to the peroneal tendons, with the superior peroneal retinaculum still intact.
4. SPR Management: "We'll incise the peroneal sheaths for the length of our incision. It's crucial to preserve the SPR if it's intact and stable. However, if there's concurrent peroneal tendon pathology, such as tears or instability, we may need to take down the SPR directly off the posterior fibula. If so, we'll reattach it later using a suture anchor."
* Pearl: If the SPR is taken down, plan for its meticulous repair to prevent postoperative peroneal subluxation.
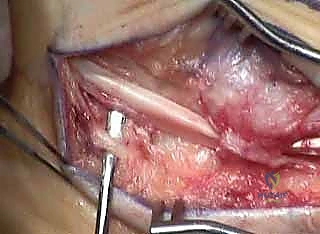
5. Peroneus Longus to Brevis Transfer:
* Tendon Harvest: "Now, let's address the tendon transfer. We'll identify the peroneus longus tendon. We need to remove a section of the peroneus longus distally, typically by detaching it from its insertion or by transecting it more proximally, ensuring adequate length for transfer."
TECH FIG 2 • Lateral displacement calcaneal osteotomy and peroneus longus to brevis transfer. C. With the superior peroneal retinaculum flap taken posterior, a section of the peroneus longus is removed.
* Transfer and Suture: "We'll then bring the free end of the peroneus longus proximally and suture it to the peroneus brevis tendon. We use a figure-of-eight non-absorbable suture, such as 2-0 FiberWire, ensuring a strong tenodesis. The goal is to rebalance the foot by converting the deforming plantarflexion force of the longus into a dorsiflexion force. Make sure the knot does not impinge below the SPR, which could lead to irritation."
TECH FIG 2 • Lateral displacement calcaneal osteotomy and peroneus longus to brevis transfer. D. The peroneus longus has been sutured to the brevis, making sure the knot does not impinge under the superior peroneal retinaculum through range of motion of the tendon.
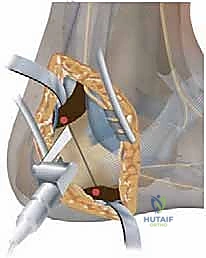
6. Calcaneal Exposure: "Now, let's turn our attention to the calcaneus. We'll carry our dissection straight through the subcutaneous fat to the bone, inferior to the peroneal tendons. Once the calcaneus is reached, perform a subperiosteal dissection inferiorly, exposing the lateral wall of the calcaneus."
* Anatomy: Protect the sural nerve that we've already identified and retracted.
7. Hohmann Retractor Placement: "Place small Hohmann retractors superiorly to protect the insertion of the Achilles tendon and anteriorly to protect the origin of the plantar fascia. These are critical structures to safeguard during the osteotomy."
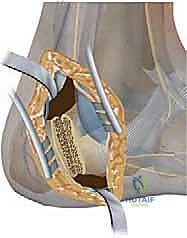
8. Osteotomy Cut: "With soft tissues meticulously protected, we'll use a sagittal saw to make the osteotomy. The cut should be perpendicular to the long axis of the calcaneus, extending from lateral to medial. Ensure you are not violating the subtalar joint superiorly or the plantar fascia insertion inferiorly."
TECH FIG 2 • Lateral displacement calcaneal osteotomy and peroneus longus to brevis transfer. F. A saw is used to cut across the calcaneus, perpendicular to its long axis, protecting the Achilles and plantar fascia.
9. Heel Shift: "Now, the correction. An assistant will hold the foot. We'll shift the free tuberosity piece laterally until we achieve a physiologic valgus position, typically around 5 degrees. This usually translates to an 8 to 10 mm lateral shift. Use fluoroscopy to confirm the alignment."
* Pearl: The lateral displacement osteotomy is preferred over the Dwyer in most adult cases because it preserves the moment arm of the Achilles tendon, providing better power for push-off.
10. Fixation: "Maintain the heel shift with a Kirschner wire or by the assistant's hand. We'll then place two 6.5-mm partially threaded cancellous screws in lag fashion across the osteotomy site. The screws should be positioned superior to the posterior weight-bearing surface of the heel and must not penetrate the subtalar joint."
* Surgical Warning:
> Surgical Warning: Heel Screw Placement
> With a lateral heel shift, there's a natural tendency to angle the drill too far laterally, risking non-purchase in the medial calcaneus. The drill should be angled slightly medially to ensure proper purchase in the remaining calcaneus. Use fluoroscopy (lateral and axial views) to confirm screw trajectory and length, avoiding joint penetration.
TECH FIG 2 • Lateral displacement calcaneal osteotomy and peroneus longus to brevis transfer. G. An assistant holds the lateral shift while two 6.5-mm partially threaded cancellous screws are placed across the osteotomy.
TECH FIG 2 • Lateral displacement calcaneal osteotomy and peroneus longus to brevis transfer. H. Final screw positioning as seen from lateral and superior views.
11. Bone Smoothing: "After fixation, use a rasp to smooth down any prominent lateral bone edges created by the shift. This prevents soft tissue irritation."
C. Dwyer Lateral Closing-Wedge Calcaneal Osteotomy
In specific cases, particularly in pediatric patients or when a significant reduction in calcaneal pitch is desired, a Dwyer osteotomy may be chosen.
- Approach: "We'll use the same lateral approach as outlined for the lateral sliding calcaneal osteotomy, ensuring meticulous protection of the sural nerve and peroneal tendons."
- Wedge Resection: "Instead of a transverse cut and shift, we'll remove a wedge of bone, based laterally, using a sagittal saw. The size of this wedge is determined by our preoperative templating and the desired amount of correction needed to bring the heel to a physiologic valgus position."
- Pearl: The Dwyer osteotomy is particularly useful for deformities associated with increased calcaneal pitch, where a proximal slide of the calcaneus is being done to lower the arch.
- Wedge Closure and Fixation: "Once the bone wedge is removed, dorsiflex the foot to close the osteotomy. We'll then fixate it as described previously, typically with two 6.5-mm partially threaded cancellous screws in lag fashion, confirming position with fluoroscopy."
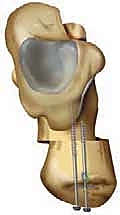
D. First Metatarsal Dorsiflexion Osteotomy
Addressing the plantarflexed first ray is crucial for correcting forefoot driven cavus.
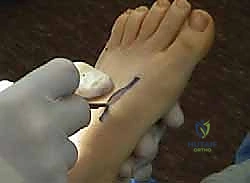
- Incision: "Make a dorsal longitudinal incision, approximately 4-5 cm, directly over the proximal first metatarsal. This provides excellent access to the bone."
TECH FIG 4 • First metatarsal dorsiflexion osteotomy. B. Incision over first metatarsal.
* Anatomy: Be mindful of the dorsal cutaneous nerves (branches of the superficial peroneal nerve) and dorsal metatarsal arteries.
2. Dissection and Tendon Retraction: "Carefully deepen the dissection to the extensor tendons. We'll retract the extensor hallucis longus and brevis tendons laterally to expose the bone. Perform a subperiosteal dissection to expose the proximal metatarsal, extending to just shy of the first tarsometatarsal (TMT) joint."
* Pearl: Use small Hohmann retractors around the bone to protect the delicate soft tissues and neurovascular structures during saw cuts.
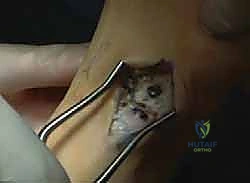
3. Marking the Osteotomy: "Mark a transverse line on the dorsal aspect of the bone, approximately 1 cm distal to the first TMT joint. This ensures we are in the metatarsal diaphysis and away from the joint capsule."
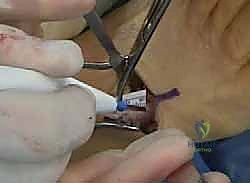
TECH FIG 4 • First metatarsal dorsiflexion osteotomy. C. Measuring 1 cm from first tarsometatarsal joint.
4. Osteotomy Cuts (Dorsal Closing Wedge): "This is a dorsal closing-wedge osteotomy. Our first cut will be through approximately 90% of the bone, perpendicular to the long axis of the diaphysis, starting dorsally and ending just shy of the plantar cortex. The second cut is made 2 to 3 mm distal to the first, angled back toward the plantar endpoint of the first cut. This creates our dorsal wedge."
* Surgical Warning:
> Surgical Warning: First Metatarsal Osteotomy
> The most common pitfall here is taking too little of a dorsal wedge. This leaves the first metatarsal plantarflexed, predisposing the patient to recurrence of the cavus deformity. Use fluoroscopy to confirm adequate dorsiflexion and restoration of anatomic alignment of the talus and first metatarsal (about 0 degrees on a lateral radiograph).
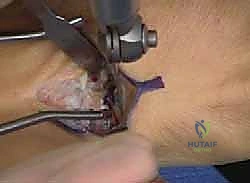
TECH FIG 4 • First metatarsal dorsiflexion osteotomy. D. A small dorsally based wedge is removed. (continued)
5. Wedge Removal and Reduction: "Complete the first cut, remove the bone wedge, and then gently close the osteotomy, bringing the first ray into a neutral or slightly dorsiflexed position. We're aiming to restore the anatomic alignment of the talus and first metatarsal on the lateral radiograph to approximately 0 degrees."
TECH FIG 4 • First metatarsal dorsiflexion osteotomy. E. The wedge is closed and held with a screw recessed in the first metatarsal.
6. Fixation: "Once the desired correction is achieved, we'll fixate the osteotomy. Use a small burr to create a shallow hole dorsally to recess the screw head. Then, place a 3.5-mm lag screw from this burr hole across the osteotomy. Take extreme care not to enter the first TMT joint, which could lead to painful arthritis."
TECH FIG 4 • (continued) E. The wedge is closed and held with a screw recessed in the first metatarsal. F. Final first ray position.
E. Partial Plantar Fasciotomy
This is a useful adjunct, particularly when severe midfoot flexion prevents adequate reduction of the forefoot after osteotomies.
- Incision: "Make a small, longitudinal incision, approximately 2-3 cm, just distal and parallel to the plantar heel pad, slightly medial to the midline."
- Dissection: "Carefully dissect through the subcutaneous fat. The medial calcaneal branch of the tibial nerve and the intrinsic musculature of the foot are at risk here, so meticulous, sharp and blunt dissection is warranted."
- Surgical Warning:
> Surgical Warning: Plantar Fascia Release
> The medial calcaneal branch of the tibial nerve and the intrinsic musculature of the foot are immediately deep to the skin and subcutaneous fat. Careful, layered dissection is paramount to avoid nerve injury, which can lead to painful neuromas or dysesthesia.
- Surgical Warning:
- Fascia Identification: "Once the plantar fascia is identified, delineate its medial and lateral borders. We'll begin our transection approximately 1 cm distal to its origin on the calcaneus."
- Release: "Using a small scalpel or tenotomy scissors, perform a partial or complete release. For most cases, a partial release (medial two-thirds) is sufficient. More severe deformities may require a more extensive or complete release. Assess the flexibility of the midfoot after the release."
F. Jones Procedure for Claw Hallux
If residual claw hallux is present, a Jones procedure is an excellent option, combining an IP joint fusion with an EHL transfer.
- IP Joint Incision and Exposure: "First, we'll make a transverse incision dorsally over the interphalangeal (IP) joint of the great toe. Deepen the dissection to expose the joint capsule."
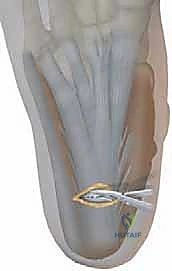
TECH FIG 6 • Jones procedure of first toe. A. Incision is made transversely over the interphalangeal joint to remove cartilage and harvest extensor hallucis longus tendon.
2. EHL Harvest and Arthrotomy: "Identify the extensor hallucis longus (EHL) tendon. We'll cut it proximally within this wound. Then, perform an arthrotomy in the IP joint, freeing up the collateral ligaments."
3. Cartilage Removal and Fenestration: "Use small curettes to meticulously remove all articular cartilage from both joint surfaces. Then, use a 2-mm drill bit to fenestrate the subchondral bone on both sides of the joint, promoting fusion."
4. K-wire Placement: "Make a small transverse incision at the toe tip to facilitate K-wire placement. Now, place a 1.6 mm Kirschner wire from proximal to distal through the distal phalanx and out the tip of the toe, just under the nail. Leave minimal wire within the joint."
5. Retrograde K-wire and Reduction: "While holding the IP joint reduced and in a functional position (typically 0-5 degrees dorsiflexion), pass the K-wire retrograde across the IP joint, ensuring stable fixation."
6. Screw Fixation: "Confirm the position on fluoroscopy. We'll then drill over the K-wire with a cannulated drill bit and place a 4.0-mm partially threaded cannulated screw over the wire for compression. Measure the length carefully so it does not penetrate the metatarsophalangeal (MTP) joint. Remove the K-wire once the screw is in place."
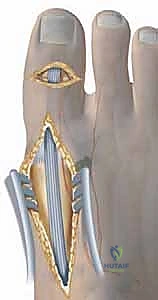
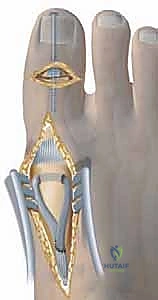
TECH FIG 6 • Jones procedure of first toe. B. Incision is made longitudinally over the first metatarsal, transferring the tendon to the neck, and a screw is placed across the interphalangeal joint in lag mode. A B
7. Metatarsal Neck Incision: "Now, we'll make a second dorsal midline longitudinal incision, approximately 3-4 cm, centered over the first metatarsal neck."
8. EHL Tendon Retrieval: "Identify the distal end of the previously cut EHL tendon and bring it into this wound."
9. Metatarsal Tunnel Creation: "Using a 4.0-mm drill bit, make two drill holes on the medial and lateral aspects of the first metatarsal neck. Connect these holes using a small curette, creating a tunnel through the metatarsal
Additional Intraoperative Imaging & Surgical Steps
REFERENCES
-
Patients are kept immobilized and non – weight-bearing for a total of 8 weeks, and weight bearing is begun when bony healing has occurred.
-
Dwyer FC. The present status of the problem of pes cavus. Clin Orthop Relat Res 1975;106:254–275.
-
Jahss MH. Tarsometatarsal truncated-wedge arthrodesis for pes cavus and equinovarus deformity of the fore part of the foot. J Bone Joint Surg Am 1980;62A:713–722.
-
Japas LM. Surgical treatment of pes cavus by tarsal V-osteotomy: preliminary report. J Bone Joint Surg Am 1968;50AL927–944.
-
McCluskey WP, Lovell WW, Cummings RJ. The cavovarus foot deformity: etiology and management. Clin Orthop Relat Res 1989; 247:27–37.
-
Sammarco GJ, Taylor R. Cavovarus foot treated with combined calcaneus and metatarsal osteotomies. Foot Ankle Int 2001;22:19–30.
-
Wetmore RS, Drennan JC. Long-term results of triple arthrodesis in Charcot-Marie-Tooth disease. J Bone Joint Surg Am 1989;71A: 417–422.
-
Younger AE, Hansen ST. Adult cavovarus foot. J Am Acad Orthop Surg 2005;13:302–315.
OUTCOMES
- Long-term studies of cavovarus correction in adults are lacking, likely given the varied presentation and multiple modes of treatment for the disorder.
- Early treatment while feet are flexible is advised to prevent more extensive procedures required for rigid deformities and complications from progressive arthrosis.
COMPLICATIONS
- Painful hardware
- Infection
You Might Also Like