Minimally Invasive Approach for Femur Intramedullary Nailing Success
Key Takeaway
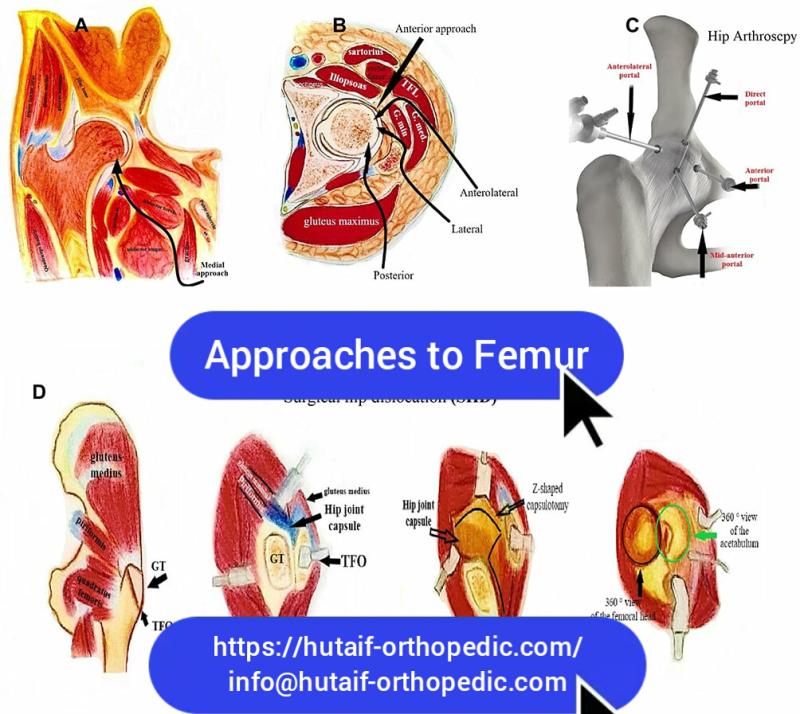
We review everything you need to understand about Minimally Invasive Approach for Femur Intramedullary Nailing Success. A minimally invasive approach to the proximal femur for intramedullary nailing addresses acute, pathologic, or nonunion femoral shaft fractures. The entry point is radiographically determined, aligning with the intramedullary canal based on nail design and patient anatomy. This precise alignment on AP and lateral views ensures effective treatment. Patients can be positioned supine or lateral for the procedure.
As Academic Orthopedic Surgeons and Medical Educators, our commitment to advancing surgical science and refining clinical practice is paramount. The evolution of intramedullary (IM) nailing for femoral fractures stands as a testament to this pursuit, with minimally invasive approaches representing a significant leap forward in optimizing patient outcomes. This comprehensive review aims to serve as a high-yield reference for orthopedic surgeons, residents, and medical students, delving into the nuances of a minimally invasive strategy for femur intramedullary nailing.
Introduction and Epidemiology
Femoral shaft fractures represent a significant burden of musculoskeletal trauma, with an incidence varying between 10 and 20 per 100,000 person-years. These injuries often result from high-energy mechanisms in younger individuals but can also occur due to low-energy falls in osteoporotic elderly populations. The advent of intramedullary nailing revolutionized the treatment of femoral shaft fractures, offering superior biomechanical stability, load sharing, and promoting biological healing compared to earlier external fixation or plate osteosynthesis methods. The transition from open reduction to reamed and unreamed closed intramedullary nailing marked a paradigm shift, minimizing soft tissue disruption and preserving fracture hematoma.
Minimally invasive approaches (MIA) to intramedullary nailing further refine this principle by limiting the surgical footprint, aiming to reduce operative morbidity, minimize blood loss, decrease postoperative pain, and potentially accelerate functional recovery. The judicious selection of an entry point, whether piriformis fossa or trochanteric, is critical for successful nail insertion and fracture reduction while avoiding iatrogenic complications. This document will systematically review the anatomical considerations, surgical techniques, potential complications, and evidence-based practices guiding the successful implementation of MIA for femoral intramedullary nailing.
Surgical Anatomy and Biomechanics
A thorough understanding of the proximal femoral anatomy and its biomechanical implications is fundamental to achieving optimal outcomes with intramedullary nailing. The success of the procedure hinges on accurate entry point selection, which dictates the alignment of the nail within the medullary canal and minimizes soft tissue damage.
Proximal Femoral Anatomy
The proximal femur is characterized by its complex three-dimensional structure. Key anatomical landmarks relevant to IM nailing include:
- Greater Trochanter: The most lateral prominence of the proximal femur, serving as the insertion point for the gluteus medius and minimus muscles.
- Piriformis Fossa: A depression located superomedial to the tip of the greater trochanter, representing the traditional entry point for many older generation femoral nails. It is situated between the anterior border of the piriformis tendon insertion and the posterior border of the gluteus minimus.
- Trochanteric Fossa: The original seed content states this marks the insertion of obturator externus but cannot be used reliably in all patients because it does not always line up with the intramedullary canal in both planes and cannot be palpated because of overlying musculature. For nails that are straight when viewed in the anterior–posterior plane, the skin incision, the entry point of the nail in the bone, and the medullary canal of the femur should all be in a straight line.
- Tip of Greater Trochanter: This superior-most point of the greater trochanter is increasingly utilized as an entry point, especially for nails designed with a lateral bend or for subtrochanteric fractures and certain hip fractures. This avoids the piriformis fossa and its associated potential for damaging the blood supply to the femoral head and neck.
- Gluteus Medius and Minimus: These abductor muscles insert onto the greater trochanter. The choice of entry point and the surgical approach must consider minimizing iatrogenic damage to these muscles, which can lead to abductor weakness and limp.

Entry Point Considerations
The entry point for the insertion of an intramedullary nail into the femur is determined radiographically. It depends on the design of the nail and the anatomy of the proximal femur in the individual patient. The majority of intramedullary nails are straight when viewed in the anterior–posterior plane. The nail should be inserted so that its entry point into the bone is exactly in line with the intramedullary canal on both anterior–posterior and lateral radiographs. The use of preoperative templates overlying radiographs allows for a precise calculation of the entry point.
Some nails, especially those used for fixation of extracapsular hip fractures, are angled at their upper end and require insertion via the tip of the greater trochanter. These nails require a skin incision directly over the tip of the greater trochanter.
Lateral entry points (e.g., tip of greater trochanter) often require a lateralized entry portal to achieve proper alignment with the femoral canal, especially in patients with a wide greater trochanter or significant femoral bowing. Medialization of the entry portal can lead to varus malalignment or medial cortex comminution. Conversely, an excessively lateral entry point, particularly with a straight nail, can lead to valgus malalignment or proximal femoral fracture.
Biomechanical Principles of Intramedullary Nailing
Intramedullary nailing functions as a load-sharing device, providing inherent stability by being centrally located within the bone. This differs from plate osteosynthesis, which is load-bearing. Key biomechanical advantages include:
- Load Sharing: The nail shares axial loads with the bone, promoting physiological stress distribution and minimizing stress shielding.
- Axial Stability: The nail resists axial compression, providing strong support against shortening.
- Rotational Stability: Achieved through interlocking screws, which prevent rotation of the fracture fragments relative to the nail.
- Angular Stability: The fit of the nail within the medullary canal and the presence of interlocking screws resist angular deformities.
- Biological Fixation: Closed nailing techniques preserve the periosteal blood supply and fracture hematoma, crucial for bone healing. Reaming, while slightly disruptive, can introduce growth factors and osteoprogenitor cells to the fracture site.
Correct entry point selection is paramount to maintaining the natural curvature and alignment of the femur, preventing malalignment, and distributing stress effectively. A misplaced entry point can result in angular deformity, prominent hardware, or iatrogenic fracture, compromising the biomechanical construct.
Indications and Contraindications
The application of intramedullary nailing for femoral fractures is widespread, but careful consideration of indications and contraindications is essential for optimal patient selection and surgical planning.
Indications for Intramedullary Nailing
Intramedullary nailing is the gold standard for most femoral shaft fractures due to its superior biomechanical properties and high union rates.
-
Acute Femoral Shaft Fractures: This includes diaphyseal fractures (AO/OTA 32-A/B/C) of varying comminution.
- Transverse and Short Oblique Fractures: Excellent stability with IM nailing.
- Spiral Fractures: Good stability, especially with interlocking.
- Comminuted Fractures: Relative stability maintained through load sharing, allowing for indirect reduction.
- Segmental Fractures: IM nailing can stabilize multiple segments simultaneously.
- Open Femoral Fractures (Gustilo-Anderson Type I, II, IIIA): After debridement and antibiotic coverage, IM nailing can be performed. Some Type IIIB may also be amenable, though careful consideration of infection risk is critical.
- Fractures in Polytrauma Patients: IM nailing provides rapid stabilization, decreasing the risk of fat embolism syndrome, improving respiratory function, and facilitating early mobilization, aligning with damage control orthopedics principles.
-
Pathologic Femoral Shaft Fractures: Fractures occurring through areas of compromised bone, often due to metastatic disease or primary bone tumors. IM nailing provides immediate pain relief and restores stability, allowing for early weight-bearing and potential adjunctive therapy (e.g., radiation).
- Prophylactic Nailing: For impending pathologic fractures, identified by significant cortical involvement (>50%) or pain refractory to non-operative management.
-
Delayed Union and Nonunion of Femoral Shaft Fractures: IM nailing, often with exchange nailing, reaming, and/or bone grafting, is a primary treatment strategy for established nonunions, particularly aseptic ones. It provides stability, stimulates a biological response, and allows for revision.
-
Femoral Malunion: In some cases, corrective osteotomy with IM nailing may be indicated for symptomatic malunion.
-
Periprosthetic Fractures: Certain types of periprosthetic femoral fractures around hip or knee prostheses can be treated with IM nailing, provided there is adequate bone stock for fixation and the prosthesis does not impede nail insertion.
Contraindications for Intramedullary Nailing
While IM nailing is versatile, certain conditions preclude its use or necessitate alternative approaches.
-
Absolute Contraindications:
- Active Infection at the Fracture Site or Proximal Entry Point: High risk of propagating infection.
- Severely Contaminated Open Fractures (Gustilo-Anderson Type IIIB/C with extensive soft tissue loss): Initial management often involves external fixation, followed by definitive soft tissue coverage, and then potentially delayed IM nailing.
- Insufficient Medullary Canal Diameter: If the medullary canal is too narrow to accommodate even the smallest available nail, IM nailing is not feasible.
- Concomitant Proximal or Distal Articular Fractures: If the fracture extends into the hip or knee joint and requires anatomical reduction and rigid internal fixation that would be compromised by IM nailing, alternative fixation (e.g., plating) may be preferred.
- Lack of Fluoroscopic Imaging: IM nailing is a fluoroscopy-dependent procedure.
- Severe Comorbidities Precluding Anesthesia: If the patient cannot tolerate general or regional anesthesia.
-
Relative Contraindications:
- Proximal or Distal Metaphyseal Fractures: While not absolute, these can be challenging due to wider canal and less cortical bone, potentially leading to instability or malreduction.
- Extreme Proximal or Distal Fractures: Fractures too close to the trochanteric region or femoral condyles may not allow for adequate proximal or distal locking screw placement.
- Pregnancy: While IM nailing can be performed, efforts to minimize radiation exposure are crucial.
- Pre-existing Hardware: Existing plates, screws, or hip/knee arthroplasty components may obstruct nail insertion or locking, requiring careful preoperative planning or hardware removal.
- Obesity: Can make patient positioning, fluoroscopy, and surgical exposure more challenging.
The decision to proceed with IM nailing must always be individualized, weighing the risks and benefits for each patient.
| Operative Indications (Minimally Invasive IM Nailing) | Non-Operative Indications / Alternative Operative Strategies |
|---|---|
| Acute femoral shaft fractures (diaphyseal, comminuted) | Stable, non-displaced stress fractures (rarely femur) |
| Pathologic femoral shaft fractures (metastatic, tumor) | Active infection prohibiting internal fixation |
| Impending pathologic fractures | Severely contaminated open fractures (Gustilo IIIB/C) |
| Delayed union and nonunion of femoral shaft fractures | Extremely narrow medullary canal |
| Segmental femoral fractures | Proximal/distal articular fractures requiring direct fixation |
| Certain periprosthetic femoral fractures | Severe patient comorbidities precluding surgery |
| Polytrauma patients with femoral shaft fractures |
Pre Operative Planning and Patient Positioning
Meticulous preoperative planning and appropriate patient positioning are critical determinants of successful minimally invasive femoral intramedullary nailing. These steps aim to anticipate and mitigate potential challenges, ensuring a smooth and efficient surgical procedure.
Preoperative Planning
-
Radiographic Assessment:
- Standard Views: AP and lateral radiographs of the entire femur, including the hip and knee joints, are essential to assess fracture morphology, comminution, and rule out ipsilateral hip or knee injuries.
- CT Scan: May be beneficial for complex comminuted fractures, articular involvement, or to assess bone quality, canal morphology, and potential obstructions (e.g., hardware).
- Contralateral Femur Films: In cases of severe comminution or uncertain length, an AP film of the contralateral femur can aid in length determination.
-
Templating:
- Nail Length: Measure the length from the intended entry point (e.g., piriformis fossa or greater trochanter tip) to the distal femoral physis (or knee joint line).
- Nail Diameter: Use templates overlaying calibrated radiographs (AP and lateral) to assess the narrowest point of the medullary canal. Choose a nail that is appropriately sized for the canal, typically 1-2 mm smaller than the largest reamer used if reaming is performed.
- Nail Curvature: Most nails have an anterior bow. Select a nail that matches the patient's natural femoral bow to prevent anterior cortical impingement or iatrogenic fracture.
- Entry Point Confirmation: Preoperative templating allows for a precise calculation of the entry point, aligning it with the medullary canal on both anterior-posterior and lateral radiographs.

-
Implant Selection:
- Nail Design: Consider the various nail designs (e.g., straight, slightly bowed, trochanteric entry, piriformis entry). For extracapsular hip fractures or subtrochanteric fractures, angled nails inserted via the tip of the greater trochanter are often preferred. For diaphyseal fractures, straight nails with an entry point aligned with the canal are common.
- Reamed vs Unreamed: Decide based on fracture type, open vs. closed, and surgeon preference. Reamed nails offer a broader selection of diameters and better cortical contact, potentially leading to faster union. Unreamed nails may preserve endosteal blood supply, beneficial in open fractures.
-
Patient Preparation:
- Medical Optimization: Address any comorbidities (e.g., cardiac, pulmonary) to minimize perioperative risks.
- Prophylactic Antibiotics: Administer intravenous antibiotics within one hour prior to incision.
- DVT Prophylaxis: Initiate as per institutional guidelines.
Patient Positioning
Optimal patient positioning is crucial for achieving fracture reduction, maintaining alignment, facilitating fluoroscopic imaging, and ensuring surgical access.
- Supine Position on a Fracture Table:
- Indications: Most commonly used for diaphyseal femoral fractures.
- Technique: The patient is placed supine with the injured leg secured in a boot traction device. The contralateral leg is typically flexed at the hip and knee and abducted to allow for unimpeded fluoroscopic visualization of the proximal femur in the AP and lateral planes.
- Advantages: Allows for controlled traction to aid reduction, relatively stable position, good access for IM nailing.
- Disadvantages: Can make access to the hip region difficult in some obese patients. Risk of perineal nerve compression with inappropriate padding.
Figure: Patient positioning on a fracture table, showing the contralateral leg abducted for C-arm access.

- Supine Position on a Radiographic Table (Free-Leg Draping):
- Indications: Preferred for highly unstable fractures, severe comminution, or when specific reduction maneuvers (e.g., "joysticking" pins, external manipulators) are anticipated.
- Technique: The patient is supine. The injured leg is typically draped free to allow full manipulation by the surgical assistant. A bolster or beanbag under the ipsilateral buttock can help internally rotate the hip and provide a stable base.
- Advantages: Maximized mobility of the limb for reduction, improved access to the proximal femur for entry point.
- Disadvantages: Requires a skilled assistant to maintain reduction and traction, can be physically demanding, increased radiation exposure to assistant.
Figure: Supine position with free-leg draping, allowing for dynamic manipulation of the limb for fracture reduction.

- Lateral Decubitus Position:
- Indications: Less common but may be used for morbidly obese patients where a supine approach makes fluoroscopy or access challenging.
- Technique: Patient positioned on their uninjured side, supported by a beanbag. The injured leg is draped free.
- Advantages: Improved access to the lateral aspect of the hip, potentially better fluoroscopic views in obese patients.
- Disadvantages: More challenging to achieve and maintain fracture reduction, difficult to obtain true lateral views of the hip and distal femur.
Fluoroscopic Setup
- The C-arm must be positioned to allow unobstructed AP and lateral views of the entire femur, particularly the proximal entry point and the fracture site.
- The C-arm should be able to "swing" from proximal to distal without repositioning the patient or the table.
- Prior to draping, ensure adequate imaging of the hip joint in both planes and distal femur, confirming that the C-arm can move freely.
Detailed Surgical Approach and Technique
The minimally invasive approach for intramedullary nailing requires precision, relying heavily on fluoroscopic guidance and meticulous soft tissue handling. The goal is to achieve stable fracture fixation with minimal iatrogenic injury.
Skin Incision and Initial Dissection
- Skin Incision:
- Entry Point Localization: The entry point is critical. It is identified radiographically using the C-arm to ensure it aligns with the intramedullary canal on both AP and lateral views. For straight nails, the ideal entry point is centrally located within the piriformis fossa or slightly medial to the tip of the greater trochanter, in line with the femoral axis. For angled nails (e.g., trochanteric nails), the entry point is typically the true tip of the greater trochanter.
- Incision Placement: A small longitudinal skin incision, typically 3-5 cm, is made directly over the intended bony entry point. The incision should be centered over the guide wire path.
Figure: Skin incision directly over the projected entry point for a trochanteric nail.

- Soft Tissue Dissection:
- Fascia Lata: The fascia lata is incised in line with the skin incision.
- Muscle Splitting: The underlying gluteus medius and potentially gluteus minimus muscles are split longitudinally, typically along their fibers, to expose the bony cortex of the greater trochanter or piriformis fossa. This muscle-splitting approach is preferred to minimize muscle damage, which is crucial for preserving abductor function. Retractors are used to gently spread the muscle fibers.
- Avoiding Hip Capsule Injury: Care must be taken to avoid violating the hip joint capsule, especially with piriformis entry points, as this increases the risk of iatrogenic avascular necrosis of the femoral head.
Figure: Soft tissue dissection revealing the greater trochanter, with care taken to split muscle fibers.

Guide Wire Insertion and Entry Point Creation
- Guide Wire Insertion:
- Initial Placement: A guide wire (typically a sharp-tipped K-wire) is inserted percutaneously through the small incision. Fluoroscopy (AP and lateral views) is essential to confirm the precise entry point on the proximal femur. The wire should be aimed down the central axis of the medullary canal.
- Piriformis Entry: The wire is placed directly into the piriformis fossa, aiming slightly anterior to avoid posterior cortex impingement.
- Trochanteric Entry: The wire is placed at the tip of the greater trochanter, ensuring it aligns with the shaft in both planes. This often requires a slightly lateralized start to prevent varus malalignment.
Figure: Guide wire placement, confirming central alignment in the medullary canal under fluoroscopy.

- Opening the Entry Portal:
- A cannulated awl or entry reamer is advanced over the guide wire to create the initial opening in the cortical bone. This step is performed with caution to prevent comminution of the greater trochanter. The trajectory of the awl must precisely follow the guide wire.
- Mal-positioning the entry portal can lead to angular deformities, difficulty passing the nail, or iatrogenic fracture of the greater trochanter.
Figure: Use of a cannulated awl over the guide wire to create the entry portal.

Reaming (If Indicated)
- Medullary Reaming:
- A ball-tipped guide wire is exchanged for the initial entry guide wire. The ball-tipped guide wire is then advanced past the fracture site into the distal medullary canal, ideally positioned centrally.
- Sequential reaming is performed, starting with a small reamer and incrementally increasing diameter by 0.5 mm or 1.0 mm until the desired canal size is achieved. Reaming should be slow and controlled, allowing heat dissipation and minimizing the risk of thermal necrosis or fat embolism.
- The final reamer size should be 1.0-2.0 mm larger than the chosen nail diameter to allow for smooth nail passage and accommodate for canal irregularities.
- Unreamed Nailing: In certain situations (e.g., severe open fractures, polytrauma with chest injury), unreamed nails may be used to reduce the risk of fat embolism, though union rates may be slightly lower.
Fracture Reduction
Achieving and maintaining anatomical or near-anatomical reduction is paramount before nail insertion. Minimally invasive techniques often rely on indirect reduction.
- Traction: Applied via the fracture table, or manually by an assistant in free-leg draping, to restore length and align the femoral axis.
- Rotation: Carefully assessed using fluoroscopy, ensuring proper rotation by comparing the lesser trochanter's visibility or by evaluating cortical step-off at the fracture site.
- Manipulation:
- Manual Manipulation: Direct manipulation of the distal fragment.
- Percutaneous Clamps/Tools: Used to guide fragments.
- "Joy-sticking" Pins: K-wires inserted percutaneously into proximal and distal fragments can be used to manipulate and align them.
- External Fixator: A temporary external fixator can provide provisional stability and aid reduction in highly unstable or comminuted fractures.
- Blocking Screws (Poller Screws): Placed eccentrically in the medullary canal to prevent nail migration into malalignment (e.g., varus or valgus).
Figure: Fluoroscopic view demonstrating fracture reduction, with alignment achieved through traction and manipulation.

Nail Insertion
- Nail Selection: Once the canal is prepared and reduction achieved, the appropriate length and diameter nail is selected.
- Insertion: The intramedullary nail is gently advanced over the guide wire.
- Impactor/Hammer: Used with controlled, firm blows to advance the nail. Avoid excessive force to prevent iatrogenic fracture.
- Reaming and Nail Insertion Techniques: For fractures with significant comminution, particularly in the isthmus, a careful balance between reaming to allow nail passage and preserving bone biology is required.
- Maintaining Reduction: Constant monitoring of reduction under fluoroscopy during nail insertion is crucial. The nail acts as an internal splint, helping to maintain reduction as it crosses the fracture site.
Figure: Nail insertion, advanced across the fracture site under fluoroscopic guidance.

Proximal and Distal Locking
Locking screws are essential for providing rotational and angular stability, preventing shortening or distraction.
- Proximal Locking:
- Performed first to establish rotational control from the insertion point.
- Utilizes a dedicated targeting jig attached to the nail insertion handle.
- Confirm screw placement with AP and lateral fluoroscopy. Ensure screws are bicortical and engage the nail.
Figure: Proximal locking with a targeting jig, ensuring accurate screw placement into the nail.

- Distal Locking:
- Often the most technically challenging step, requiring precise fluoroscopic technique due to the lack of an external jig.
- Freehand Technique: Achieved by angling the C-arm to perfectly align the distal screw holes with the x-ray beam. This creates perfect "circles" of the holes on the fluoroscopic screen.
- Targeting Devices: Some nail systems offer specific distal targeting jigs.
- Drilling and Screw Insertion: Once aligned, a drill bit is advanced percutaneously to create the screw hole. Ensure bicortical purchase.
- Multiple Views: Confirm screw position with AP and lateral views, ensuring it passes through the nail and both cortices.
Figure: Distal locking using the freehand technique, showing the C-arm aligned to visualize the screw holes.

Final Assessment and Closure
- Fluoroscopic Assessment: Perform a final comprehensive fluoroscopic survey (AP and lateral views) of the entire femur, including hip and knee, to confirm:
- Nail position, length, and depth.
- Accurate fracture reduction (length, alignment, rotation).
- Correct placement of all proximal and distal locking screws (bicortical, through the nail).
- No iatrogenic fractures.
Figure: Post-operative AP fluoroscopic image showing final nail and screw placement.

Figure: Post-operative lateral fluoroscopic image confirming alignment and screw position.

- Wound Closure:
- Irrigate wounds thoroughly.
- Close soft tissues in layers.
- Skin closure with sutures or staples.
- Apply sterile dressing.
Complications and Management
Despite being a highly successful procedure, intramedullary nailing of the femur is not without potential complications. Recognizing and effectively managing these adverse events is crucial for optimizing patient outcomes.
Common Complications and Salvage Strategies
| Complication | Incidence (Approximate) | Etiology | Salvage Strategy / Management |
|---|---|---|---|
| Nonunion | 2-10% | Inadequate stability, poor biology (open fractures, excessive reaming), infection, malreduction, systemic factors (smoking, NSAIDs). | Aseptic: Exchange nailing (larger diameter nail, reaming), bone grafting (autograft/allograft), plate augmentation, low-intensity pulsed ultrasound (LIPUS), electrical stimulation. Septic: Debridement, antibiotics, external fixation, removal of hardware, delayed revision. |
| Malunion (Rotational/Angular) | 5-30% | Inaccurate reduction intraoperatively, difficulty assessing rotation (especially with comminution), inappropriate entry point. | Acute: Revision nailing, correction with manipulation or blocking screws. Chronic/Symptomatic: Corrective osteotomy and refixation (plate or nail). Asymptomatic malunions may be observed. |
| Infection | 1-5% (higher in open fractures) | Contamination during surgery, compromised soft tissues, prolonged open wound. | Acute: Aggressive surgical debridement, copious irrigation, pathogen-directed antibiotics, retention of hardware if stable. Chronic: Hardware removal, debridement, antibiotic cement spacer, staged reconstruction. |
| Hardware Failure (Screw/Nail Breakage) | 1-5% | Nonunion, excessive stress on hardware due inappropriate loading, material fatigue, poor construct. | Address underlying nonunion first. Exchange nailing, plate augmentation, bone grafting. Removal of broken hardware can be challenging. |
| Iatrogenic Fracture (Proximal/Distal) | 1-3% | Malpositioned entry point, excessive reaming, forceful nail insertion, stress riser from distal locking hole. | Acute: Address intraoperatively; may require repositioning of nail, additional fixation (e.g., plate, cerclage wires). Post-op: Depends on stability; may require revision nailing, plating, or conversion to arthroplasty if periarticular. |
| Abductor Weakness/Limp | 5-15% | Damage to gluteus medius/minimus during entry portal creation (muscle incision vs. splitting), prominent hardware. | Physiotherapy, gait training. In severe cases, surgical exploration to remove prominent hardware, or abductor repair/transfer (rare). |
| Nerve Injury (Sciatic/Peroneal) | <1% | Direct trauma during surgery, traction injury (especially with fracture table), prolonged tourniquet time, malreduction. | Observation for neuropraxia. Surgical exploration for direct injury or entrapment. Supportive care, physiotherapy. |
| Avascular Necrosis (AVN) of Femoral Head | <1% (piriformis entry) | Disruption of femoral head blood supply (e.g., medial femoral circumflex artery) with piriformis entry, particularly with medial or deep insertion. | Conservative management if mild. Core decompression, osteotomy, or total hip arthroplasty for progressive collapse. Prevention is key (careful entry point, avoidance of capsular violation). |
| Fat Embolism Syndrome (FES) | <1% (clinical); 10-20% (subclinical) | Intramedullary reaming, increased intramedullary pressure during nailing. | Prevention: careful patient selection, adequate resuscitation, gentle reaming, use of unreamed nails in high-risk patients. Management: supportive care, respiratory support, corticosteroids (controversial). |
| Thromboembolic Events (DVT/PE) | 1-5% | Trauma itself, immobility, hypercoagulable state, surgery. | Prophylaxis (mechanical/pharmacological). Treatment with anticoagulation. |
| Heterotopic Ossification (HO) | 5-20% (often asymptomatic) | Tissue trauma, especially in patients with head injury, burns, or spinal cord injury. | Prophylaxis: NSAIDs (e.g., Indomethacin) or radiation therapy in high-risk patients. Symptomatic HO: Surgical excision after maturation, combined with prophylaxis. |
| Pain at Proximal Entry Site | 10-20% | Prominent hardware (nail end, proximal locking screws), persistent soft tissue irritation, nerve impingement. | Hardware removal after fracture union, especially if symptomatic. Careful assessment to rule out other causes of pain. |
General Management Principles
- Prevention: Meticulous surgical technique, precise preoperative planning, appropriate entry point selection, and diligent intraoperative fluoroscopic guidance are the cornerstones of preventing complications.
- Early Recognition: Vigilant postoperative monitoring, clinical examination, and timely radiographic evaluation are crucial for early detection of complications.
- Timely Intervention: Prompt and appropriate intervention, guided by evidence-based practices, can often mitigate the severity and long-term consequences of complications.
- Patient Education: Informing patients about potential complications and setting realistic expectations regarding recovery and potential secondary procedures is vital.
Post Operative Rehabilitation Protocols
Postoperative rehabilitation is an integral component of the overall management of femoral shaft fractures treated with intramedullary nailing. The goal is to restore strength, range of motion, and function while protecting the fracture fixation. Protocols are typically progressive and individualized, adapting to the patient's fracture stability, bone healing progression, and overall health status.
Immediate Postoperative Period (Days 0-7)
- Pain Management: Multimodal analgesia (opioids, NSAIDs, acetaminophen, nerve blocks) to control pain and facilitate early mobilization.
- Weight Bearing:
- Stable Fractures (Transverse, short oblique, minimal comminution, good interdigitation, stable locking): Often immediately full weight-bearing as tolerated (FWBAT) or protected weight-bearing (PWB) with crutches or a walker. Load sharing of the IM nail allows for early weight bearing.
- Less Stable Fractures (Comminuted, segmental, open, pathologic): Typically protected weight-bearing (e.g., touch-down weight-bearing, 25-50% body weight) for 6-12 weeks, progressing as radiographic healing permits.
- Range of Motion (ROM):
- Hip and Knee: Gentle active and passive range of motion exercises for the hip and knee within pain limits. Emphasis on knee flexion to prevent arthrofibrosis. Continuous passive motion (CPM) may be considered for the knee in selected cases.
- Muscle Strengthening:
- Isometric Exercises: Quadriceps and gluteal sets to maintain muscle tone.
- Ankle Pumps: To prevent deep vein thrombosis.
- Mobilization: Out of bed to a chair, ambulation with assistive devices, focusing on transfer training.
- Wound Care: Daily dressing changes as per protocol, monitor for signs of infection.
Early Rehabilitation Phase (Weeks 1-6)
- Progression of Weight Bearing: Gradually increase weight bearing as pain subsides and radiographic signs of early callus formation appear, transitioning from PWB to FWB as tolerated.
- Strength Training:
- Isotonic Exercises: Straight leg raises (supine, side-lying), hip abduction/adduction, knee flexion/extension (e.g., heel slides).
- Gluteal Strengthening: Bridges, clam shells.
- ROM: Continue to work on achieving full hip and knee range of motion.
- Balance and Proprioception: Introduce balance exercises as weight-bearing status allows.
- Gait Training: Focus on normalized gait pattern with appropriate assistive devices, gradually decreasing reliance on crutches/walker.
Intermediate Rehabilitation Phase (Weeks 6-12)
- Full Weight Bearing: Most stable fractures should be FWB by this stage, with less stable fractures progressing towards FWB.
- Advanced Strengthening:
- Progressive Resistance Exercises: Leg presses, squats (mini-squats initially), lunges.
- Core Strengthening: Important for overall stability and balance.
- Functional Activities: Incorporate activities of daily living (ADLs), climbing stairs, stepping.
- Cardiovascular Conditioning: Stationary cycling, swimming (once wounds healed).
Advanced Rehabilitation Phase (Months 3-6+)
- Return to Activity: Gradual return to recreational activities, sports-specific training, and work duties.
- High-Level Strengthening and Conditioning: Advanced plyometrics, agility drills, sport-specific exercises, if appropriate.
- Endurance Training: Continue cardiovascular conditioning.
- Addressing Deficits: Continue to address any residual strength, endurance, or balance deficits.
Important Considerations
- Radiographic Healing: Progressive weight-bearing and activity progression must always be correlated with radiographic evidence of fracture healing (callus formation, bridging bone). Clinical assessment of pain and stability also plays a crucial role.
- Hardware Removal: While not routinely indicated, hardware removal may be considered in symptomatic patients (e.g., prominent nail, chronic pain at entry site) after complete fracture union, typically 1-2 years post-surgery.
- Patient Compliance: Emphasize the importance of adherence to rehabilitation protocols.
- Multidisciplinary Approach: Collaboration between the orthopedic surgeon, physical therapist, and occupational therapist is essential for a holistic and effective rehabilitation plan.
Summary of Key Literature and Guidelines
The minimally invasive approach to femoral intramedullary nailing has become the standard of care for most femoral shaft fractures, supported by a robust body of literature and widely accepted clinical guidelines.
Evolution and Evidence
Historically, open reduction with plating was common, but its significant soft tissue stripping and higher rates of nonunion and infection led to the adoption of intramedullary nailing. The shift towards reamed, closed IM nailing demonstrated superior outcomes. The concept of "minimally invasive" in this context refers to limiting the surgical incision and preserving soft tissues and fracture hematoma, primarily achieved through percutaneous insertion and indirect reduction techniques.
Numerous studies have consistently demonstrated the efficacy of IM nailing for femoral shaft fractures:
- Union Rates: High union rates, typically ranging from 95-98% for acute fractures, are consistently reported in systematic reviews and large retrospective series.
- Time to Union: Average time to union is typically 4-6 months, though this can vary based on fracture type, patient factors, and adjunctive treatments.
- Functional Outcomes: Patients generally achieve good to excellent functional outcomes, with most returning to pre-injury activity levels, albeit with potential residual limitations in high-impact activities for some.
- Minimally Invasive Benefits: Studies comparing minimally invasive IM nailing to more extensive open approaches consistently show reduced blood loss, shorter hospital stays, less postoperative pain, and potentially faster rehabilitation.
Key Guidelines and Principles
- AO Principles of Fracture Management: The AO Foundation heavily advocates for biological fixation principles, including indirect reduction and minimal soft tissue dissection, which are central to the minimally invasive approach. They emphasize stable internal fixation to permit early, pain-free mobilization.
- Entry Point Selection: Debate continues regarding the optimal entry point (piriformis vs. trochanteric).
- Piriformis Entry: Historically common, but concerns exist regarding potential damage to the blood supply of the femoral head (medial femoral circumflex artery ascending branch) and iatrogenic AVN, especially with medialized entry.
- Greater Trochanteric Entry (GTE): Gained favor, particularly for trochanteric and subtrochanteric fractures, due to a lower risk of AVN and easier access in some cases. Modern nail designs are often optimized for GTE. While GTE may be associated with a slightly higher risk of abductor dysfunction in some studies, this is often mitigated by careful muscle-splitting techniques.
- The choice is often guided by nail design and fracture pattern, with a strong recommendation for an entry point that is coaxial with the medullary canal to minimize stress on the proximal femur and prevent malalignment.
- Reaming vs. Unreamed Nailing: While unreamed nails may theoretically preserve endosteal blood flow, especially in open fractures, meta-analyses generally indicate that reamed nailing leads to higher union rates and faster healing, particularly for closed diaphyseal fractures, without a significant increase in infection risk in most settings. The theoretical risk of fat embolism syndrome with reaming is real but often subclinical and manageable with modern anesthetic and surgical techniques.
- Polytrauma Management: IM nailing is a cornerstone of "damage control orthopedics" in polytrauma patients, providing early fracture stabilization to reduce systemic inflammatory response, minimize secondary insults, and facilitate aggressive resuscitation and early mobilization.
Emerging Concepts and Future Directions
- Navigation and Robotics: Advanced imaging and robotic assistance are being explored to further refine guide wire and screw placement, potentially improving accuracy and reducing fluoroscopy time, though their widespread application in IM nailing is still evolving.
- Patient-Specific Instrumentation: Custom-designed guides or nails based on preoperative CT scans could further optimize entry point and nail fit, particularly in challenging anatomies.
- Biologic Augmentation: Ongoing research into biologic adjuncts (e.g., bone morphogenetic proteins, platelet-rich plasma, stem cells) to accelerate healing, especially in delayed unions or nonunions.
- Improved Implant Design: Continuous evolution of nail designs, materials, and locking mechanisms to enhance stability, reduce complication rates, and improve ease of insertion.
In conclusion, the minimally invasive approach to femoral intramedullary nailing remains a highly effective and refined surgical technique. Mastery of surgical anatomy, meticulous preoperative planning, precise intraoperative execution, and vigilant postoperative management are essential for achieving consistent success in treating femoral shaft fractures. The academic orthopedic surgeon must remain abreast of evolving literature and technological advancements to continually optimize patient care.
Figure: Final postoperative AP and Lateral radiographs of a femur intramedullary nail, demonstrating successful reduction and fixation.

Clinical & Radiographic Imaging


You Might Also Like