Cross Finger & Radial Forearm Flaps: Surgical Technique
Key Takeaway
Cross finger and radial forearm flaps are essential techniques for reconstructing complex soft tissue defects in the hand. This guide details the precise surgical steps, from flap design and elevation to donor site management and postoperative protocols. Mastery of these procedures ensures optimal functional and aesthetic outcomes while minimizing donor site morbidity and preserving critical neurovascular structures.
INTRODUCTION TO HAND SOFT TISSUE RECONSTRUCTION
The reconstruction of soft tissue defects in the hand requires a meticulous approach to restore both form and function. When primary closure or skin grafting is contraindicated—typically due to exposed bone, tendon without paratenon, or neurovascular structures—pedicled or free flap coverage becomes mandatory. This comprehensive guide details two workhorse techniques in operative orthopaedics and hand surgery: the Cross Finger Flap for localized digital defects, and the Radial Forearm Flap for larger, complex defects of the hand and wrist.
Both techniques demand a profound understanding of vascular anatomy, precise tissue handling, and rigorous postoperative rehabilitation protocols to optimize outcomes and minimize donor site morbidity.
APPLYING CROSS FINGER FLAPS
The cross finger flap is a highly reliable, random-pattern (or sometimes axially based on dorsal branches of the proper digital artery) pedicled flap. It is primarily indicated for volar soft tissue defects of the digits, particularly over the middle and proximal phalanges, where exposed flexor tendons or bone preclude the use of full-thickness skin grafts.
Indications and Contraindications
Indications:
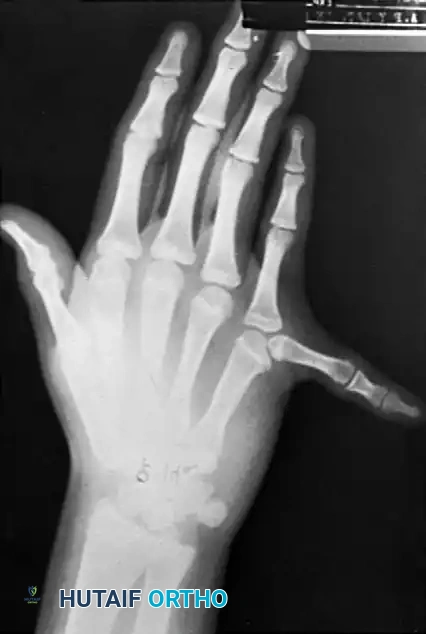
* Volar digital defects with exposed bone, joint, or flexor tendon.
* Defects where local advancement flaps (e.g., V-Y advancement) are insufficient.
* Reconstruction of the volar pad to restore durable, sensate skin (though sensation is recovered via peripheral ingrowth).
Contraindications:
* Crush injuries involving the proposed donor finger.
* Pre-existing stiffness or osteoarthritis in the donor or recipient digits, as the required immobilization may exacerbate joint contractures.
* Peripheral vascular disease or severe vasospastic disorders.
🔪 Surgical Pearl: Always assess the donor digit carefully. The donor site must have uncompromised dorsal skin, and the patient must be compliant with the postoperative immobilization and subsequent division protocols.
Preoperative Planning and Flap Design
Proper design is critical to prevent tension on the pedicle and ensure adequate coverage.
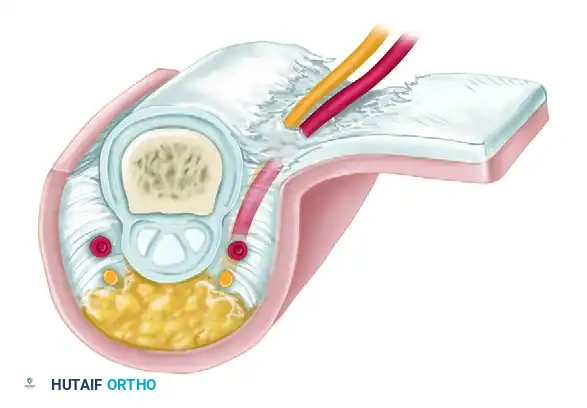
- Defect Preparation: Excise the edges of the defect so that it is rectangular. The longer sides of the rectangle should run parallel to the long axis of the finger. Crucially, avoid crossing the volar skin creases to prevent subsequent flexion contractures.
- Measurement: Measure the dimensions of the prepared defect. Place the injured recipient finger against the proposed donor finger to determine the exact location for the base of the flap.
- Flap Dimensions: Design the flap to be 4 to 6 mm wider than the defect. It must be long enough to cover the defect entirely—accounting for normal primary skin contraction—and to provide a tension-free bridge between the two fingers.
Surgical Technique: Step-by-Step
Step 1: Flap Elevation
Cut the flap from the donor finger through the skin and subcutaneous tissues. The base of the flap must remain attached to the midlateral line adjacent to the recipient finger.
If necessary for adequate width, the flap may be raised from one midlateral line of the donor finger to the contralateral midlateral line. However, strictly avoid incising the volar surface of the donor finger.
When raising the flap, the dissection must remain in the subcutaneous plane. It is imperative to leave the peritenon of the extensor expansion intact to accept the subsequent skin graft.

🚨 Surgical Warning: Violation of the extensor peritenon will result in failure of the split-thickness skin graft at the donor site, leading to extensor tendon desiccation, necrosis, and severe functional impairment.
Step 2: Mobilizing the Base
To achieve adequate rotation and reach, the base of the flap often needs further mobilization. This is accomplished by carefully cutting the oblique fascial fibers (Cleland's ligaments) that attach the skin to the extensor tendon and periosteum along the side of the finger.
During this release, meticulous care must be taken to avoid damaging the volar digital artery and nerve.
Step 3: Hemostasis and Grafting
* Release the tourniquet to obtain absolute hemostasis. Hematoma formation under the flap or graft is a primary cause of failure.
* Reinflate the tourniquet once hemostasis is secured.
* Harvest a thick split-thickness skin graft (0.018 inch) from a distant donor site (e.g., proximal forearm or anterior thigh).
* Suture the graft to the donor area on the dorsum of the finger and to the undersurface of the bridging pedicle. This prevents scarring and contracture of the pedicle bridge.
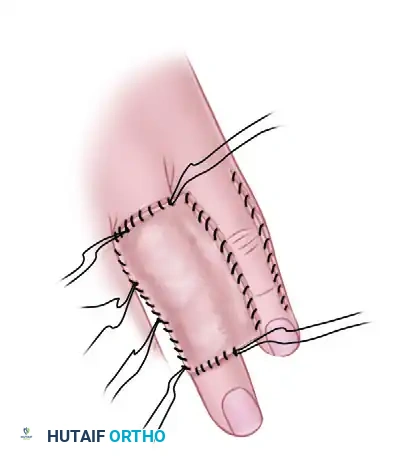
Step 4: Flap Inset and Dressing
Apply the flap to the recipient area. Ensure the entire recipient bed is in direct contact with the flap. Suture it in place using fine non-absorbable sutures (5-0 or 6-0 nylon).
Pitfall: Avoid excessive tension on sutures that run transverse to the long axis of the finger, as this can easily compromise the delicate vascularity of the flap.
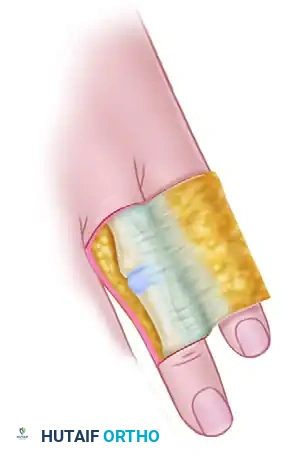
Leave the sutures long at the edges of the free split-thickness skin graft to fashion a tie-over stent dressing. This ensures uniform pressure and graft take.

Cover the suture lines with nonadhering gauze, place moist cotton pledgets around the graft, and apply a secure gauze wrapping.
Step 5: Immobilization
To ensure absolute immobility of the recipient and donor fingers, place an oblique Kirschner wire (K-wire) through the interphalangeal joint of the recipient finger, or pin the two fingers together. A volar splint of plaster or fiberglass should be applied for additional support.
Variations of the Cross Finger Flap
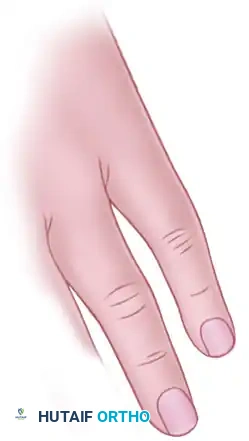
While the standard laterally based flap is most common, the technique can be altered so that the base of the flap is proximal rather than lateral. A proximally based flap is particularly useful for covering defects near the tip of an adjacent finger or thumb.
Rotation of the proximally based flap is necessary, and extreme care must be taken to prevent strangulation at the base, which leads to venous congestion and subsequent necrosis. Rotated flaps that are based proximally can also be utilized to cover defects on the same finger (homodigital flaps).
Postoperative Care and Flap Division
- Immobilization Phase: The fingers remain immobilized for 12 to 14 days.
- Flap Detachment: At 12 to 14 days, the pedicle is divided under local anesthesia.
- Inset: The skin margins of the recipient finger must be meticulously trimmed so that the junction of the normal skin with the graft lies exactly at the midlateral position on the finger. This prevents volar scarring and contracture.
- Rehabilitation: Active and passive motion of both the donor and recipient fingers should be initiated the day after the flap is detached to prevent joint stiffness and tendon adhesions.
FOREARM FLAPS FOR HAND COVERAGE
When defects are too large for local digital flaps, regional flaps from the forearm provide robust, vascularized tissue. Two primary arterialized pedicle flaps from the forearm—the Radial Forearm Flap and the Posterior Interosseous Flap—have proven highly reliable for covering extensive defects in the hand.
Each flap relies on a consistent arterial supply. However, variations in forearm vascular anatomy, particularly concerning the posterior interosseous artery, may occasionally preclude their use.
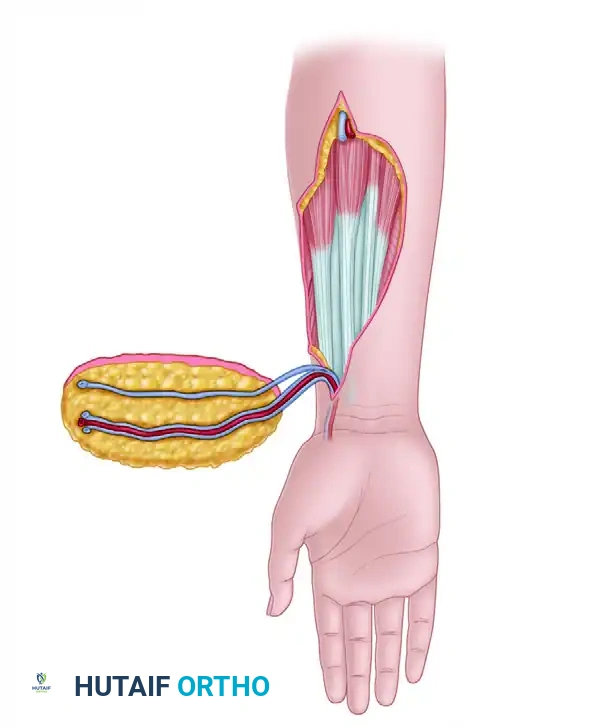
The Radial Forearm Flap (Chinese Flap)
The radial forearm flap is a versatile fasciocutaneous (or osteocutaneous) flap based on the radial artery and its venae comitantes. It can be raised as a proximally based pedicled flap for elbow defects, a distally based (reverse-flow) pedicled flap for hand defects, or as a free tissue transfer.
Vascular Anatomy
The radial artery supplies blood to the distal, palmar, and lateral forearm skin, encompassing an area of approximately 16 cm × 8 cm.
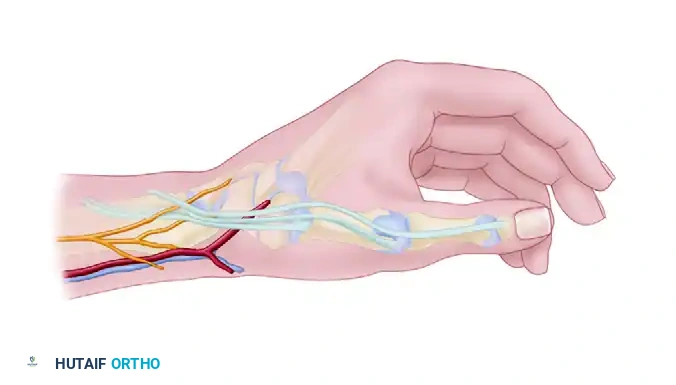
The primary flap territory is supplied through a dense network of fasciocutaneous perforators, with a major branch arising approximately 7 cm proximal to the radial styloid.
When used as a reverse-flow pedicled flap for hand coverage, the blood supply depends entirely on retrograde flow from the deep palmar arch (supplied by the ulnar artery) into the distal radial artery. Venous drainage relies on retrograde flow through the venae comitantes, bypassing venous valves via collateral crossover channels, or via a superficial vein anastomosed at the recipient site.
Preoperative Assessment
🚨 CRITICAL SAFETY STEP: A preoperative Allen test is absolutely mandatory to assess the adequacy of ulnar arterial flow and the patency of the palmar arches. If the status of the ulnar artery cannot be definitively determined clinically, formal arteriography or Doppler ultrasound mapping is required to confirm hand circulation before sacrificing the radial artery.
Surgical Technique: Reverse Radial Forearm Flap
1. Flap Design:
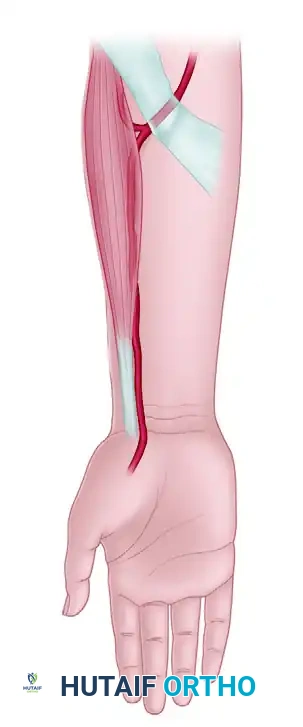
The flap is designed on the volar aspect of the forearm, centered over the course of the radial artery. The pivot point is typically located at the anatomic snuffbox or just proximal to the radial styloid.
2. Elevation:
Dissection begins at the proximal margin of the flap. The radial artery and its venae comitantes are identified, ligated proximally, and divided. The flap is elevated in a subfascial plane, proceeding from proximal to distal.
3. Nerve Preservation:
The flap is innervated by branches of the lateral antebrachial cutaneous nerve (a continuation of the musculocutaneous nerve). During elevation, extreme care must be taken to identify and preserve the superficial branch of the radial nerve, which lies deep to the brachioradialis muscle and emerges subcutaneously in the distal third of the forearm.
4. Pedicle Dissection:
The pedicle (radial artery and venae comitantes) is dissected distally to the pivot point. The brachioradialis tendon may need to be mobilized to free the pedicle adequately.
5. Flap Inset:
The flap is rotated 180 degrees to cover the defect on the hand. It is exceptionally useful for covering large dorsal hand defects, first web space contractures, or complex volar wounds.
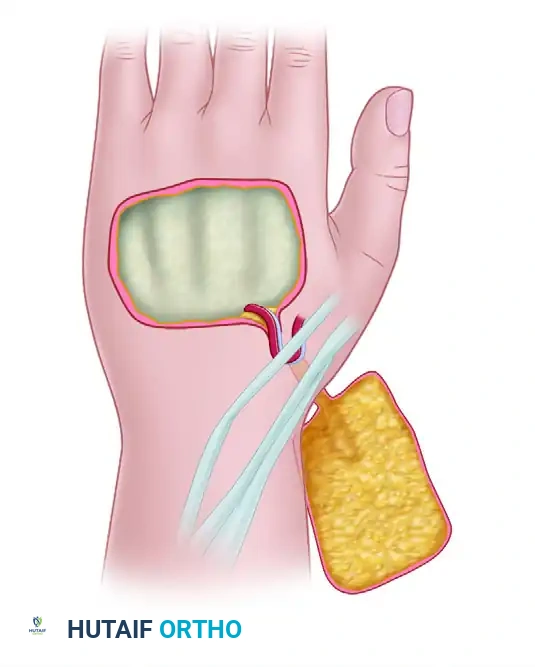
6. Donor Site Management:
One of the primary criticisms of the radial forearm flap is the aesthetic and functional morbidity of the donor site. If the flap is harvested as a purely fascial flap (adipofascial), the overlying skin can be closed primarily with minimal scarring, and the fascial flap is then covered with a split-thickness skin graft at the recipient site. If a standard fasciocutaneous flap is taken, the donor defect must be covered with a split-thickness skin graft. Care must be taken to ensure the paratenon over the flexor carpi radialis (FCR) and brachioradialis tendons is preserved to accept the graft.
Postoperative Protocol for Forearm Flaps
- Monitoring: The flap must be monitored closely for arterial insufficiency (pallor, loss of turgor, delayed capillary refill) or venous congestion (violaceous color, brisk capillary refill, swelling). Venous congestion is the most common complication in reverse-flow flaps.
- Positioning: The hand should be elevated to promote venous drainage. Avoid any constrictive dressings around the wrist or pedicle pivot point.
- Mobilization: Depending on the recipient site and concomitant injuries (e.g., tendon repairs, fractures), early protected mobilization of the digits is encouraged to prevent stiffness. The wrist is typically splinted in a neutral position to avoid tension on the pedicle.
CONCLUSION
Both the cross finger flap and the radial forearm flap remain indispensable tools in the armamentarium of the reconstructive hand surgeon. The cross finger flap provides durable, matched tissue for digital defects with minimal technical complexity, provided the extensor peritenon of the donor digit is respected. Conversely, the radial forearm flap offers a massive territory of pliable, well-vascularized tissue capable of covering complex, composite defects of the hand and wrist. Rigorous preoperative vascular assessment, meticulous surgical execution, and structured postoperative rehabilitation are the cornerstones of success in these reconstructive endeavors.
You Might Also Like