Radial Forearm & Posterior Interosseous Flaps: Surgical Guide
Key Takeaway
The radial forearm and posterior interosseous flaps are workhorse locoregional options for complex upper extremity reconstruction. This guide details the precise surgical techniques, vascular anatomy, and postoperative protocols required for successful flap elevation and inset. Key considerations include meticulous pedicle dissection, preservation of donor site morbidity, and management of anatomical variations to ensure optimal functional and aesthetic outcomes in soft tissue coverage of the hand and wrist.
INTRODUCTION TO FOREARM FASCIOCUTANEOUS FLAPS
The reconstruction of complex soft tissue defects in the hand and upper extremity demands a profound understanding of locoregional flap anatomy. Among the most reliable and versatile options available to the reconstructive orthopedic surgeon are the radial forearm flap and the posterior interosseous artery (PIA) flap. Both flaps rely on the robust fasciocutaneous vascular networks of the forearm, allowing for the transfer of pliable, well-vascularized tissue to distal defects without the absolute necessity of microsurgical free tissue transfer.
This comprehensive guide delineates the precise surgical techniques, anatomical considerations, and postoperative management protocols for both the distally based radial forearm flap (as popularized by Foucher et al.) and the posterior interosseous flap (utilizing the principles of Zancolli, Angrigiani, and Chen).
THE RADIAL FOREARM FLAP
The radial forearm flap is a highly reliable fasciocutaneous flap based on the radial artery and its venae comitantes. When utilized as a distally based (retrograde) pedicled flap, it provides an exceptional arc of rotation capable of reaching the dorsal and volar aspects of the hand, the thumb, and the web spaces.
Preoperative Evaluation and Indications
The primary indication for a distally based radial forearm flap is the coverage of significant soft tissue defects of the hand and wrist where paratenon or periosteum is absent, precluding the use of simple skin grafts.
🚨 Surgical Warning: The absolute prerequisite for elevating a distally based radial forearm flap is an intact and dominant ulnar artery capable of perfusing the entire hand via the superficial and deep palmar arches. A rigorous Allen test, supplemented by Doppler ultrasonography or digital plethysmography, is mandatory to confirm adequate collateral circulation.
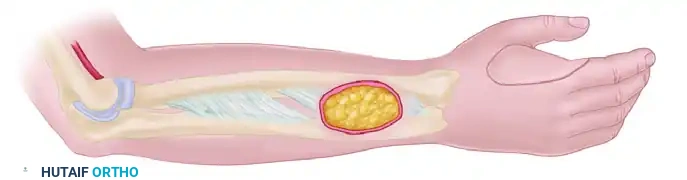
Flap Design and Dimensions
Following meticulous debridement and preparation of the recipient bed, the surgeon must confirm that the defect is suitable to receive the flap.
- Axis of the Flap: The flap is designed and centered over the longitudinal axis of the radial artery, which runs from the midpoint of the antecubital fossa to the palpable pulse at the radial styloid.
- Dimensions: The skin paddle is drawn to match the dimensions of the recipient defect. As demonstrated by Foucher et al., the radial forearm donor site can yield massive flaps; the largest flaps successfully obtained in their series measured up to 16 cm in length and 9 cm in width.
- Pivot Point: The pivot point for a distally based flap is typically located 2 to 3 cm proximal to the radial styloid, where the radial artery gives off its palmar carpal branch.
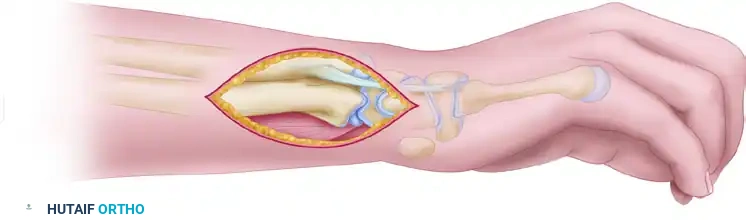
Surgical Technique: Step-by-Step Elevation
The elevation of the radial forearm flap requires meticulous dissection to preserve the delicate fasciocutaneous perforators while minimizing donor site morbidity.
1. Initial Incisions and Proximal Exposure
Begin by exposing the radial artery at both the proximal and distal borders of the planned flap. This confirms the anatomical position of the vessel relative to the skin paddle. Once confirmed, ligate and divide the radial artery and its venae comitantes at the extreme proximal border of the flap.
2. Nerve Identification and Preservation
At the proximal border of the flap, carefully identify the lateral antebrachial cutaneous nerve (often referred to in older literature as the musculocutaneous nerve branches). Dissect and preserve these sensory branches. If a sensate flap is required, these nerves can be harvested with the flap for later coaptation; otherwise, they should be preserved to maintain forearm sensation.
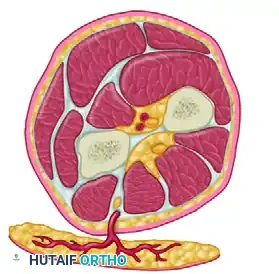
3. Medial Dissection
Incise the anterior (medial) border of the flap. Depending on the required width, this incision may extend beyond the volar midline of the forearm. Progressively raise the medial two-thirds of the flap (the portion medial to the radial artery) in a subfascial plane.
Surgical Pearl: It is critical to leave the epimysium/perimysium intact over the flexor carpi radialis (FCR) and the flexor digitorum superficialis (FDS) muscles. An intact perimysium is essential to provide a vascularized bed for the subsequent split-thickness skin graft used to close the donor site.
Ensure that the radial artery, its venae comitantes, and the surrounding fascial plexus are taken as a single, undisturbed block from the radial groove.
4. Lateral Dissection
Upon reaching the distal end of the pedicle, transition to dissecting the lateral border of the flap. Incise the skin laterally and medially. During this lateral dissection, it is imperative to identify and leave the cephalic vein and the superficial branch of the radial nerve intact in the donor bed, unless the cephalic vein is specifically required for venous supercharging.
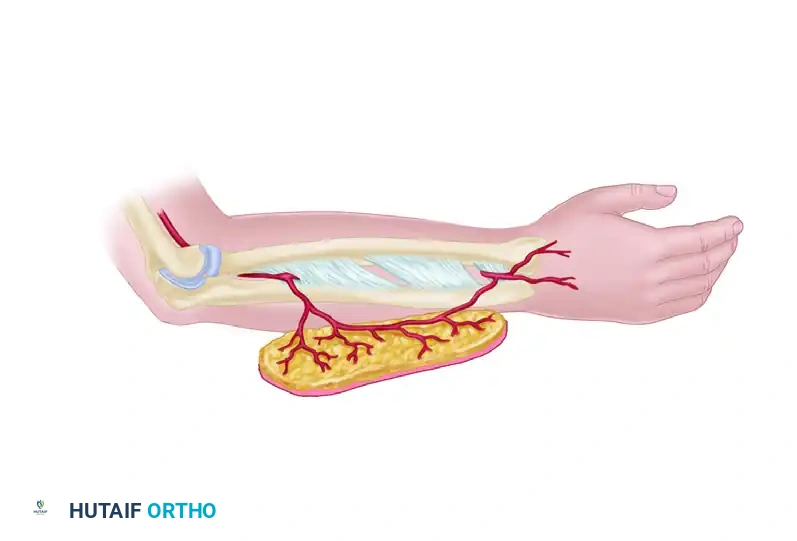
5. Pedicle Mobilization
Dissect the flap from proximal to distal to mobilize the tissue island. Handle the pedicle with extreme care to avoid any traction or shear damage to the venae comitantes, which are thin-walled and prone to spasm or thrombosis.
If the arc of rotation is insufficient to reach the defect without tension, the pedicle can be lengthened. This is achieved by continuing the dissection distally into the anatomical snuffbox, reaching the angle between the first and second metacarpals.
6. Releasing the Retinacular Sheaths
To allow the pedicle to rotate freely and pass beneath the dorsal tendons without compression, delicately dissect the radial vessels away from the abductor pollicis longus (APL), extensor pollicis brevis (EPB), and extensor pollicis longus (EPL). Open the extensor retinacular sheaths over the first dorsal compartment to allow the flap pedicle to pass smoothly beneath the tendons.
7. Hemostasis and Inset
Obtain meticulous hemostasis of the numerous small muscular branches using bipolar electrocoagulation. Monopolar cautery must be strictly avoided near the pedicle. Upon completion of the dissection, a mobilized pedicle of approximately 8 cm is typically obtained, providing a versatile arc of rotation to almost any part of the hand. Proceed to inset the flap into the specific injury site, ensuring no twisting or kinking of the pedicle occurs during rotation.
THE POSTERIOR INTEROSSEOUS ARTERY (PIA) FLAP
The posterior interosseous flap is a highly valuable fasciocutaneous flap harvested from the dorsal aspect of the forearm. It is particularly useful for reconstructing defects on the dorsum of the hand, the first web space, and the proximal phalanges, offering the distinct advantage of preserving the major arterial axes (radial and ulnar arteries) of the hand.
Vascular Anatomy and Biomechanics
The survival of the PIA flap relies on the complex anastomotic network between the anterior and posterior interosseous systems.
The posterior interosseous artery is usually a direct branch of the common interosseous artery. It enters the posterior compartment of the forearm and supplies a distinct skin territory on the dorsal surface. In the distal third of the forearm, the posterior interosseous artery becomes hypoplastic but forms a critical anastomosis with the anterior interosseous artery, which pierces the interosseous membrane to enter the dorsal compartment at the distal aspect of the interosseous space (proximal to the distal radioulnar joint).
Over its course down the forearm, the posterior interosseous artery gives off four to six distinct cutaneous perforating branches. These branches pass vertically through the intermuscular septum between the extensor digiti minimi (EDM) and the extensor carpi ulnaris (ECU) muscles, supplying an area of skin located primarily in the middle third of the dorsal forearm.
Preoperative Evaluation
Preoperative evaluation for a PIA flap must be exhaustive. The surgeon must consider:
* Previous Wrist Trauma: Any injury to the distal radioulnar joint (DRUJ) or distal forearm may have compromised the critical distal anastomosis between the anterior and posterior interosseous arteries.
* Defect Location: The flap can reach as far distal as the dorsum of the proximal interphalangeal (PIP) joint.
* Sensory Requirements: Assess whether a sensate flap is necessary for the recipient site.
* Peripheral Arterial Disease (PAD): Microvascular disease can compromise the delicate septal perforators.
* Volar Forearm Injury: Any deep volar injury might have damaged the anterior interosseous artery, which is the primary inflow source for the retrograde PIA flap.
Flap Design and Dimensions
The skin island is designed over the middle third of the dorsal forearm, centered over the axis of the septum between the ECU and EDM.
According to the landmark studies by Büchler and Frey, viable flap islands can range significantly in size, from as small as 1.5 cm × 4 cm up to 9 cm × 11 cm. When utilized as a "retrograde" flap (relying on distal inflow from the anterior interosseous artery), the pivot point is centered over the distal radioulnar joint. This provides an impressive arc of rotation of up to 19 cm, allowing coverage of distal sites such as the first web space or the dorsal PIP joints.
Surgical Technique: Retrograde Elevation
The technique described below incorporates the foundational principles of Zancolli and Angrigiani, alongside modern recommendations by Chen et al.
🚨 Surgical Warning: Because anatomical variations in the posterior interosseous system are common (e.g., an absent or hypoplastic middle segment of the artery), the surgeon must always elevate the flap under tourniquet without exsanguinating the arm completely, allowing visualization of the perforators. Always have an alternative reconstructive plan (such as a free flap) prepared.
1. Incision and Septal Identification
Begin with a longitudinal incision along the dorsal forearm to expose the deep fascia. Identify the intermuscular septum separating the extensor carpi ulnaris (ECU) and the extensor digiti minimi (EDM).
2. Perforator Dissection
Carefully dissect the fascia to visualize the cutaneous branches passing through the ECU-EDM septum. The skin paddle is then incised, ensuring these central perforators are captured within the flap's central axis.
3. Proximal Ligation and Distal Dissection
For a distally based flap, the posterior interosseous artery and its venae comitantes are ligated at the proximal margin of the flap (distal to the supinator muscle). The flap is then elevated from proximal to distal.
The dissection proceeds distally along the septum, meticulously separating the pedicle from the adjacent muscle bellies. The motor branches of the posterior interosseous nerve, which cross the artery in the proximal forearm, must be identified and rigorously protected to prevent devastating extensor weakness.
4. Managing Anatomical Variations
Anatomical variations may preclude the development of the flap as initially planned. If anatomical anomalies interfere with the pedicle's integrity, three salvage options have been suggested to improve reliability:
1. Venous Supercharging: If severe venous congestion is encountered after insetting the flap (a common complication due to the valved nature of the retrograde venae comitantes), perform an additional venous anastomosis between a superficial flap vein and a recipient site vein.
2. Conversion to Free Flap: If anatomical variation prevents the elevation of a distally based flap (e.g., due to an absent distal anastomosis or compromise of the motor nerve branches during dissection), the flap should be immediately converted to a free tissue transfer.
3. Wide-Based Elevation: In patients with possible peripheral vascular disease, raise the flap with a wider fascial base, incorporating additional branches of both the anterior and posterior interosseous arteries to maximize collateral perfusion.
POSTOPERATIVE CARE AND REHABILITATION
The postoperative management of forearm fasciocutaneous flaps is as critical as the surgical execution. Both the radial forearm and posterior interosseous flaps require stringent monitoring to ensure vascular patency.
Flap Monitoring
Flap circulation must be monitored continuously for at least the first 24 hours. Clinical assessments should include capillary refill time, skin turgor, color, and surface temperature. Surface Doppler ultrasonography should be used to confirm arterial inflow and venous outflow. If flap viability is uncertain at any point, the patient must remain admitted, and the flap should be monitored in a controlled clinical setting until it is deemed completely safe to allow the patient to return home.
Environmental and Systemic Controls
Strict precautions must be taken to prevent vasospasm, which can rapidly lead to pedicle thrombosis and flap necrosis.
* Avoid Vasoconstrictors: The patient must strictly avoid smoking and all nicotine products.
* Temperature Control: The patient's room should be kept warm. Exposure to excessively cold environments or the consumption of cold drinks should be avoided.
* Stress Reduction: Emotional upsets and pain can trigger sympathetic nervous system responses leading to vasospasm; therefore, adequate analgesia and a calm environment are essential.
Wound Care and Rehabilitation
The donor site, typically covered with a split-thickness skin graft, is immobilized in a volar splint to ensure graft take.
* If any sutures at the recipient site appear too tight and threaten to strangulate the skin edges or compress the pedicle, they must be removed immediately.
* Standard skin sutures are removed between 10 to 14 days postoperatively.
* Once the flap is stable and the donor site graft has taken, a tailored rehabilitation program appropriate for the specific underlying injury (e.g., tendon repair, fracture fixation) is initiated under the guidance of a specialized hand therapist. Early, controlled mobilization is key to preventing tendon adhesions beneath the flap.
You Might Also Like