Mastering Proximal Humeral Resection with Allograft Prosthetic Composite Arthroplasty
Key Takeaway
This masterclass details proximal humeral resection with allograft prosthetic composite arthroplasty. We'll meticulously cover surgical anatomy, preoperative planning, and intraoperative execution from incision to reconstruction. Learn critical techniques for neurovascular preservation, tumor margin control, and hardware application. Gain insights into pearls, pitfalls, and comprehensive postoperative management for optimal patient outcomes, ensuring functional recovery and long-term stability.
Comprehensive Introduction and Patho-Epidemiology
The proximal humerus represents the third most common anatomical site for the genesis of primary malignant bone sarcomas, following the distal femur and proximal tibia. When confronting aggressive neoplasms in this region—such as osteosarcoma, chondrosarcoma, or Ewing sarcoma—the orthopedic oncologist is tasked with a dual mandate: achieving definitive, margin-negative oncologic resection while simultaneously reconstructing a highly complex, multidirectional joint to preserve upper extremity function. Historically, the surgical armamentarium was limited to forequarter amputations or flail shoulders (Tikhoff-Linberg resections), which, while oncologically sound, yielded devastating functional and psychological consequences for the patient. The advent of limb-salvage surgery revolutionized this paradigm, introducing techniques such as massive osteoarticular allografts and modular endoprostheses.
However, isolated osteoarticular allografts are fraught with long-term complications, including subchondral collapse, joint fragmentation, secondary osteoarthritis, and catastrophic fracture due to the lack of biological revascularization of the articular segment. Conversely, isolated metallic megaprostheses, while providing immediate structural stability, fail to offer a biological substrate for the reattachment of the native rotator cuff and deltoid musculature, frequently resulting in a stable but profoundly weak, non-functional shoulder. To bridge this biomechanical and biological chasm, the Allograft Prosthetic Composite (APC) arthroplasty was developed. This sophisticated reconstructive technique leverages the structural permanence and articular congruity of a metallic hemiarthroplasty or total shoulder prosthesis, ingeniously mated with an intercalary structural allograft.
The paramount advantage of the APC lies in its soft-tissue integration capabilities. The allograft serves as a biological scaffold, retaining its native tendinous insertions (such as the rotator cuff tendons and deltoid tuberosity). This allows the surgeon to perform robust, tendon-to-tendon or tendon-to-bone repairs between the host's remaining musculature and the allograft's soft-tissue envelope. Over time, biological healing occurs at these interfaces, restoring the dynamic stabilizers of the glenohumeral joint and significantly enhancing active abduction and forward elevation compared to endoprosthetic reconstruction alone. Furthermore, the allograft restores bone stock, which is invaluable should revision surgery become necessary in the future.
Mastering the APC technique requires a profound understanding of three-dimensional shoulder anatomy, meticulous preoperative templating, exacting surgical execution, and a nuanced appreciation for the biomechanics of the shoulder girdle. The procedure is technically demanding, requiring the surgeon to seamlessly transition between the roles of an extirpative oncologist and a reconstructive arthroplasty specialist. This chapter will exhaustively detail the surgical anatomy, indications, preoperative planning, step-by-step intraoperative execution, and postoperative management required to successfully perform a proximal humeral resection and APC reconstruction.
Detailed Surgical Anatomy and Biomechanics
Before initiating any surgical incision, a rigorous and uncompromising review of the complex anatomical relationships within the shoulder girdle is mandatory. The proximal humerus is enveloped by a dense network of musculature and critical neurovascular structures, all of which dictate the surgical approach, the feasibility of limb salvage, and the ultimate functional outcome.
Osteology and Resection Types
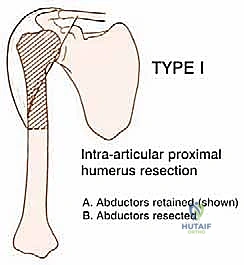
Oncologic resections of the proximal humerus are broadly categorized into intra-articular and extra-articular resections based on the extent of tumor involvement. An intra-articular resection (Type 1) is indicated when the tumor is confined to the proximal humerus without extension into the glenohumeral joint space or the glenoid vault.
In a Type 1 resection, the glenoid cartilage and the crucial abductor mechanism (if not directly infiltrated by the tumor) can be preserved. This is the optimal scenario for an APC reconstruction.
Conversely, an extra-articular resection (Type 2 or Type 3) involves en bloc removal of the proximal humerus along with the glenoid, the entire shoulder capsule, and occasionally portions of the scapula and clavicle. Extra-articular resections are necessitated by tumors that have breached the articular cartilage or contaminated the joint space via a pathological fracture. Reconstructive options following extra-articular resections are vastly different, often requiring constrained reverse total shoulder megaprostheses or resulting in a flail shoulder, as the native rotator cuff and glenoid articulation are sacrificed.
Muscular Intervals and Attachments
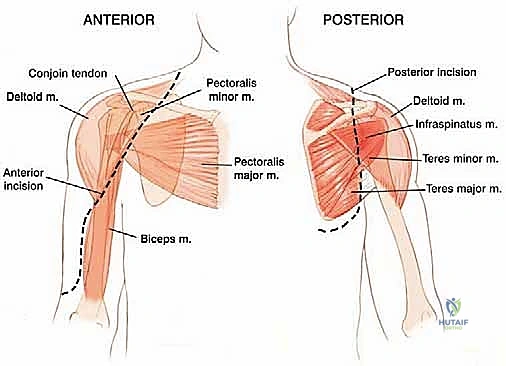
The functional recovery of the shoulder post-APC is entirely dependent on the strategic management of the surrounding musculature. The deltoid muscle, the primary abductor and flexor of the arm, is innervated by the axillary nerve. Its preservation is the single most critical factor in achieving a functional limb. During resection, the deltoid must be carefully detached from its insertion at the deltoid tuberosity, preserving its neurovascular pedicle. The rotator cuff—comprising the supraspinatus, infraspinatus, teres minor, and subscapularis—provides dynamic stabilization. In an APC reconstruction, the host's rotator cuff tendons (if oncologically safe to preserve) are meticulously tagged and later sutured to the corresponding tendons on the allograft.
The pectoralis major, inserting onto the lateral lip of the bicipital groove, and the latissimus dorsi and teres major, inserting into the medial lip and floor respectively, must be identified and released to mobilize the proximal humerus. The short head of the biceps and the coracobrachialis originate from the coracoid process and can generally be preserved and retracted medially, protecting the underlying brachial plexus.
Neurovascular Structures: The Critical Boundaries
The neurovascular anatomy dictates the limits of safe dissection. The axillary nerve and the posterior humeral circumflex artery exit the axilla posteriorly through the quadrangular space, bounded by the teres minor, teres major, the long head of the triceps, and the surgical neck of the humerus.
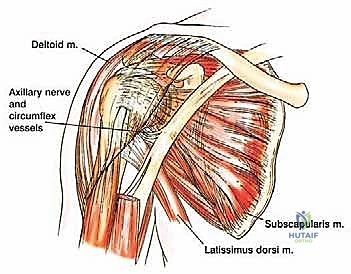
This bundle courses transversely around the surgical neck, deep to the deltoid, approximately 5 centimeters distal to the lateral acromion. Accidental transection or traction injury to the axillary nerve results in catastrophic loss of deltoid function, rendering the APC reconstruction functionally obsolete.

Further distally, the radial nerve courses from medial to lateral along the posterior aspect of the humeral shaft within the spiral groove. As the humeral osteotomy is planned, especially for diaphyseal-extending tumors, the radial nerve must be visually identified and physically protected. Medially, the brachial plexus and the axillary artery and vein lie in close proximity to the coracoid process and the subscapularis muscle. Medial retraction must be performed with extreme caution to avoid traction neuropraxia or vascular intimal tears. The musculocutaneous nerve, piercing the coracobrachialis, must also be safeguarded during medial dissection.
Exhaustive Indications and Contraindications
The decision to proceed with an Allograft Prosthetic Composite reconstruction is highly nuanced and requires a multidisciplinary approach involving orthopedic oncology, medical oncology, radiation oncology, and musculoskeletal pathology. The primary goal is always oncologic clearance; functional reconstruction is strictly secondary.
Indications for APC Arthroplasty
The classic indication for a proximal humeral APC is a primary malignant bone sarcoma (e.g., osteosarcoma, chondrosarcoma, Ewing sarcoma) that necessitates a wide, en bloc resection of the proximal humerus but spares the axillary nerve, the deltoid muscle, and a sufficient portion of the rotator cuff. APCs are particularly favored in younger, active patients who require a durable reconstruction capable of withstanding higher mechanical demands than a standard megaprosthesis can tolerate.
Furthermore, aggressive benign bone tumors, such as recurrent giant cell tumors or aneurysmal bone cysts that have caused massive osteoarticular destruction precluding standard osteosynthesis or joint-preserving curettage, are excellent candidates for this technique. In the revision arthroplasty setting, where catastrophic aseptic loosening or periprosthetic fracture has resulted in massive proximal humeral bone loss, an APC can restore bone stock and provide a stable platform for a revision stem.
Contraindications to Limb Salvage and APC
Absolute contraindications to limb salvage with an APC primarily revolve around oncologic safety and anatomical feasibility. If the tumor encases the major neurovascular bundle (the brachial plexus or axillary artery/vein), limb salvage is generally contraindicated, and forequarter amputation is required to achieve negative margins. Similarly, if the axillary nerve is directly infiltrated by the tumor, sacrificing it will result in a flail, functionless shoulder, making the complex APC reconstruction a poor choice compared to a simpler spacer or amputation.
Relative contraindications include active, uncontrolled local or systemic infection, which would almost certainly seed the massive structural allograft, leading to catastrophic failure. Severe baseline neurological deficits affecting the upper extremity, poor soft-tissue coverage precluding primary closure over the bulky allograft, and a patient's inability to comply with the rigorous, months-long postoperative rehabilitation protocol also serve as strong deterrents to this procedure.
Summary of Indications and Contraindications
| Category | Indications for APC Reconstruction | Contraindications for APC Reconstruction |
|---|---|---|
| Oncologic | Primary bone sarcomas (Osteosarcoma, Chondrosarcoma) | Tumor encasement of brachial plexus or axillary vessels |
| Benign/Destructive | Aggressive benign tumors (Giant Cell Tumor) with massive bone loss | Direct tumor infiltration of the axillary nerve |
| Revision Arthroplasty | Failed total shoulder arthroplasty with severe proximal bone loss | Active local or systemic bacterial infection |
| Metastatic Disease | Solitary metastasis with a prolonged expected life span | Disseminated metastatic disease with short life expectancy |
| Patient Factors | Young, active patients requiring durable biological reconstruction | Severe cognitive impairment or inability to follow rehab protocols |
| Anatomical | Intact deltoid muscle and viable skin/soft tissue envelope | Inadequate soft tissue coverage requiring complex free flaps (relative) |
Pre-Operative Planning, Templating, and Patient Positioning
Thorough preoperative planning is the absolute cornerstone of a successful oncologic resection and subsequent APC reconstruction. The surgeon must construct a precise mental and digital roadmap of the entire procedure before entering the operating theater.
Imaging and Staging Studies
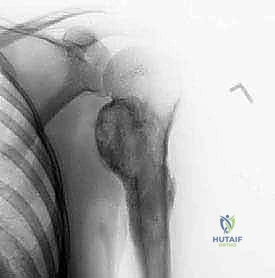
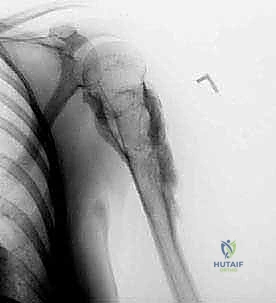
The diagnostic workup begins with high-quality, orthogonal plain radiographs (AP, lateral, and axillary views). These provide initial data regarding the tumor's location, matrix mineralization (e.g., chondroid rings and arcs typical of chondrosarcoma), and the extent of cortical destruction.
However, plain radiographs notoriously underestimate the intramedullary extent of the disease.
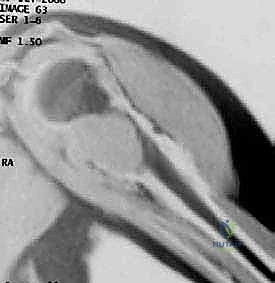
Therefore, a contrast-enhanced Magnetic Resonance Imaging (MRI) scan of the entire humerus is mandatory. T1-weighted coronal and sagittal sequences are critical for defining the exact intramedullary extent of the tumor, which dictates the level of the humeral osteotomy.
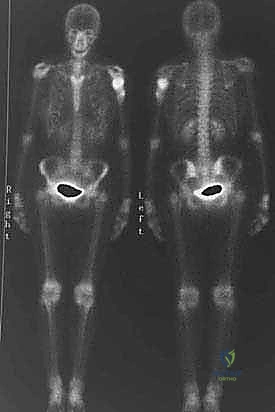
T2-weighted axial sequences are utilized to assess extraosseous soft-tissue extension and the tumor's proximity to the neurovascular bundle. Computed Tomography (CT) of the humerus provides superior detail regarding cortical integrity and subtle pathological fractures. Systemic staging, including a high-resolution CT of the chest to rule out pulmonary metastases and a Technetium Tc 99m whole-body bone scan or PET-CT to exclude polyostotic disease, must be completed prior to definitive surgical intervention.
Biopsy Principles
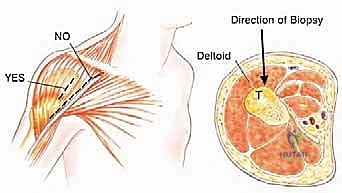
The biopsy is a critical operative procedure that must be meticulously planned. An improperly placed biopsy tract can contaminate vital neurovascular structures or muscle compartments, converting a limb-salvage candidate into an amputee. The biopsy should be performed by the surgeon who will execute the definitive resection. For proximal humeral lesions, the biopsy incision must be longitudinal and placed directly over the anterior aspect of the deltoid muscle.
It is an absolute rule to avoid the deltopectoral groove during the biopsy, as contaminating this interval forces the surgeon to excise the cephalic vein and the medial border of the deltoid during the definitive resection, complicating the exposure and compromising functional recovery. The biopsy tract must be meticulously excised en bloc with the tumor specimen.
Allograft Procurement and Digital Templating
Once the resection length is determined via MRI, an appropriate structural allograft is procured from an AATB-accredited tissue bank. The allograft must be size-matched to the patient's native humerus.
Digital templating is performed using calibration markers on the preoperative radiographs. The surgeon must template the level of the osteotomy, the length of the allograft required, the diameter of the host medullary canal for the prosthetic stem, and the size of the prosthetic humeral head. The allograft should ideally possess robust tendinous attachments at the greater and lesser tuberosities to facilitate the soft-tissue reconstruction.
Patient Positioning and OR Setup
The patient is positioned in a semi-Fowler's (beach chair) position, with the head of the bed elevated to approximately 30 to 45 degrees. A longitudinal towel roll or a specialized scapular positioner is placed behind the medial border of the ipsilateral scapula. This maneuver translates the shoulder girdle anteriorly, stabilizing the scapula and providing extensile access to the glenohumeral joint. The patient's head must be secured in a neutral position to prevent traction on the contralateral brachial plexus. The entire upper extremity, from the fingertips to the base of the neck, is prepped and draped free using a sterile U-drape and an extremity drape. This allows for unrestricted manipulation, rotation, and dislocation of the arm throughout the procedure. A sterile C-arm fluoroscopy unit must be available in the room to confirm the osteotomy level and the final component positioning.
Step-by-Step Surgical Approach and Fixation Technique
The surgical execution of an APC arthroplasty is a complex orchestration of oncologic extirpation and biomechanical reconstruction. It demands meticulous hemostasis, precise tissue handling, and an unwavering focus on anatomical landmarks.
Incision, Exposure, and Neurovascular Protection
The procedure commences with an extensile deltopectoral incision, extending from the lateral third of the clavicle, across the coracoid process, and down the anterolateral aspect of the arm, following the deltopectoral groove. If a prior biopsy was performed through the anterior deltoid, an elliptical incision is made to incorporate and excise the entire biopsy tract en bloc with the underlying muscle fascia.

The cephalic vein is identified and typically retracted laterally with the deltoid to preserve its venous drainage, though it may be ligated if it is intimately involved with the tumor mass. The deltopectoral interval is developed, and the clavipectoral fascia is incised. The coracoid process and the conjoined tendon (short head of the biceps and coracobrachialis) are identified. The musculocutaneous nerve is palpated as it enters the coracobrachialis. The pectoralis major insertion is identified, tagged with heavy non-absorbable suture, and released from the lateral lip of the bicipital groove. This allows for significant lateral retraction of the deltoid and medial retraction of the conjoined tendon, exposing the anterior aspect of the proximal humerus.
The axillary nerve must be identified early in the dissection. By palpating the anterior surface of the subscapularis and sweeping a finger inferiorly, the surgeon can locate the axillary nerve and posterior humeral circumflex vessels passing posteriorly into the quadrangular space. This bundle must be protected at all times.
Oncologic Resection of the Proximal Humerus
The limits of the tumor, as dictated by the preoperative MRI, are measured from the articular surface of the humeral head or a fixed anatomical landmark. The planned osteotomy site is marked on the humeral diaphysis, ensuring a wide oncologic margin (typically 2 to 3 centimeters of normal bone beyond the MRI-defined intramedullary extent).

The rotator cuff tendons (supraspinatus, infraspinatus, teres minor, and subscapularis) are systematically identified. If the tumor does not breach the capsule or involve the tuberosities, these tendons are tagged with heavy #2 or #5 non-absorbable sutures (e.g., FiberWire or Ethibond) using a Krackow locking technique and released from their osseous insertions. If the tumor encroaches on the tuberosities, portions of the cuff must be sacrificed en bloc with the specimen to maintain oncologic margins.
The latissimus dorsi and teres major are released from the medial humerus. The humerus is then externally rotated, and the anterior capsule is incised. The humeral head is dislocated anteriorly. The diaphyseal osteotomy is performed using a sagittal saw under continuous saline irrigation to prevent thermal necrosis. The distal aspect of the resection is elevated, and the remaining posterior soft tissues are meticulously dissected, taking extreme care to protect the radial nerve as it courses in the spiral groove posteriorly. The entire proximal humerus is then removed en bloc and sent to pathology for immediate margin analysis.
Back-Table Preparation of the Allograft Prosthetic Composite
While the host site is prepared and hemostasis is achieved, the APC is assembled on the sterile back table. The structural allograft is thawed in warm saline impregnated with antibiotics (e.g., vancomycin and tobramycin). The allograft is cut to exactly match the length of the resected host bone. A step-cut or oblique osteotomy is highly recommended at the allograft-host junction to increase the surface area for biological healing and to provide inherent rotational stability, which a transverse osteotomy lacks.
The medullary canal of the allograft is reamed to accommodate the long stem of the chosen prosthesis. The prosthesis (typically a long-stemmed hemiarthroplasty or reverse total shoulder component) is then cemented into the allograft using polymethylmethacrylate (PMMA) bone cement. It is critical to ensure the correct version (typically 20 to 30 degrees of retroversion relative to the epicondylar axis) during cementation.
Implantation and Host-Allograft Fixation
Once the cement in the allograft has fully polymerized, the composite is brought to the surgical field. The medullary canal of the host humerus is prepared via sequential reaming and broaching.
The distal stem of the prosthesis is then inserted into the host humerus. Depending on the surgeon's preference and the patient's bone quality, the stem may be press-fit (if a porous-coated stem is used to encourage osteointegration) or cemented into the host bone.
If a step-cut osteotomy was utilized, the allograft and host bone are intimately interlocked. To augment the fixation and compress the osteotomy site, a dynamic compression plate (typically a 4.5mm narrow LCP) is often applied anteriorly or laterally, spanning the allograft-host junction. This plate neutralizes bending and torsional forces, protecting the osteotomy while biological union occurs.
Soft-Tissue Reconstruction and Closure
The defining step of the APC technique is the biological soft-tissue reconstruction. The previously tagged host rotator cuff tendons are meticulously sutured to the corresponding tendinous remnants on the allograft. If the allograft lacks sufficient tendon, heavy non-absorbable sutures are passed through transosseous drill holes made in the greater and lesser tuberosities of the allograft.
The subscapularis is repaired anteriorly, and the supraspinatus and infraspinatus are repaired superiorly and posteriorly. This reconstruction restores the dynamic force couples of the shoulder. The pectoralis major is reattached to the allograft or the lateral aspect of the conjoint tendon. A closed suction drain is placed deep within the wound. The deltopectoral interval is closed loosely, and the skin is reapproximated with staples or a subcuticular suture. The arm is placed in a rigid shoulder immobilizer or an abduction sling.
Complications, Incidence Rates, and Salvage Management
Despite meticulous surgical technique, APC arthroplasty is a massive, biologically demanding procedure associated with a significant complication profile. Patients must be thoroughly counseled regarding these risks preoperatively.
Nonunion and Allograft Fracture
Nonunion at the host-allograft junction is a primary concern, occurring in approximately 10% to 15% of cases. The avascular nature of the massive allograft means healing relies entirely on creeping substitution from the host bone, a process that can take 12 to 24 months. Factors increasing nonunion risk include the use of postoperative adjuvant chemotherapy or radiation, poor host bone quality, and inadequate mechanical stabilization. Treatment typically involves autologous bone grafting (e.g., from the iliac crest) and revision of the internal fixation. Allograft fracture, either diaphyseal or articular fragmentation, occurs in 5% to
