Essential Surgical Approaches: Upper Extremity by Miller MD et
02 إبريل 2026
12 min read
84 Views
Key Takeaway
For anyone wondering about Essential Surgical Approaches: Upper Extremity by Miller MD et, The anterior (deltopectoral) approach is a surgical technique to access the shoulder joint. It utilizes the interval between the deltoid and pectoralis major muscles, protecting nerves like the axillary. This approach, consistent with principles taught by miller md et al., exposes the clavipectoral fascia, subscapularis, and proximal humerus, providing direct access for surgical intervention.
- ** Approaches to the upper extremity (** Table 2.22)
- Surgical approaches to the shoulder ( Fig. 2.25)
- Anterior (deltopectoral) approach ( Fig. 2.26)
- Interval: deltoid (axillary nerve) and pectoralis major (medial and lateral pectoral nerves); can be extended distally along lateral border of biceps into anterolateral approach to humerus
- Dissection
- Interval marked by cephalic vein. Develop plane between deltoid and pectoralis major to expose the clavipectoral fascia. Cephalic vein is mobilized either laterally or medially according to surgeon preference.
- Incise clavipectoral fascia lateral to the conjoint tendon to expose the subscapularis and proximal humerus. Retract deltoid laterally. Shoulder abduction relaxes deltoid to improve access.
- For access to shoulder joint, subscapularis may be divided longitudinally, detached from the lesser tuberosity, or taken off with a lesser tuberosity osteotomy.
- A leash of three vessels (one artery and the superior and inferior venae comitantes) marks the lower border of the subscapularis.
- Anterior shoulder capsule closely associated with subscapularis tendon
- Layers of the anterior shoulder are summarized in Table 2.23.
-
Table 2.22 Upper Extremity Approaches Approach Superficial Interval Deep Interval (Nerve) Stru (Nerve) ---
Shoulder Anterior (deltopectoral) | Deltoid (axillary) and pectoralis major (medial/lateral
| |
C M
| pectoral)
| |
A
| ---|---|---|---| Lateral (deltoid-splitting) | Split deltoid (axillary)
| |
Axill Posterior | Split deltoid (axillary)
| Infraspinatus (suprascapular) and teres minor (axillary)
| A P S
Humerus Anterolateral (proximal) | Deltoid (axillary) and pectoralis major (medial/lateral pectoral)
| |
C M Anterolateral (middle/distal) | Lateral to biceps (musculocutaneous)
| Split brachialis (radial and musculocutaneous)
| C M Anterolateral (distal) | Brachialis
(musculocutaneous) and brachioradialis (radial)
| |
R L Posterior (triceps-splitting) | Lateral and long heads of triceps (distal to branching of radial nerve)
| Split medial (deep) head of triceps (radial)
| R U Posterior (triceps-slide) | Triceps (radial) and medial intermuscular septum
| |
R U
Elbow Anterior (antecubital fossa) | Biceps
(musculocutaneous) and brachioradialis (radial)
| Pronator teres (median) and supinator (PIN)
| C B L B R
M S P Medial (Hotchkiss) | Brachialis
(musculocutaneous) and triceps (radial) or pronator teres (median)
| Split or elevation of flexor-pronator mass (median)
| U M Lateral (Kaplan) | ECRB (radial/PIN) and
EDC (PIN)
| |
P L
| |
| Posterolateral (Kocher) | Anconeus (radial) and
ECU (PIN)
| |
P L
| ---|---|---|---| Posterior | Multiple options (olecranon osteotomy, triceps-sparing [Bryan-Morrey], triceps splitting) but none with a true internervous plane
| |
U R
Forearm Anterior (Henry) | Brachioradialis (radial) and pronator teres/FCR (median)
| |
P R
R S Posterior (Thompson) | ECRB (radial/PIN) and
EDC/EPL (PIN)
| |
PIN Posterior ulna | ECU (radial) and FCU (ulnar)
| |
U U
Wrist Dorsal | Third and fourth extensor compartments (no internervous plane)
| |
PIN Volar (distal Henry) | Median nerve and
radial artery
| |
M
R Carpal tunnel | Median nerve and
ulnar nerve
| Transverse carpal ligament
| Med
m P
AHCA, Anterior humeral circumflex artery; LABCN, lateral antebrachial cutaneous nerve; MABCN, medial antebrachial cutaneous nerve; PCB, palmar cutaneous branch of median nerve; PHCA, posterior humeral circumflex artery; SBRN, superficial branch of radial nerve. - Risks
- Musculocutaneous nerve
-
Penetrates posterior aspect of conjoint tendon approximately 5–8 cm distal to coracoid (may be more proximal in 30% of
shoulders) - Protect by keeping dissection lateral to conjoint tendon and avoiding vigorous medial retraction.
- Axillary nerve
- Passes anterior to posterior through quadrangular space just inferior to the shoulder capsule
- Shoulder adduction and external rotation reduce tension on the nerve.
- Subscapularis failure
- Subscapularis should be securely repaired during closing.
-
Protect subscapularis repair postoperatively with passive external rotation restrictions.


 FIG. 2.25 Surgical intervals. Internervous planes for approaches to the shoulder and arm. From Miller MD et al:
Orthopaedic surgical approaches,
ed 2, Philadelphia, 2014, Saunders,
Figure 2-11.
FIG. 2.25 Surgical intervals. Internervous planes for approaches to the shoulder and arm. From Miller MD et al:
Orthopaedic surgical approaches,
ed 2, Philadelphia, 2014, Saunders,
Figure 2-11.
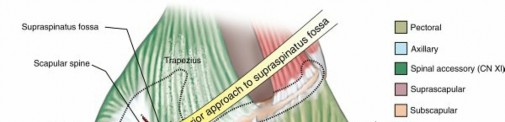
- Lateral (deltoid-splitting) approach
- Interval: none; often split is made through the anterior raphe.
- Dissection
- Either split the deltoid muscle or detach it subperiosteally from the acromion.
- Supraspinatus tendon is exposed, which allows for repairs of the rotator cuff.
- Risks
- Axillary nerve
- Courses from posterior to anterior around shoulder in deep fascia of deltoid approximately 5–7 cm distal to acromion
- Place a stich at the
-
Posterior approach
inferior border of the muscle split so it will not accidentally propagate distally during the procedure. - Interval: infraspinatus (suprascapular nerve) and teres minor (axillary nerve)
- Dissection
- Split the posterior deltoid, thereby exposing the interval between the infraspinatus and teres minor.
- Posterior capsule lies immediately deep to the interval.
- Risks
-
Quadrangular space (axillary nerve and posterior humeral circumflex artery): keep dissection above the teres minor.
-
Suprascapular nerve may be damaged with excessive medial retraction of infraspinatus.


 FIG. 2.26 Anterior (Henry) surgical approach to the shoulder.
From Miller MD et al:
Orthopaedic surgical approaches,
Philadelphia, 2008, Saunders, Figure SA-12.
FIG. 2.26 Anterior (Henry) surgical approach to the shoulder.
From Miller MD et al:
Orthopaedic surgical approaches,
Philadelphia, 2008, Saunders, Figure SA-12.
-
Table 2.23 Layers of Shoulder Layer Structures --- I | Deltoid, pectoralis major, trapezius II | Clavipectoral fascia, conjoined tendon, short head of biceps, and coracobrachialis III | Deep layer of subdeltoid bursa, rotator cuff muscles (
s
upraspinatus,
i
nfraspinatus,
t
eres minor,
s ubscapularis [mnemonic: “SITS”]) IV | Glenohumeral joint capsule, coracohumeral ligament - Surgical approaches to the humerus
- Anterolateral approach
-
Interval: deltoid (axillary nerve) and pectoralis major (medial and lateral pectoral nerves) and along lateral biceps proximally, between the fibers of the brachialis (radial and musculocutaneous nerves) midhumerus, and between the brachialis (radial and
musculocutaneous nerves) and brachioradialis (radial nerve) distally - Dissection
- Proximal approach
- Interval marked by the cephalic vein. Retract the pectoralis major medially and the deltoid laterally.
- Anterior circumflex humeral vessels may need to be ligated.
- Middle approach
- Split the brachialis fibers longitudinally (dual innervation).
- Alternatively, the humerus may be exposed between the brachialis and biceps, but this approach is not extensile distally.
- Distal approach
- Retract the brachialis muscle medially and the brachioradialis laterally.
- May be extended distally to the forearm when combined with a volar Henry approach
- Risks
- Radial and axillary nerves are at risk for injury mainly because of forceful retraction. Radial nerve can also be injured by screw penetration or retraction compression as it courses within the spiral groove.
-
For distal exposure, be wary of the lateral antebrachial cutaneous nerve entering the field (coursing medially to lateral under the biceps tendon) and the radial nerve (traveling under
the brachioradialis muscle). - Posterior approach to the humerus
- Interval: none
- Dissection
- Triceps-splitting
- Superficial approach: dissect between lateral and long heads of the triceps (triceps-splitting).
- Deep approach: split the medial head of the triceps (triceps-splitting).
- Lateral triceps slide
-
Mobilize the entire triceps complex medially by dissecting the lateral head off the lateral intermuscular septum.


 FIG. 2.27 Internervous planes for medial approaches to the elbow.
From Miller MD et al:
Orthopaedic surgical approaches,
ed 2, Philadelphia, 2014, Saunders, Figures 3-8 and 3-9.
FIG. 2.27 Internervous planes for medial approaches to the elbow.
From Miller MD et al:
Orthopaedic surgical approaches,
ed 2, Philadelphia, 2014, Saunders, Figures 3-8 and 3-9.
- Risks
- Radial nerve: limits proximal extension of approach
- Identify and protect the radial nerve as it passes from medial to lateral in the proximal part of the exposure.
- With the triceps-splitting approach, access to posterior humerus can be increased from 55% to 76% by mobilizing the radial nerve.
- Ulnar nerve: jeopardized unless subperiosteal dissection of the humerus is performed meticulously
- Axillary nerve: seen in the proximal exposure of the lateral triceps slide
- Surgical approaches to the elbow ( Figs. 2.27 and 2.28)
- Anterior approach to the antecubital fossa
-
Interval: biceps, brachioradialis, and pronator teres (
Fig. 2.29)


--- FIG. 2.28 Internervous planes for lateral approaches to the elbow. From Miller MD et al: Orthopaedic surgical approaches, ed 2, Philadelphia, 2014, Saunders, Figures 3-8 and 3-9.

 FIG. 2.29 Anterior approach to the elbow.
From Miller MD et al:
Orthopaedic surgical approaches,
ed 2, Philadelphia, 2014, Saunders, Figure 3-19.
FIG. 2.29 Anterior approach to the elbow.
From Miller MD et al:
Orthopaedic surgical approaches,
ed 2, Philadelphia, 2014, Saunders, Figure 3-19.
- Dissection
- Curved incision from medial border of biceps transversely across the flexion crease and distally along radial border of brachioradialis
- Avoid 90-degree angle across flexion crease.
- Brachioradialis retracted laterally, pronator teres retracted medially
-
Dissect supinator from radius to expose elbow capsule and anterior radius.

--- FIG. 2.30 Medial approach to the elbow. (A) Superficial exposure. (B) Deep exposure. From Miller MD et al: Orthopaedic surgical approaches,
Philadelphia, 2008, Saunders, Figures EF-23 and EF-26. - Risks
- Multiple veins, including cephalic and basilic vein, anastomose in antecubital fossa.
- Lateral antebrachial cutaneous nerve emerges from beneath the biceps tendon.
- Brachial artery lies directly deep to biceps aponeurosis.
- Recurrent branches of radial artery
- Median nerve most medial major neurovascular structure in antecubital fossa
-
PIN (supinate forearm to protect)
- Medial approach to the elbow (Hotchkiss) ( Fig. 2.30)
- Interval: between the brachialis (musculocutaneous nerve) and triceps (radial nerve) proximally and between the brachialis and pronator teres (median nerve) distally
- Dissection: incise anterior third of the flexor pronator mass to reach the anterior elbow capsule.
- Risks
- Medial antebrachial cutaneous nerves cross field and must be protected.
- Ulnar nerve
- Lateral (Kaplan) approach to the elbow
- Interval: between the ECRB (radial/PIN) and extensor digitorum communis (EDC) (PIN) (Note: uses the same muscular interval as the more distal dorsal Thompson approach.)
-
Dissection: split the anular ligament while
remaining anterior to the LUCL. Pronate the arm to move the PIN anteriorly and radially. - Risks: PIN, lateral ulnar collateral ligament (LUCL)
- Posterolateral (Kocher) approach to the elbow ( Fig. 2.31)
- Interval: between the anconeus (radial nerve) and the origin of the main extensor (extensor carpi ulnaris [ECU], PIN)
- Dissection: pronate the arm to move the PIN anteriorly and radially, and approach the radial head through the proximal supinator fibers.
-
Risks: extending this approach distal to anular ligament increases risk for injury to PIN.
- Proximal extension of lateral approach
- Interval: along lateral intercondylar ridge, between triceps and ECRL (brachioradialis nerve)
- Dissection: subperiosteally expose the anterior humerus and lateral column.
- Risks: retractor placed under brachialis anteriorly to protect radial nerve, distally limited by PIN
- Posterior approach to the elbow
- Interval: none
- Dissection
- Olecranon osteotomy: predrill the olecranon osteotomy (best done with a chevron cut 2 cm distal to the tip), and protect the ulnar nerve ( Fig. 2.32 ).
- Triceps-sparing (Bryan-Morrey): elevate the triceps insertion subperiosteally off the olecranon and retract laterally. Repair triceps mechanism with transosseous sutures.
- Triceps splitting: in an alternative approach, split the triceps and leave the olecranon intact.
- Paratricipital (triceps slide): triceps is elevated off the medial and lateral intermuscular septa so the tendon may be mobilized in either direction to access the humerus. The triceps insertion is undisturbed.
- Risks:
- Ulnar nerve can be injured with dissection or excessive retraction.
- Radial nerve limits the proximal extension along the humerus.
-
Do not divide triceps transversely in the triceps-sparing approach.


 FIG. 2.31 Posterolateral approach to the elbow.
From Miller MD et al:
Orthopaedic surgical approaches,
Philadelphia, 2008, Saunders, Figure EF-32.
FIG. 2.31 Posterolateral approach to the elbow.
From Miller MD et al:
Orthopaedic surgical approaches,
Philadelphia, 2008, Saunders, Figure EF-32.

 FIG. 2.32 Posterior approach to the elbow. (A) Superficial exposure. (B) Deep exposure. An olecranon osteotomy is shown. From Miller MD et al:
Orthopaedic surgical approaches,
Philadelphia, 2008, Saunders, Figures EF-46 and EF-47.
FIG. 2.32 Posterior approach to the elbow. (A) Superficial exposure. (B) Deep exposure. An olecranon osteotomy is shown. From Miller MD et al:
Orthopaedic surgical approaches,
Philadelphia, 2008, Saunders, Figures EF-46 and EF-47.


 FIG. 2.33 Volar approaches to the forearm.
From Miller MD et al:
Orthopaedic surgical approaches,
ed 2, Philadelphia, 2014, Saunders, Figure 3-11.
FIG. 2.33 Volar approaches to the forearm.
From Miller MD et al:
Orthopaedic surgical approaches,
ed 2, Philadelphia, 2014, Saunders, Figure 3-11.
- Surgical approaches to the forearm (Figs. 2.33 and 2.34)
- Anterior (Henry) approach ( Fig. 2.35)
- Interval: between the brachioradialis (radial nerve) and pronator teres proximally or FCR distally (median nerve)
- Dissection
- Proximally: isolate and ligate the leash of Henry (radial artery branches) proximally and strip the supinator from its insertion subperiosteally. Supination of the forearm displaces the PIN ulnarly (i.e., laterally and posteriorly).
- Middle third: pronate forearm and incise the insertion of the pronator teres subperiosteally.
- Distally: dissect off the FPL and PQ.
- Risks
- Superficial branch of the radial nerve must be protected (retract laterally) with the brachioradialis.
- Radial artery is at risk for injury proximally because it courses medial to the biceps tendon and distally with retraction of the brachioradialis.
-
PIN can be injured during deep dissection of proximal exposure (fully
supinate to move laterally). - Posterior (Thompson) approach ( Fig. 2.36)
-
Interval: between ECRB (radial nerve/PIN) and EDC or EPL distally (PIN)

--- FIG. 2.34 Internervous planes for dorsal approaches to the forearm. From Miller MD et al: Orthopaedic surgical approaches, ed 2, Philadelphia, 2014, Saunders, Figure 3-11.

 FIG. 2.35 Anterior (Henry) approach to the forearm.

 FIG. 2.36 Dorsal (posterior [Thompson]) approach to the forearm. (A) Superficial exposure. (B) Deep exposure with the forearm supinated. From Miller MD et al:
Orthopaedic surgical approaches,
FIG. 2.36 Dorsal (posterior [Thompson]) approach to the forearm. (A) Superficial exposure. (B) Deep exposure with the forearm supinated. From Miller MD et al:
Orthopaedic surgical approaches,
Philadelphia, 2008, Saunders, Figures EF-65 and EF-68. - Dissection
- Identify PIN as it exits the supinator before the forearm is supinated and reflect the supinator off the anterior surface of the proximal radius.
- Distally, retract the APL and EPB to gain access to the middle and distal portions of the radius.
- Risks: PIN must be identified and protected.
- Exposure of the ulna (ECU/FCU approach)
- Interval: between the ECU (PIN) and the FCU (ulnar nerve)
- Dissection: strip muscles from the ulna subperiosteally.
- Risks: FCU stripped subperiosteally to protect ulnar nerve and artery
- Surgical approaches to the wrist and hand
- Dorsal approach to the wrist ( Fig. 2.37)
- Interval: between the third and fourth extensor compartments (EPL and extensor digitorum)
- Dissection
- Incise the extensor retinaculum between the third and fourth compartments.
- Protect and retract these tendons to allow access to the distal radius and the dorsal radiocarpal joint.
- Transpose the EPL and incise the dorsal capsule.
- Risks: do not violate the interosseous scapholunate ligament.
- Carpal tunnel release
-
Incision is usually made in line with the fourth ray to avoid the palmar cutaneous branch of the median nerve.


--- FIG. 2.37 Dorsal surgical approach to the wrist. (A) Superficial exposure. (B) Deep exposure. From Miller MD et al: Orthopaedic surgical approaches,
Philadelphia, 2008, Saunders, Figures HW-13 and HW-14. - Dissection through the TCL must be performed carefully to avoid injury to median nerve or its motor branch.
- Volar (Russé) approach to the scaphoid
- Interval: between FCR and radial artery
- An approach through the radial aspect of the FCR sheath: often easier and protects the radial artery
- Dorsolateral approach to the scaphoid
- Using an incision within the anatomic snuffbox (first and third dorsal wrist compartments) helps protect the superficial radial nerve and radial artery (deep).
- Volar approach to the flexor tendons (Bunnell)
- Zigzag incisions across the flexor creases help to expose the flexor sheaths.
- Digital sheaths should be avoided.
- Midlateral approach to the digits
- Good for stabilization of fractures and neurovascular exposure
- Requires a laterally placed incision at the dorsal extent of the interphalangeal creases
- Exposure of the digital neurovascular bundle: volar to the incision
-
Cross-sectional diagrams of the upper extremity with MRI are demonstrated in
Figs. 2.38
through
2.42.


 FIG. 2.38 Muscles of the scapula and glenohumeral joint.
From Drake RL et al, editors:
Gray’s atlas of anatomy,
ed 2, Philadelphia, 2015, Churchill Livingstone.
FIG. 2.38 Muscles of the scapula and glenohumeral joint.
From Drake RL et al, editors:
Gray’s atlas of anatomy,
ed 2, Philadelphia, 2015, Churchill Livingstone.


--- FIG. 2.39 Illustration (A) and imaging (B) of cross-sectional anatomy of the arm. From Drake RL et al, editors: Gray’s atlas of anatomy, ed 2, Philadelphia, 2015, Churchill Livingstone.


--- FIG. 2.40 Illustration (A) and imaging (B) of cross-sectional anatomy of the forearm. From Drake RL et al, editors: Gray’s atlas of anatomy, ed 2, Philadelphia, 2015, Churchill Livingstone.


 FIG. 2.41 Imaging of carpal region anatomy.
From Drake RL et al, editors:
Gray’s atlas of anatomy,
ed 2, Philadelphia, 2015, Churchill Livingstone.
FIG. 2.41 Imaging of carpal region anatomy.
From Drake RL et al, editors:
Gray’s atlas of anatomy,
ed 2, Philadelphia, 2015, Churchill Livingstone.

--- FIG. 2.42 Imaging of the anatomy of the hand.
From Drake RL et al, editors: Gray’s atlas of anatomy, ed 2, Philadelphia, 2015, Churchill Livingstone.
🔗 Read the comprehensive guide:
Why the Anterior Approach for Total Hip is Gaining Popularity
You Might Also Like

Medically Verified Content by
Prof. Dr. Mohammed Hutaif
Consultant Orthopedic & Spine Surgeon