FDL and FHL Transfer to the Tarsal Navicular: A Comprehensive Surgical Guide
Key Takeaway
The transfer of the flexor digitorum longus (FDL) or flexor hallucis longus (FHL) to the tarsal navicular is a cornerstone procedure for reconstructing posterior tibial tendon insufficiency. While the FHL possesses superior strength, the FDL is frequently preferred due to its advantageous anatomical vector. Successful outcomes require combining the tendon transfer with corrective bony osteotomies to address the underlying flatfoot deformity and restore medial column integrity.
Introduction and Biomechanical Rationale
The posterior tibial tendon (PTT) is the primary dynamic stabilizer of the medial longitudinal arch and the principal invertor of the midfoot. Insufficiency of this musculotendinous unit leads to Adult Acquired Flatfoot Deformity (AAFD), increasingly referred to as Progressive Collapsing Foot Deformity (PCFD). When the PTT fails, secondary static stabilizers—including the spring ligament complex, plantar fascia, and deltoid ligament—are subjected to unphysiologic loads, ultimately leading to progressive attenuation and structural collapse.
Reconstruction of the medial column soft tissues frequently necessitates the transfer of either the flexor digitorum longus (FDL) or the flexor hallucis longus (FHL) to the tarsal navicular.
FDL versus FHL: Tendon Selection
While the FHL muscle belly possesses superior physiological cross-sectional area and strength characteristics compared to the FDL (more closely approximating the native strength of the posterior tibial muscle), seminal biomechanical studies by Wapner et al. demonstrated that the FDL is often the more appropriate choice for reconstruction.
The FDL is favored for several critical reasons:
* Anatomical Proximity: The FDL lies immediately adjacent to the PTT, providing an optimal vector of pull that closely mimics the native PTT without requiring complex rerouting.
* Donor Site Morbidity: Harvesting the FHL can lead to functional deficits in the hallux, particularly in push-off strength during the terminal stance phase of gait. FDL harvest relies on the robust tendinous cross-slips (the chiasma plantare) at the Master Knot of Henry, which preserves lesser toe flexion via the intact FHL.
* Excursion Match: The FDL provides an excellent excursion match for the PTT, allowing for appropriate tensioning and synergistic phase firing during the gait cycle.
Nonoperative Management: The Role of Structured Rehabilitation
Before considering surgical intervention, a rigorous, structured physical therapy program is mandatory for patients with flexible deformities. A well-designed conservative protocol can frequently obviate the need for surgery.
Alvarez et al. demonstrated highly successful outcomes using a specific rehabilitation protocol. In their cohort, after a median of 10 physical therapy visits over a 4-month period, 83% of patients achieved successful subjective and functional outcomes, with an 89% overall satisfaction rate.
The Alvarez Rehabilitation Protocol
Clinical Pearl: The success of conservative management hinges on aggressive strengthening rather than mere immobilization. Passive modalities alone are insufficient for PTT tendinopathy.
The evidence-based conservative protocol includes:
* Orthotic Management: Utilization of a short, articulated ankle-foot orthosis (AFO) or a custom-molded rigid foot orthosis to mechanically support the medial longitudinal arch and unload the PTT.
* High-Repetition Isokinetics: High-repetition, low-resistance exercises targeting the posterior tibialis.
* Aggressive Plantar Flexion: Concentric and eccentric loading of the gastrocsoleus complex and deep posterior compartment.
* Home Exercise Program (HEP): An aggressive, high-repetition daily HEP that heavily emphasizes gastrocsoleus tendon stretching to counteract the equinus contracture that universally accompanies and exacerbates flatfoot deformity.
Surgical Indications and Preoperative Planning
Surgical reconstruction is strictly indicated for patients in whom conservative management fails to provide acceptable pain relief or functional improvement, typically classified as Stage II AAFD (flexible deformity).
The Fallacy of Isolated Soft Tissue Reconstruction
Initial historical enthusiasm for the isolated transfer of the FDL tendon to the navicular—with or without side-to-side augmentation using a remnant of the PTT—has completely waned. Long-term literature unequivocally reports the deterioration of results over time if the underlying flatfoot deformity is not simultaneously corrected. The transferred FDL is only approximately 30% as strong as the native PTT; it will inevitably stretch out and fail if subjected to the uncorrected biomechanical forces of a valgus hindfoot and abducted forefoot.
Therefore, reconstruction of the tendinous portion of the pathological process must be paired with corrective bony procedures.
Adjunctive Corrective Procedures
To protect the tendon transfer, the surgeon must address the structural deformity through:
* Medializing Calcaneal Osteotomy (MCO): Medial displacement of the calcaneal tuberosity restores the mechanical axis of the hindfoot, shifting the Achilles tendon vector from a valgus-deforming force to an invertor force.
* Lateral Column Lengthening (LCL): Achieved via an Evans osteotomy (between the anterior and middle facets of the subtalar joint) or a distraction arthrodesis of the calcaneocuboid joint. This corrects forefoot abduction and restores the talonavicular coverage angle.
* Medial Column Stabilization: Repair of the spring ligament, arthrodesis of hypermobile midfoot joints (e.g., naviculocuneiform), or a plantarflexion opening wedge medial cuneiform osteotomy (Cotton procedure) to correct forefoot supination.
Evaluation of the Posterior Tibial Tendon and Muscle
Intraoperative decision-making regarding the native PTT is critical. The surgeon must meticulously evaluate the posterior tibial muscle belly and the macroscopic quality of the tendon.
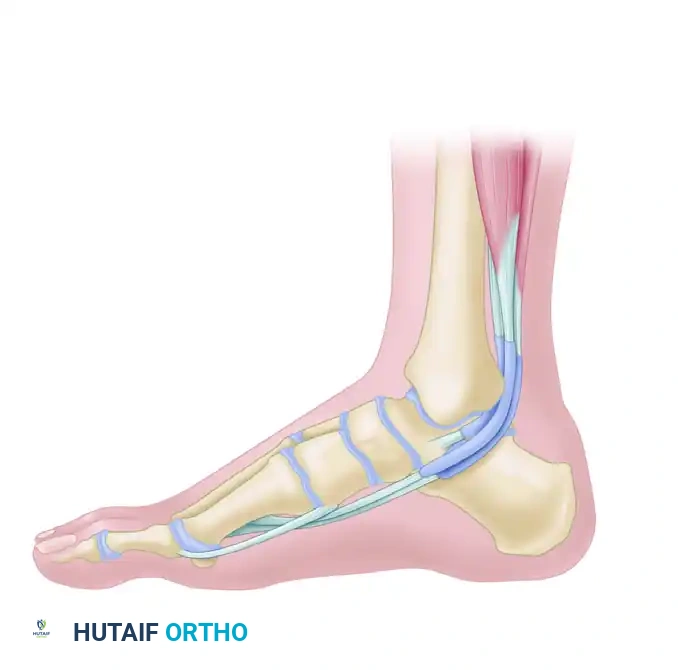
FIGURE 82-22 Complete rupture of posterior tibial tendon with proximal tendon ending within hypertrophied synovium. Once synovium was excised, complete rupture of posterior tibial tendon with healing by thin strand of scar in continuity was evident. Toes are to right.
- Inelastic and Non-Contractile Muscle: In long-standing disease, the posterior tibial muscle undergoes fatty infiltration, becomes inelastic, loses its normal healthy red color, and fails to contract when stimulated with electrocautery. In this scenario, it is inadvisable to supplement the FDL tendon with the remnant of the PTT. The diseased tendon should be excised, and the muscle stump discarded.
- Viable Muscle: If the muscle belly appears normal and contractile, resection of the entirely diseased segment of the PTT is performed. The healthy proximal stump of the PTT is then incorporated into the reconstruction using a side-to-side Pulvertaft weave with the transferred FDL tendon.
Surgical Anatomy and Positioning
The patient is positioned supine with a bump under the ipsilateral hip to allow neutral rotation of the leg. A thigh tourniquet is applied.
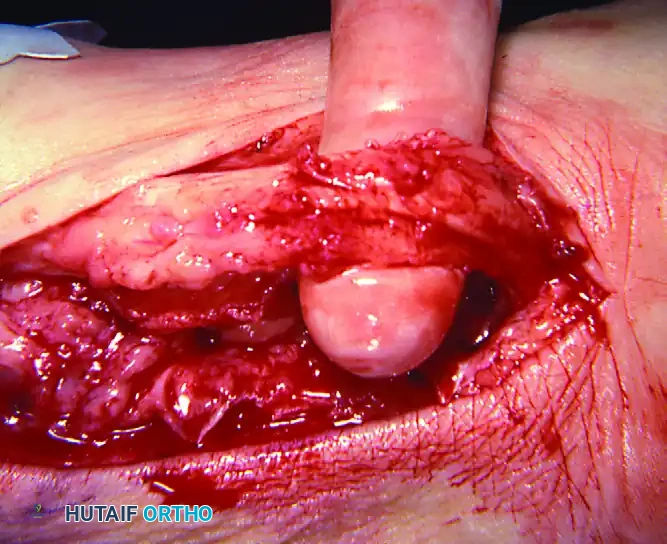
FIGURE 82-21 Technique for tendon transfer. Incision starts just behind musculotendinous border of posterior tibial tendon and courses behind medial malleolus to base of first metatarsal medially.
The primary incision is a medial utility incision. It begins just posterior to the musculotendinous junction of the PTT, courses distally behind the medial malleolus, and extends to the base of the first metatarsal medially. This provides expansile access to the PTT, the navicular, the Master Knot of Henry, and the medial cuneiform.
Step-by-Step Surgical Technique
1. Exposure and Assessment of the PTT
- Incise the flexor retinaculum (laciniate ligament) to open the tendon sheath of the PTT.
- Inspect the tendon. It may present as a flimsy scar in continuity, a hypertrophied mass of tenosynovitis, or a dense, solid band of scar.
- Free the tendon from its bed. Apply sustained, slow tension.
- If the posterior tibial muscle-tendon unit has no excursion (which is common in long-standing deformity), cut it short proximally and discard the diseased segment.
- Rarely, if the tendon regains sufficient length and the muscle is viable, it can be advanced and sutured to the undersurface of the navicular or woven into the FDL transfer.
2. Harvesting the Flexor Digitorum Longus
- Expose the FDL and FHL at the Master Knot of Henry, located plantar and lateral to the tuberosity of the navicular.
- Dissect along the superior border of the abductor hallucis muscle, retracting it plantarward.
> Surgical Warning: The branches of the medial plantar neurovascular bundle lie directly along the path of this deep dissection, approximately 2 cm lateral to the distal edge of the navicular. Dissection here must be blunt and meticulous. The distance from the medial incision to these deep plantar tendons is surprisingly great. - Use a right-angle smooth retractor to pull the intrinsic muscles plantarward.
- Identify the crossing of the tendons: The FHL crosses dorsal to the FDL.
- Sever the FDL tendon as distally as possible while passively flexing the lesser toes.
- Because of the strong tendinous cross-ties (chiasma plantare) between the FHL and FDL, the patient will retain active plantar flexion of the lesser toes via the intact FHL muscle-tendon unit.
- Rerouting the transferred FDL tendon through the native pulley of the PTT is unnecessary and may create unwanted friction.
3. Preparation of the Tarsal Navicular
- Identify the medial tuberosity and the central body of the tarsal navicular.
- Using successively larger drill bits (starting at 1/8 inch and progressing to 5/16 inch, or utilizing a cannulated reamer system), drill a bone tunnel perpendicular to the navicular in its midportion.
- Crucial Trajectory: The drill must pass from dorsal to plantar. Dissecting dorsally and plantarward to expose the exact midportion of the bone requires patience.
> Pitfall: Do not stop short and drill too medially. Leaving insufficient bony support on the medial cortex will cause the drill (or the tensioned tendon) to crack through the medial wall of the navicular, compromising fixation.
4. Tendon Passage and Fixation
- Prepare the distal 1.0 to 1.5 cm of the harvested FDL tendon by weaving a #0 or 2-0 nonabsorbable suture (e.g., FiberWire or Ethibond) using a Krackow or locking whipstitch technique.
- Pass a straight hemostat or a wire tendon passer with a loop through the navicular tunnel from dorsal to plantar.
- Grasp the suture ends and pull the FDL tendon up through the hole from plantar to dorsal until all slack is eliminated. Passing the tendon plantar-to-dorsal creates a supportive "sling" under the medial column.
- Place the foot in maximal equinovarus (plantarflexion and inversion) to take tension off the medial column.
- Pull the tendon maximally taut.
- Fixation Options:
- Suture Fixation: Using a small, free-cutting needle, suture the tendon directly to the adjacent dorsal periosteum and deep fascia. The foot should remain in the equinovarus position when relaxed.
- Interference Fixation: As described by Wukich et al., a biotenodesis or PEEK interference screw (typically 4.75 mm to 5.5 mm, matched to the tendon diameter) can be inserted into the dorsal tunnel to rigidly anchor the tendon, providing superior biomechanical pull-out strength compared to suture alone.
- If the native PTT muscle is viable, advance the proximal stump and suture it to the transferred FDL tendon under resting tension.
5. Adjunctive Lateral Balancing: Peroneus Longus to Brevis Tenodesis
In cases where a severe forefoot valgus or a rigidly plantarflexed first ray is present (often exacerbating the collapse of the medial arch), an adjunctive release of the peroneus longus with transfer to the peroneus brevis may be indicated to remove the deforming plantarflexion force on the medial column.
- Make a longitudinal incision over the distal fibula, beginning 6 to 8 cm proximal to the tip of the lateral malleolus.
- Identify the peroneus longus and section it just proximal to the superior peroneal retinaculum.
- Tenodese the proximal stump of the peroneus longus to the adjacent peroneus brevis tendon using nonabsorbable sutures.
- Make a separate 3-cm longitudinal incision along the plantar-lateral aspect of the foot, extending from the base of the fifth metatarsal proximally toward the cuboid tunnel.
- Release the distal attachments of the peroneus longus at the cuboid tunnel.
- Through the primary medial incision, use a right-angle clamp to hook around the distal peroneus longus tendon near its insertion site at the base of the first metatarsal and medial cuneiform. Deliver it gently through the medial incision, leaving its insertion intact to act as a stabilizing medial force if routed appropriately, or simply release it to decompress the first ray.
Postoperative Rehabilitation Protocol
Strict adherence to the postoperative immobilization protocol is vital to prevent elongation or rupture of the tendon transfer and to allow bony osteotomies to achieve clinical union.
- Immediate Postoperative Phase (Weeks 0-2): While holding the foot in strict equinovarus, apply a bulky, sterile compressive dressing and a rigid short-leg cast (or posterior splint). The patient is strictly non-weight-bearing (NWB).
- First Cast Change (Days 12-16): The initial cast is removed, sutures are extracted, and wound healing is assessed. A new short-leg cast is applied, maintaining the foot in equinovarus to protect the tendon transfer. NWB status continues.
- Weeks 4-6: The foot is gradually brought out of equinovarus and raised to a neutral position (0 degrees of dorsiflexion, neutral inversion/eversion) via serial casting. The patient remains NWB to protect the calcaneal osteotomies.
- Weeks 6-10: At the 6-week mark, radiographic union of the osteotomies is assessed. If callus formation is adequate, the patient is transitioned to a short-leg walking cast or a rigid controlled ankle motion (CAM) boot. Progressive weight-bearing is initiated.
- Weeks 10 and Beyond: The cast or boot is discontinued. The patient is transitioned to supportive athletic footwear equipped with a custom-molded medial arch support or an articulated AFO. Formal physical therapy is initiated, focusing on progressive resistance exercises, proprioceptive training, and gait retraining. Maximal medical improvement is typically achieved between 9 and 12 months postoperatively.
You Might Also Like
