Advanced Anterior Cruciate Ligament Reconstruction: Hamstring Autograft and Allograft Principles
Key Takeaway
Anterior cruciate ligament (ACL) reconstruction using hamstring autografts requires meticulous graft harvesting, precise tunnel placement, and rigid fixation to restore knee biomechanics. This comprehensive surgical guide details the proximal release technique for semitendinosus and gracilis tendons, optimal femoral and tibial tunnel drilling, and advanced fixation strategies. It also evaluates the indications and biological integration of synthetic ligaments and collagen allografts in complex or revision instability cases.
INTRODUCTION TO ANTERIOR CRUCIATE LIGAMENT RECONSTRUCTION
Anterior cruciate ligament (ACL) reconstruction remains one of the most frequently performed procedures in orthopedic sports medicine. The primary goal is to restore the native kinematics of the knee, providing a stable joint that allows athletes and active individuals to return to their pre-injury levels of function. Among the various graft choices available, the quadrupled hamstring autograft (semitendinosus and gracilis) has gained immense popularity due to its high ultimate tensile strength, stiffness profile comparable to the native ACL, and lower donor-site morbidity compared to bone-patellar tendon-bone (BPTB) autografts.
This comprehensive guide details the surgical technique for ACL reconstruction using a hamstring autograft with a proximal release technique, alongside an evidence-based evaluation of synthetic materials and allograft alternatives for complex or revision scenarios.
SURGICAL TECHNIQUE: HAMSTRING AUTOGRAFT WITH PROXIMAL RELEASE
Patient Positioning and Initial Exposure
Proper patient positioning is critical for optimal visualization and unobstructed manipulation of surgical instruments. The patient is placed supine on the operating table with a lateral post or leg holder applied to the proximal thigh, allowing the knee to be manipulated freely through a full range of motion (0 to 120 degrees). A well-padded tourniquet is applied proximally.
- Make a medial parapatellar incision beginning just above the level of the superior pole of the patella.
- Extend the incision approximately 8 cm distal to the joint line, terminating near the tibial insertion of the pes anserinus tendon.
- Perform a standard anteromedial arthrotomy. Before proceeding with the reconstruction, systematically evaluate the joint and treat any concurrent intraarticular pathology, such as meniscal tears or chondral defects.
Hamstring Tendon Harvest
Identifying and harvesting the hamstring tendons requires a thorough understanding of the posteromedial knee anatomy.
- Identify the semitendinosus tendon at the posteromedial aspect of the pes anserinus. Anatomically, the semitendinosus is the lowermost (distal) component of the pes anserinus group.
- Locate the gracilis tendon, which runs immediately proximal to the semitendinosus.
- The insertion of the semitendinosus can be definitively identified by its characteristic Y-shaped insertion onto the anteromedial tibia and the tibial crest, where it frequently blends into the deep fascia of the calf.
🔪 Surgical Warning: Saphenous Nerve Injury
Extreme care must be taken during the dissection of the pes anserinus to avoid iatrogenic injury to the sartorial branch of the saphenous nerve and the adjacent saphenous vein. Neuroma formation or numbness in the anteromedial leg is a common complication if this nerve is transected.
Proximal Release and Tendon Stripping
The proximal release technique is utilized to maximize graft length and ensure a smooth harvest.
- Release the proximal portion of the semitendinosus and gracilis tendons, along with the surrounding fascia, from their musculotendinous junctions. This can be achieved using blunt dissection, sharp dissection, or a specialized tendon stripper.
- Critical Step: If a closed tendon stripper is used, you must meticulously release all fascial attachments (vincula) connecting the tendons to the medial head of the gastrocnemius and the semimembranosus.
- Without releasing these fascial bands, the tendon stripper will deviate from the tendon path and prematurely transect the graft, resulting in an excessively short, unusable construct.
- After the successful release of the tendons, allow the muscle bellies to retract proximally.
- Deliver both tendons through the distal portion of the medial parapatellar incision, initially leaving their tibial insertions intact.
- If a free tendon graft is preferred (which is the modern standard for suspensory or interference fixation), carefully dissect the tendons completely off their tibial attachment sites. By including the periosteum of the tibial crest at the insertion site, an additional 1 to 2 cm of graft length can be harvested.
Graft Preparation
A robust, well-tensioned graft is the foundation of a successful reconstruction.
- Free the harvested tendons from any remaining adherent muscle tissue using a blunt elevator or the back of a scalpel blade.
- Suture the two tendons to each other under tension using a 2-0 absorbable suture to create a unified complex.
- Weave a Bunnell stitch (or Krackow stitch) using No. 2 nonabsorbable suture material into the free ends of all four strands.
- Place the tendons on a commercially available graft tensioning board. Ensure all four strands are placed under equal, uniform tension to prevent unequal load-sharing postoperatively.
- Measure the final diameter of the doubled-over construct using a sizing block. Most quadrupled hamstring constructs measure between 7.0 and 8.0 mm in diameter. The tibial and femoral drill holes must precisely match this diameter.
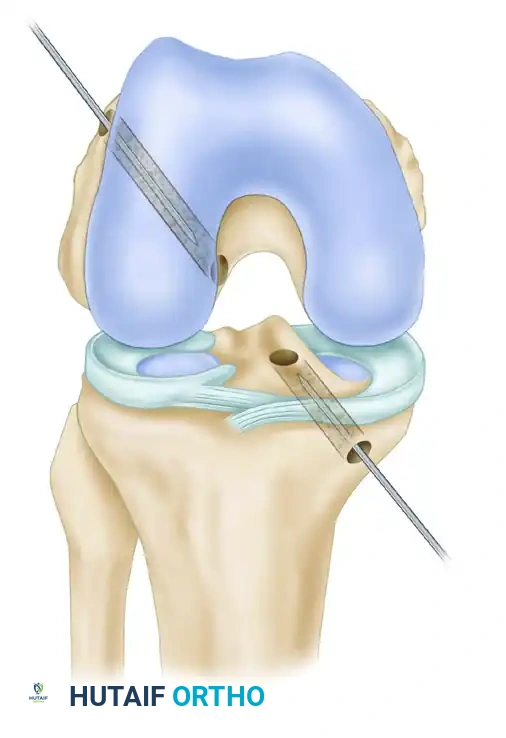
Tibial Tunnel Preparation
The placement of the tibial tunnel dictates the sagittal and coronal orientation of the graft, heavily influencing postoperative kinematics and preventing roof impingement.
- Wrap the tendons deep to the remaining sartorius tendon to the anteromedial flare of the tibia, approximately 3.5 to 4.0 cm below the joint line.
- Insert a tibial guide pin at this location. Direct it proximally and medially to enter the joint precisely at the anatomical footprint of the native ACL.
- Use a cannulated reamer to create the tibial tunnel over the guide pin.
- Biomechanical Pearl: Research indicates that tibial tunnel fixation is significantly improved if the tunnel is initially reamed 2 mm smaller than the graft diameter and subsequently dilated to the final size. Ream the external tibial cortex to the exact diameter of the construct, but ream the cancellous medullary canal 2 mm smaller. Passing dilators through the external cortex compacts the cancellous bone, dramatically increasing the pull-out strength of the tibial interference screw.
Femoral Tunnel Preparation
Femoral fixation can be achieved via a two-incision (rear-entry/outside-in) technique or a single-incision (transtibial or anteromedial portal) technique.
Option A: Two-Incision Technique (Outside-In)
- Make a longitudinal lateral skin incision over the lateral femoral epicondyle.
- Split the fascia lata in line with the incision and reflect the vastus lateralis anteriorly off the lateral intermuscular septum.
- Direct a guide pin from outside-in to emerge in the intercondylar notch at the anatomical femoral footprint of the ACL.
- Ream the lateral femoral condyle with a cannulated reamer.
- Pull the hamstring tendons through the tunnel. Secure them with multiple sutures tied over a bone bridge, a staple, or around a screw post in the lateral epicondylar area.
Option B: Single-Incision Transtibial Technique
- Place the knee in 70 to 90 degrees of flexion.
- Pass a Beath pin through the tibial tunnel, across the joint, into the femur, and out through the anterolateral thigh.
- Ream the femur using a cannulated acorn-type reamer to minimize the risk of injury to the posterior cruciate ligament (PCL).
- Positioning: The femoral tunnel should leave a 1.5 to 2.0 mm posterior cortical wall to prevent posterior blowout. On a clock face, the tunnel should be positioned at 1 to 2 o'clock for a left knee, and 10 to 11 o'clock for a right knee.
- The depth of the femoral socket should be at least 2 cm. Because the bone of the distal femur is significantly denser than the proximal tibial metaphysis, dilating the femoral tunnel is generally unnecessary.
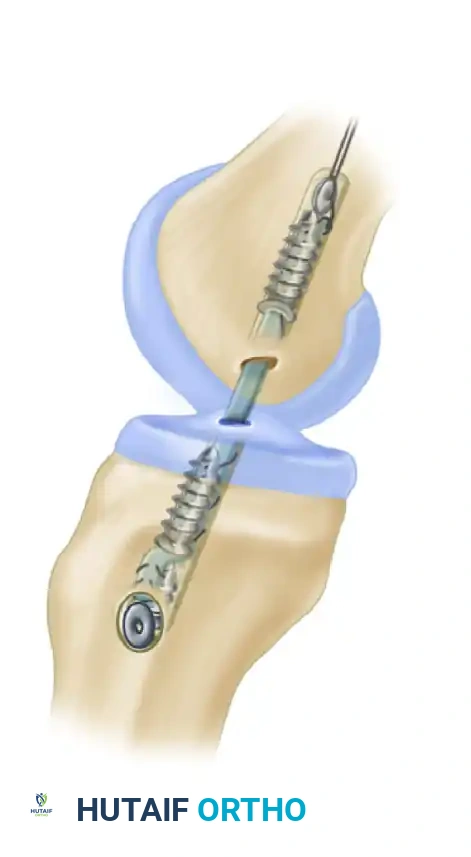
Graft Passage and Fixation
- Mark the hamstring construct with indelible ink exactly 2 cm from the leading tip. This provides visual confirmation during arthroscopy that adequate graft tissue has been seated into the femoral tunnel.
- Bring the tendons through the tibial tunnel and into the interior of the joint, advancing them into the femoral socket.
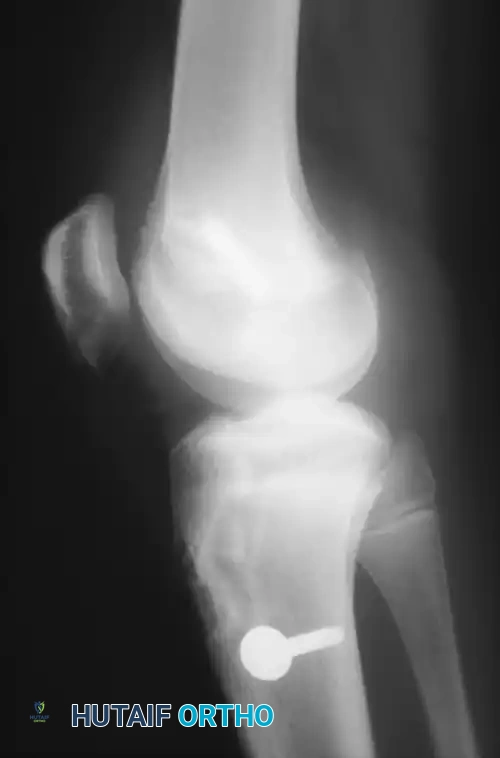
- Femoral Fixation: Secure the construct using an interference screw, a suspensory cortical button (e.g., EndoButton), or a transfixion pin.
- Tibial Fixation: Apply maximal manual tension to the graft with the knee in full extension (or slight flexion, depending on surgeon preference). Choose a bioabsorbable or titanium interference screw that is at least 1 mm larger than the diameter of the tunnel and the graft.
💡 Clinical Pearl: Interference Screw Placement
Placement of the tibial interference screw near the subchondral surface of the tibia minimizes the "windshield wiper" effect and longitudinal graft pistoning within the tunnel. However, maintaining contact between the interference screw and the dense external tibial cortex provides superior initial pull-out strength. Modern systems often utilize screws designed to achieve fixation both proximally and distally.
POSTOPERATIVE CARE AND REHABILITATION
Immediately postoperatively, the knee is placed in a controlled-motion hinged brace locked in full extension to protect the graft from premature elongation.
- Protected range-of-motion (ROM) exercises are initiated immediately to prevent arthrofibrosis and stimulate collagen remodeling.
- Weight-bearing status is typically dictated by concurrent procedures (e.g., meniscal repair), but isolated ACL reconstructions often allow early progressive weight-bearing.
- Closed kinetic chain exercises are prioritized in the early phases to minimize anterior shear forces on the newly reconstructed ligament.
COMBINED ANTERIOR CRUCIATE LIGAMENT INSTABILITIES
In patients presenting with mild to moderate (1+ to 2+) rotary instability under anesthesia, reconstructing only the primary restraint (the ACL) is usually sufficient, as the knee's dynamic stabilizers will compensate for minor secondary capsular deficiencies.
However, in patients with severe (3+ or 4+) anterolateral rotary instability or a high-grade pivot shift, isolated ACL reconstruction may fail due to excessive strain on the graft. In these complex cases, surgeons must address the secondary restraints. This is achieved by adding:
- Capsular Reefing: Such as posterior oblique ligament reconstruction.
- Extra-articular Substitution: Techniques such as an iliotibial band (ITB) tenodesis or Anterolateral Ligament (ALL) reconstruction. These procedures act as a lateral tether, significantly reducing internal tibial rotation and protecting the intra-articular graft during the critical healing phases.
SYNTHETIC MATERIALS FOR LIGAMENT RECONSTRUCTION
The allure of an off-the-shelf artificial ligament—eliminating donor site morbidity and allowing immediate, aggressive rehabilitation—has driven decades of research. However, the clinical reality of synthetic ACL grafts has been largely disappointing.
Artificial ligaments are categorized into three functional types:
1. Prosthetic Ligaments: Implanted as a permanent, standalone replacement for the native ACL.
2. Stents: Used temporarily to protect or augment a healing autogenous graft (e.g., ligament augmentation devices).
3. Scaffolds: Open-weave structures designed to provide initial mechanical support while stimulating the ingrowth of host collagenous tissue.
Clinical Outcomes of Synthetics
While several materials possess adequate initial tensile strength and biocompatibility, they universally fail to replicate the complex viscoelastic, physiological, and biomechanical characteristics of a living ACL. Over time, synthetic fibers succumb to fatigue failure, creep, and abrasive wear against the bony tunnels, frequently leading to catastrophic rupture and severe reactive synovitis.
Scaffolds, such as the polyester Leeds-Keio prosthesis, rely on an open-weave tube to promote fibrous ingrowth. Although theoretically sound, histological evidence regarding the quality of host tissue ingrowth is conflicting. Most long-term reports indicate unsatisfactory functional results, confirming that the Leeds-Keio device is not an effective primary reconstruction option.
Current Consensus: No long-term studies support the routine use of artificial ligaments. They should be used with extreme caution and strictly reserved for complex salvage procedures where all autogenous and allograft options have been exhausted.
ALLOGRAFT LIGAMENT REPLACEMENT
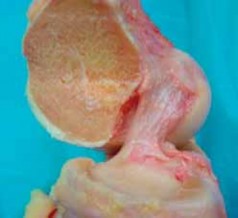
Collagen allografts theoretically fulfill many requirements of the ideal ligament substitute: they are readily available, offer unlimited length and diameter, eliminate donor-site morbidity, and reduce operative tourniquet times. Over the past two decades, free allografts (such as Achilles, tibialis anterior, and BPTB) have become a staple in revision settings and for older, less active patients.
The Biology of Allograft Incorporation
Both autografts and allografts undergo a complex, four-stage biological process after transplantation, known as ligamentization:
1. Necrosis: The cellular components of the graft die due to ischemia.
2. Revascularization: Host vessels invade the collagen scaffold from the infrapatellar fat pad and synovium.
3. Cellular Proliferation: Host fibroblasts migrate into the graft and begin synthesizing new extracellular matrix.
4. Remodeling: The collagen matrix is reorganized. Large-diameter fibers are gradually converted into smaller fibers, mimicking the native ACL structure.
Biomechanical Implications: After complete incorporation, neither autografts nor allografts return to 100% of their original pre-implantation strength. Most biomechanical studies demonstrate that ultimate load strength plateaus at 30% to 40% of the native tissue. Because of this consistent biological degradation, surgeons must utilize grafts that begin with more than 100% of the native ACL's strength (such as a thick quadrupled hamstring or a robust Achilles allograft) to ensure the final remodeled construct is mechanically sufficient.
Immunogenicity and Sterilization
Early hypotheses suggested that transplanting grafts with viable cells would enhance incorporation. This proved incorrect; preserving a vascular pedicle or viable cells offers no clinical benefit and actually provokes a host immune response.
The immunoreactivity of an allograft is driven almost entirely by its cellular components (MHC antigens), not the extracellular collagen scaffold.
- Freezing and Thawing: This standard pretreatment effectively neutralizes immunological antigens by lysing the donor fibroblasts.
- Sterilization Effects: Freeze-drying reduces the immune response more effectively than fresh-freezing, though it may alter the biomechanical properties of the collagen. Conversely, cryopreservation techniques that attempt to preserve cellularity evoke a stronger immunological response.
Clinical studies have demonstrated elevated antibody titers locally within the joint (rather than systemically) following fresh-frozen allograft reconstruction. This localized graft-versus-host reaction likely accounts for the delayed biological incorporation and revascularization seen in allografts compared to autografts. Consequently, rehabilitation protocols for allograft reconstructions are often advanced more conservatively to protect the graft during its prolonged vulnerable phase.
CONCLUSION
Anterior cruciate ligament reconstruction demands surgical precision, a deep understanding of knee biomechanics, and careful patient-specific graft selection. While the quadrupled hamstring autograft remains a gold standard due to its strength and biological compatibility, allografts provide an invaluable alternative in revision surgery or multi-ligamentous injuries. Regardless of the graft chosen, meticulous tunnel placement, rigid fixation, and a structured, biologically respectful rehabilitation protocol are the cornerstones of a successful clinical outcome.
===CONTENT_END===
You Might Also Like