INTRODUCTION TO THE GROIN PEDICLE FLAP
The groin pedicle flap, historically popularized by McGregor as the iliofemoral flap, represents a foundational pillar in the reconstructive surgery of the upper extremity. Before its landmark description as a successful free flap by Daniel and Taylor in 1973, it was the premier axial pattern flap utilized for the salvage of complex hand and forearm defects. Today, despite the advent of microsurgical free tissue transfer, the pedicled groin flap remains an indispensable tool in the armamentarium of the reconstructive orthopedic surgeon.
It is particularly valuable in scenarios where free tissue transfer is contraindicated, such as in patients with severe peripheral vascular disease, extensive zone of injury precluding local recipient vessels, or in institutions where microsurgical expertise is unavailable. The flap provides a robust, reliable, and potentially massive volume of fasciocutaneous tissue capable of covering extensive composite defects of the upper extremity.
Advantages of the Groin Flap
The enduring utility of the groin pedicle flap is attributed to several distinct anatomical and physiological advantages:
* Favorable Donor Site: The inguinal region is generally sparse in hair, making it ideal for glabrous skin reconstruction on the hand.
* Minimal Donor Site Morbidity: The donor defect can frequently be closed primarily, leaving a well-hidden scar within the "bikini line."
* Robust Vascularity: It possesses a multiple arteriovenous supply, ensuring excellent hemodynamic reliability.
* Composite Potential: There is a well-documented potential for incorporating a segment of the iliac crest to create an osteocutaneous pedicle flap for simultaneous bone and soft tissue reconstruction.
* Large Surface Area: The flap can be harvested in exceptionally large dimensions, reliably supporting tissue territories far beyond standard random-pattern flaps.
Disadvantages and Limitations
Despite its versatility, the surgeon must carefully weigh the inherent limitations of the groin flap:
* Color and Texture Mismatch: The skin of the groin may exhibit hyperpigmentation and a different texture compared to the native skin of the hand or forearm.
* Previous Surgical Scars: Prior inguinal surgery (e.g., herniorrhaphy, appendectomy, or vascular bypass) may have compromised the superficial circumflex iliac vessels, rendering the flap non-viable.
* Flap Thickness: In obese patients, the subcutaneous adipose layer in the groin can be excessively thick, requiring secondary debulking procedures to achieve an acceptable functional and aesthetic contour on the hand.
* Immobilization: The patient must tolerate 3 to 4 weeks of dependent arm immobilization attached to the groin, which can lead to shoulder and elbow stiffness.
SURGICAL ANATOMY AND VASCULAR BASIS
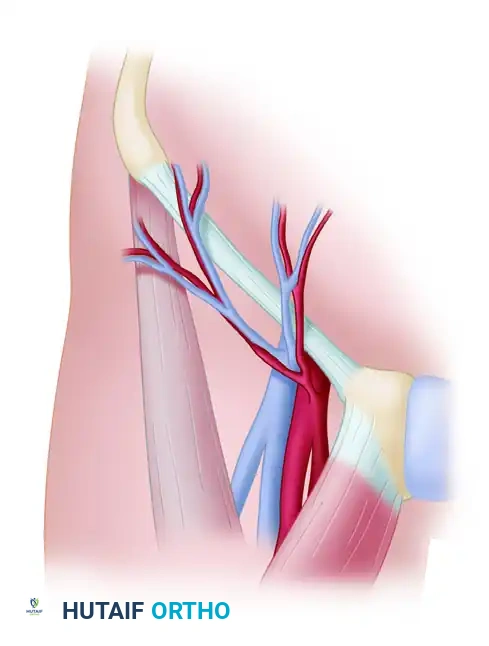
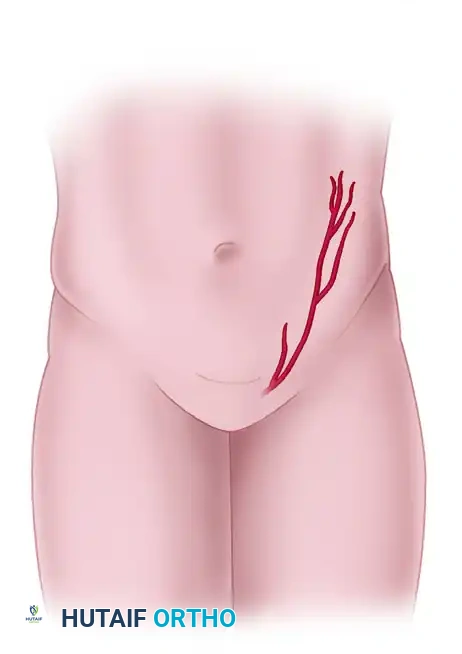
A profound understanding of the inguinal vascular anatomy is the cornerstone of a successful groin flap elevation. The flap is an axial pattern fasciocutaneous flap, primarily dependent on the superficial circumflex iliac artery (SCIA).
Arterial Supply
The SCIA typically originates directly from the femoral artery, approximately 2 to 3 cm distal to the inguinal ligament. It courses laterally and slightly superiorly, running parallel to the inguinal ligament toward the anterior superior iliac spine (ASIS).
As the SCIA reaches the medial border of the sartorius muscle, it frequently bifurcates into a superficial and a deep branch.
* The Superficial Branch: Pierces the deep fascia to arborize within the subcutaneous fat and subdermal plexus.
* The Deep Branch: Travels deep to the deep fascia of the sartorius before piercing it more laterally to supply the overlying skin.
Surgical Warning: Dissection medial to the medial border of the sartorius places the main trunk of the SCIA at extreme risk. The deep branch must often be divided if dissection proceeds medial to this landmark, which can compromise the flap's axial supply.
Venous Drainage
Venous outflow is equally critical to prevent flap congestion and subsequent necrosis. The groin flap is drained by a dual venous system:
1. Superficial Venous System: The superficial circumflex iliac vein (SCIV) and the superficial inferior epigastric vein (SIEV) drain into the saphenous bulb.
2. Deep Venous System: Venae comitantes accompany the SCIA and drain directly into the femoral vein.
Preservation of the superficial venous network during the initial medial dissection is paramount, as it provides the primary outflow tract for the flap.
PREOPERATIVE PLANNING AND TEMPLATING
Meticulous preoperative planning minimizes the risk of pedicle torsion and ensures adequate coverage of the recipient defect without excessive tension.
Vascular Mapping
- Doppler Examination: Use a handheld acoustic Doppler probe to identify and trace the course of the SCIA. The central axis of the flap is typically located about 2.5 cm distal and parallel to the inguinal ligament.
- Marking Landmarks: Accurately mark the critical bony and soft tissue landmarks:
- Pubic tubercle
- Anterior superior iliac spine (ASIS)
- Inguinal ligament
- Pulsation of the femoral artery
Defect Templating
- After thorough debridement of the upper extremity defect, use a sterile, pliable material (such as sterile paper, Esmarch bandage, or plastic sheeting) to create an exact template of the wound.
- Allowance for Contraction: Add 10% to 15% to the template dimensions to account for primary skin contraction once the flap is elevated.
- Place the template in the inguinal region, aligning its central axis with the pre-marked course of the SCIA.
- Dimensions: While massive flaps (up to 20 cm × 30 cm) have been successfully elevated, standard dimensions usually fall within a width of 10 cm and a length extending approximately 5 cm posterolateral to the ASIS.
SURGICAL TECHNIQUE: STEP-BY-STEP
1. Patient Positioning and Preparation
- Position the patient supine on the operating table.
- If a particularly large flap extending far laterally is required, place sandbags or soft bolsters beneath the ipsilateral scapula and pelvis to slightly elevate the affected side, allowing unhindered access to the flank.
- Prepare and drape the entire upper extremity, the ipsilateral chest, abdomen, and groin to allow for dynamic positioning during flap insetting.
2. Incision and Initial Elevation
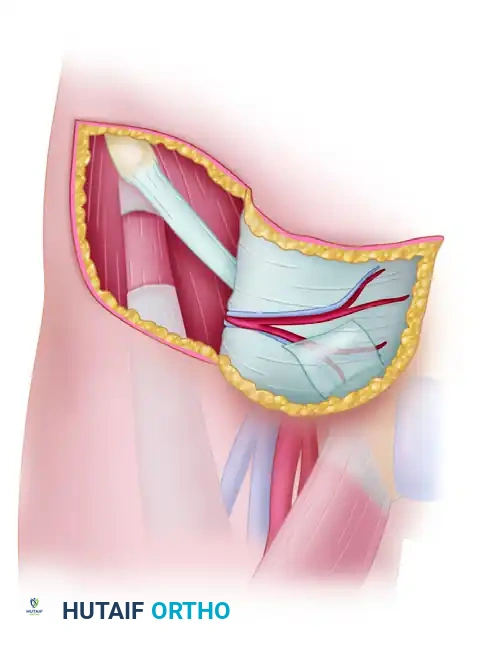
- Incise the skin along the outlined pattern. As you approach the medial aspect of the flap, taper the margins to create a narrower pedicle overlying the vascular base (approximately 2.5 cm distal to the inguinal ligament, near the medial border of the sartorius).
- Deepen the incision through the skin and subcutaneous adipose tissue down to the deep fascia (fascia lata).
- Begin elevation of the flap from lateral to medial, strictly maintaining the dissection plane beneath the deep fascia to ensure inclusion of the suprafascial vascular plexus.
3. Managing the Superior Margin
- While dissecting along the superior margin of the flap, carefully identify the superficial epigastric vessels.
- Ligate or bipolar cauterize and divide these vessels. This critical step ensures that the superficial circumflex iliac vessels are definitively kept within the substance of the flap and not inadvertently tethered or injured.
4. The Sartorius Transition (The Danger Zone)
- Approach the lateral border of the sartorius muscle with extreme caution. The deep branch of the SCIA penetrates the sartorius fascia near this point.
- At the lateral margin of the sartorius, incise the deep fascia and carefully elevate it in continuity with the flap toward the medial border.
- Medial Border Dissection: At the medial border of the sartorius, the SCIA's deep branch is encountered. If the flap requires further medial mobilization, this deep branch must be divided. However, doing so places the main trunk of the SCIA at risk.
- Clinical Pearl: In the vast majority of cases, a sufficient length of skin flap can be elevated without extending the dissection medial to the sartorius muscle. Avoid unnecessary medial dissection to protect the axial pedicle.
5. Flap Assessment and Pedicle Management
- Once elevation is complete, handle the flap with atraumatic technique. Maintain strict hemostasis throughout the donor bed.
- Assess the flap's perfusion. Groin flaps typically exhibit a pale appearance immediately after elevation due to sympathetic vasospasm.
- Cover the raw deep surface of the flap with warm, moist laparotomy sponges to prevent desiccation while preparing the recipient site.
Surgical Warning - The Delay Phenomenon: If there is any clinical doubt regarding the axial arterial integrity or venous outflow after flap elevation (e.g., persistent cyanosis, lack of dermal bleeding, or absent Doppler signal), do not proceed with attachment. Replace the flap in its donor bed, suture it loosely, and allow a delay period of 10 to 14 days before attempting transfer.
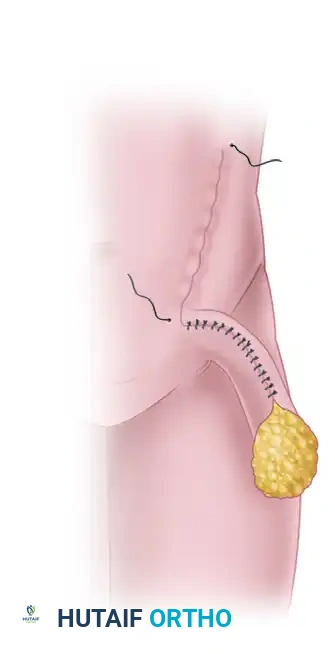
6. Donor Site Closure
- It is imperative to close the donor site before attaching the flap to the hand defect to avoid awkward positioning and tension on the newly inset flap.
- Mobilize the superior and inferior skin margins widely.
- Flex the patient's hip to 30–45 degrees to reduce tension on the closure line.
- Close the donor site in layers over a closed suction drain, utilizing robust deep dermal sutures and a meticulous skin closure. Small to medium flaps can usually be closed primarily.
7. Flap Insetting and Immobilization
- Determine the optimal position for the hand and forearm to rest against the groin without placing torsion, kinking, or tension on the pedicle.
- Elevate the skin edges of the recipient defect slightly to facilitate a tension-free inset.
- Securely attach the distal margins of the flap to the recipient defect using a non-strangulating, interrupted suture technique (e.g., half-buried mattress sutures).
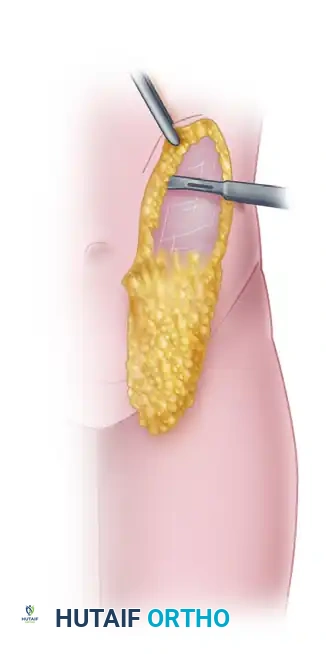
- Managing the Pedicle Bridge: The intervening pedicle bridge of skin must be managed to prevent infection and desiccation. This can be achieved by:
- Forming a closed tube with the pedicle skin.
- Applying a split-thickness skin graft to the raw, exposed undersurface of the pedicle.
- Note: If tubing the pedicle causes excessive pressure or constriction on the axial vessels, immediately release the sutures and opt for a split-thickness skin graft.
- Apply nonadherent gauze (e.g., Adaptic, Xeroform, or Mepitel) to all suture lines.
- Place highly absorbent padding in the axilla and between the arm and the torso to prevent skin maceration.
8. Final Wrapping and Securing
- With the assistance of the surgical team, elevate the patient’s torso using a transfer board.
- Apply a circumferential flannel or soft cotton wrap, incorporating the torso and the affected upper extremity to securely bind the arm to the body.
- Reinforce the cloth wrap with wide adhesive tape to prevent any inadvertent movement.
- Crucial Step: Create a small "window" in the bandage directly over the flap to allow for continuous postoperative visual and Doppler inspection.
POSTOPERATIVE CARE AND FLAP DIVISION
The success of a pedicled groin flap relies heavily on meticulous postoperative nursing care and strict patient compliance. The primary goal is to prevent any mechanical disruption or vascular compromise to the pedicle.
Immediate Postoperative Monitoring
- Immobilization: The flap must be absolutely protected. The patient must be instructed, and the nursing staff trained, to avoid pulling on the affected arm under any circumstances.
- Hourly Checks: The flap is inspected through the bandage window, and its circulatory status (color, capillary refill, turgor, and temperature) is evaluated hourly for the first 48 hours.
- Managing Ischemia: If signs of excessive tension, pedicle torsion, venous congestion, or expanding hematoma become evident:
- Immediately reposition the limb to relieve tension.
- Loosen or change the circumferential bandage.
- Remove specific inset sutures to relieve localized ischemia.
- Evacuate any underlying hematomas promptly in the operating room if necessary.
- Wound Hygiene: Bandages are changed, and the wound margins are cleaned frequently with sterile saline to decrease exudate buildup and prevent unpleasant odors associated with the closed environment.
Flap Detachment and Division
- Standard Timeline: In a healthy patient with an uncomplicated course, the flap develops sufficient neovascularization from the recipient bed to allow for detachment at 3 to 4 weeks postoperatively.
- Delayed Division: If there is any clinical doubt concerning the vascularity of the inset flap, or if a large portion of the pedicle bridge is intended to be used to cover residual defect area, the detachment should be delayed.
- Waiting an additional 1 to 2 weeks (totaling 4 to 6 weeks) significantly minimizes the risk of distal marginal necrosis.
- Division Technique: The division is typically performed under local or regional anesthesia. The pedicle is sharply divided, the inset is completed on the hand, and the residual pedicle base in the groin is either inset into the donor site or excised, followed by final closure.
Rehabilitation
Following flap division, the patient will require aggressive occupational therapy. The prolonged period of immobilization often results in adhesive capsulitis of the shoulder and stiffness of the elbow and wrist. A structured, progressive range-of-motion protocol must be initiated immediately upon detachment to restore upper extremity function.
