Introduction & Epidemiology
Fractures of the odontoid process, also known as dens fractures, represent a significant subset of cervical spine trauma, accounting for approximately 10-15% of all cervical spine fractures. They are bimodal in distribution, commonly affecting young adults involved in high-energy trauma, such as motor vehicle accidents, and the elderly population, who are more susceptible to these injuries from low-energy falls due to pre-existing osteopenia or osteoporosis.
A high association exists between odontoid fractures and other concomitant cervical spine injuries, necessitating thorough radiographic evaluation of the entire cervical axis. Studies report associated injuries in 10-25% of cases, including C1 fractures, other C2 fractures (e.g., pars interarticularis), and lower cervical spine injuries. Failure to identify these concurrent pathologies can lead to delayed diagnosis, inadequate treatment, and potential neurological deterioration.
The neurological implications of odontoid fractures are considerable. There is a 5% to 10% incidence of neurologic involvement with presentation ranging from subtle myelopathic symptoms to devastating outcomes such as Brown-Séquard syndrome, hemiparesis, cruciate paralysis, and quadriparesis. This risk is amplified by fracture displacement, instability, and concurrent ligamentous or osseous injuries that compromise the spinal canal. The potential for neurological compromise underscores the critical importance of early diagnosis, meticulous neurological assessment, and appropriate stabilization.
High-energy mechanisms of injury typically involve significant acceleration-deceleration forces, such as those encountered in motor vehicle accidents, or direct impact falls. These forces can lead to various fracture patterns. Axial loading combined with flexion or extension is a common mechanism. Avulsion of the apex of the dens can occur by the alar ligament, often associated with a flexion-distraction injury. Lateral or oblique forces can cause fractures through the body and base of the dens, leading to complex and often unstable fracture configurations. In the elderly, hyperextension injuries from ground-level falls are particularly prevalent, often resulting in Type II fractures.
Surgical Anatomy & Biomechanics
The C1-C2 complex, comprising the atlas and axis, is unique within the cervical spine, designed for significant rotational movement while maintaining stability for the cranial contents. The odontoid process, or dens, is a superior projection from the C2 vertebral body, serving as the pivot point for atlantoaxial rotation. It articulates anteriorly with the anterior arch of C1 and posteriorly with the transverse atlantal ligament.
Key ligamentous stabilizers of the atlantoaxial complex include:
*
Transverse Atlantal Ligament:
The primary stabilizer, preventing anterior translation of C1 on C2 and holding the dens against the anterior arch of C1. Its integrity is paramount for atlantoaxial stability.
*
Alar Ligaments:
Paired ligaments extending from the superolateral aspects of the dens to the medial occipital condyles. They resist axial rotation and lateral bending, becoming taut in contralateral rotation. Avulsion fractures of the odontoid apex (Type I) can result from excessive tension in these ligaments.
*
Apical Ligament:
Connects the apex of the dens to the anterior rim of the foramen magnum. While structurally minor, it contributes to overall stability.
*
Tectorial Membrane:
A cephalic extension of the posterior longitudinal ligament, covering the odontoid process and its ligaments posteriorly.
The vascular supply to the odontoid process is crucial for understanding fracture healing potential. It arrives predominantly through two main routes:
*
Apex:
Via small branches from the ascending pharyngeal and vertebral arteries.
*
Base:
Via nutrient arteries from the ascending pharyngeal and vertebral arteries that enter the C2 vertebral body.
Crucially, a watershed area exists in the neck of the odontoid, particularly at the junction of the body and the neck. This relatively hypovascular region is directly implicated in the high nonunion rates observed with Type II odontoid fractures, as the fracture line often traverses this zone, impairing callus formation and bone healing.
The biomechanics of odontoid fractures are directly influenced by the direction and magnitude of the applied forces:
*
Flexion/Extension:
Hyperextension mechanisms, common in elderly falls, can lead to Type II fractures. Hyperflexion injuries, often seen in high-energy trauma, can also contribute.
*
Axial Loading:
Combined with flexion or extension, it can drive the dens into the anterior arch of C1 or against the transverse ligament.
*
Rotational Forces:
Extreme rotation can place significant shear stress on the dens, particularly at its base.
*
Lateral Bending:
Can create tension on the contralateral alar ligament, potentially leading to avulsion injuries.
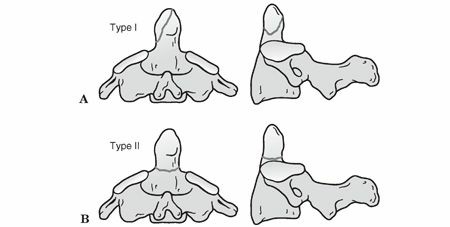
The Anderson and D’Alonzo classification, the most widely accepted system, categorizes odontoid fractures based on the fracture line's location:
Type I: Oblique avulsion fracture of the apex (5%)
This is an oblique fracture through the superior tip of the odontoid, typically representing an avulsion injury by the alar ligaments. These fractures are generally considered stable due to the intact base of the dens and minimal disruption of atlantoaxial stability. Neurological deficits are rare.
Type II: Fracture at the junction of the body and the neck; high nonunion rate, which can lead to myelopathy (60%)
This is the most common type and biomechanically the most challenging. The fracture line occurs at the waist or neck of the odontoid. These fractures are inherently unstable due to the small bone surface area for healing, the unfavorable blood supply (watershed area), and the high biomechanical stresses at this junction. Displacement is common and directly correlates with instability and increased risk of nonunion and neurological sequelae, including myelopathy from chronic instability.
Type III: Fracture extending into the cancellous body of C2 and possibly involving the lateral facets (30%)
This fracture extends into the cancellous bone of the C2 vertebral body, often involving the superior articular facets. These fractures typically have a larger cancellous bone surface area for healing and a more robust blood supply compared to Type II fractures. While potentially unstable if significantly displaced or involving the articular facets, they generally have a better union rate than Type II fractures.

Further subclassification of Type II odontoid fractures, such as the Grauer classification, further refines prognostic factors based on displacement and angulation, guiding surgical decision-making. These subclasses consider anterior versus posterior displacement and sagittal angulation, which are critical determinants of stability and reducibility.

Indications & Contraindications
The management of odontoid fractures is complex, balancing the inherent risks of nonunion, malunion, and neurological compromise with the morbidity of surgical intervention. Treatment decisions are individualized, based on fracture type, displacement, stability, patient age, neurological status, and comorbidities.
Non-Operative Indications
Non-operative management typically involves external immobilization, such as a cervical collar, halo vest, or Minerva brace.
*
Type I Fractures:
Almost universally managed non-operatively with a rigid cervical collar for 6-8 weeks. Due to their stable nature and excellent healing potential, surgical intervention is rarely indicated.
*
Undisplaced or Minimally Displaced Type III Fractures:
Can often be successfully treated with a halo vest or rigid cervical collar for 8-12 weeks. The large cancellous surface area and robust blood supply favor union. Careful monitoring for displacement is essential.
*
Select Type II Fractures:
*
Elderly patients with significant comorbidities:
Where surgical risks outweigh potential benefits, despite high nonunion rates. This is a palliative decision.
*
Children:
Who typically have higher healing rates with external immobilization.
*
Type II fractures with minimal displacement (< 2-3 mm) and no angulation:
Some literature supports a trial of halo immobilization, particularly in younger patients, though union rates are inferior to surgical fixation. Close follow-up is critical.
*
Posteriorly displaced Type II fractures:
Some studies suggest a slightly better union rate with halo vest immobilization compared to anteriorly displaced fractures.
Operative Indications
Surgical management aims to achieve stable fixation, promote union, prevent neurological deterioration, and allow for early mobilization. The choice of surgical approach (anterior vs. posterior) depends on the fracture pattern, reducibility, and surgeon preference.
*
Type II Fractures:
*
Displaced (> 2-3 mm) Type II fractures:
The most common indication for surgical intervention due to high rates of nonunion (up to 30-70%) with non-operative treatment.
*
Irreducible Type II fractures:
Failure to achieve or maintain anatomical reduction with external traction or manipulation.
*
Type II nonunions or symptomatic pseudoarthrosis:
Leading to chronic atlantoaxial instability or myelopathy.
*
Anteriorly displaced Type II fractures:
Have a significantly higher nonunion rate with conservative management.
*
Type II fractures with significant angulation.
*
Associated C1/C2 ligamentous injuries:
Especially transverse atlantal ligament disruption, indicating severe instability.
*
Type III Fractures:
*
Significantly displaced Type III fractures (> 5 mm):
Especially if irreducible or causing neural impingement.
*
Type III fractures involving the C2 lateral masses/facets:
Which can lead to segmental instability.
*
Associated C1 fractures or severe transverse atlantal ligament injury.
*
Any Odontoid Fracture with Neurological Deficit:
Requires urgent surgical stabilization and decompression (if indicated) to prevent further neurological compromise and promote recovery.
*
Patient Preference/Lifestyle:
For active patients requiring immediate stability and earlier return to activity, surgical fixation may be preferred over prolonged immobilization, even in cases amenable to non-operative management.
*
Failed Non-Operative Treatment:
Persistent pain, progressive displacement, or nonunion after an adequate trial of external immobilization.
Contraindications
- Severe Medical Comorbidities: Patients with severe cardiorespiratory compromise, uncontrolled coagulopathy, or other life-threatening conditions where the risks of general anesthesia and surgery outweigh the benefits. In these cases, non-operative management, despite potentially higher nonunion rates, may be the only viable option.
- Severe Osteoporosis: May limit hardware purchase, particularly in anterior odontoid screw fixation. Posterior fusion may still be an option with robust fixation techniques.
- Active Infection: Absolute contraindication to elective surgical intervention. Must be treated prior to surgery.
- Anatomical Variations: Unfavorable anatomical alignment or severe degenerative changes that preclude safe hardware placement or reduction. For example, a high-riding vertebral artery can complicate C2 pedicle screw placement.
- Acute atlanto-occipital dislocation or C1 ring fractures incompatible with fixation: Requires a different approach or staged procedure.
Table: Operative vs. Non-Operative Indications for Odontoid Fractures
| Feature | Non-Operative Management | Operative Management |
|---|---|---|
| Fracture Type | Type I (all); Undisplaced/Minimally displaced Type III; Select Type II (see below) | Displaced Type II (most); Irreducible Type II; Type II Nonunion; Significantly displaced Type III; Type III with facet involvement; Type II in younger, active patients |
| Displacement | Type I: Any; Type III: Undisplaced/Minimally displaced (< 5mm); Type II: Undisplaced/Minimally displaced (< 2-3mm, select cases) | Type II: Displaced (> 2-3mm); Type III: Displaced (> 5mm); Irreducible fractures of any type |
| Angulation | Minimal to none (especially Type II) | Significant (especially Type II) |
| Neurological Status | Intact neurological exam | Any neurological deficit, progressive or acute |
| Associated Injuries | No significant associated ligamentous or osseous instability | Associated C1 fractures, transverse ligament rupture, or other significant cervical instability |
| Patient Age | Elderly with comorbidities, pediatric patients | Younger, active patients; healthy elderly patients |
| Risk Factors for Nonunion | Generally low-risk types (I, select III) | High-risk factors for nonunion (e.g., anteriorly displaced Type II, significant displacement/angulation) |
| Prior Treatment | Initial presentation in indicated cases | Failed non-operative treatment (persistent pain, displacement, nonunion) |
Pre-Operative Planning & Patient Positioning
Meticulous pre-operative planning is paramount for successful odontoid fracture management, encompassing thorough diagnostic imaging review, surgical approach selection, and patient optimization.
Diagnostic Imaging
- Plain Radiographs: Initial assessment involves standard lateral, anterior-posterior (AP), and open-mouth odontoid views. These provide initial information on fracture type, displacement, and C1-C2 alignment. A swimmer's view may be necessary to visualize the cervicothoracic junction.
- Computed Tomography (CT) Scan: Essential for detailed fracture morphology, comminution, displacement, and involvement of adjacent structures. Fine-cut axial images with multiplanar reconstructions (sagittal and coronal) and 3D reconstructions are critical for precise planning of screw trajectory or fusion mass placement. It also helps identify associated C1 fractures or other C2 body fractures.
- Magnetic Resonance Imaging (MRI): Indicated if there is any neurological deficit, suspicion of spinal cord or nerve root compromise, or concern for ligamentous injury (e.g., transverse atlantal ligament, tectorial membrane, alar ligaments). MRI can also identify disc herniations or pre-existing spinal canal stenosis.
- CT Angiography (CTA) or Magnetic Resonance Angiography (MRA): May be necessary to evaluate for vertebral artery injury or anomalous course, especially when planning C1 lateral mass or C2 pedicle screw placement, which carries a risk of iatrogenic vertebral artery injury.
Decision-Making Considerations
- Fracture Classification (Anderson and D'Alonzo): Guides initial treatment strategy.
- Reducibility: Can the fracture be reduced anatomically with traction or manipulation? This influences the choice between anterior odontoid screw fixation (requires reducibility) and posterior fusion (can stabilize irreducible fractures).
- Stability: Is the fracture inherently unstable? Are there associated ligamentous injuries?
- Patient Factors: Age, bone quality (osteoporosis significantly impacts hardware purchase), comorbidities, neurological status, activity level, and patient preference.
- Surgeon Experience: The comfort level and expertise of the surgeon with specific anterior or posterior techniques.
Patient Optimization
- Medical Workup: Comprehensive medical clearance, including cardiac and pulmonary evaluation, is essential, especially in elderly, often frail patients.
- Coagulation Status: Optimize to minimize intraoperative and postoperative bleeding.
- Antibiotics: Prophylactic broad-spectrum antibiotics are administered prior to incision.
- DVT Prophylaxis: Mechanical and/or chemical prophylaxis, especially for patients undergoing prolonged immobilization or surgery.
- Blood Management: Type and cross-match blood products may be indicated.
Patient Positioning
-
Anterior Odontoid Screw Fixation:
- Supine position: The patient is placed supine on the operating table.
- Head Support: The head is positioned on a horseshoe headrest or foam doughnut, allowing for slight cervical extension to facilitate the anterior approach and reduction. Care must be taken to avoid excessive extension in unstable fractures.
- Traction: Gentle skeletal traction (e.g., Gardner-Wells tongs) may be applied pre-operatively and intra-operatively to achieve or maintain reduction.
- Fluoroscopy: The imaging C-arm must be positioned to allow for clear lateral and AP fluoroscopic views of the C1-C2 complex. The patient's shoulders may need to be pulled caudally to improve lateral imaging.
- Neuromonitoring: Somatosensory evoked potentials (SSEPs) and motor evoked potentials (MEPs) are typically utilized to monitor spinal cord function throughout the procedure, especially during reduction maneuvers.
-
Posterior C1-C2 Fusion:
- Prone position: The patient is placed prone on a radiolucent operating table.
- Head Stabilization: The head is secured in a Mayfield head clamp or similar three-point fixation device. This allows for precise control of head and neck position, critical for reduction and screw trajectory.
- Neck Flexion: The neck is gently flexed to open the posterior elements of C1 and C2, facilitating exposure. Avoid excessive flexion, which can exacerbate anterior cord compression.
- Traction: Skeletal traction may be applied through the Mayfield clamp or Gardner-Wells tongs to aid in reduction prior to definitive fixation.
- Fluoroscopy/Navigation: Essential for confirming reduction and accurate screw placement. Intraoperative navigation (stealth) can significantly enhance accuracy, especially for C1 lateral mass and C2 pedicle screws, minimizing the risk of vertebral artery or spinal cord injury.
- Neuromonitoring: SSEPs and MEPs are standard for posterior cervical procedures.
Detailed Surgical Approach / Technique
Surgical management of odontoid fractures typically involves either anterior odontoid screw fixation or posterior C1-C2 fusion, each with distinct indications and technical considerations.
A. Anterior Odontoid Screw Fixation
This approach is primarily indicated for reducible Type II odontoid fractures (and some shallow Type III fractures) without significant comminution, where anatomical reduction can be achieved and maintained. It has the advantage of preserving C1-C2 rotation.
1. Patient Positioning and Preparation
- Supine position with slight cervical extension on a radiolucent table.
- Gentle skeletal traction (e.g., Gardner-Wells tongs, 5-10 lbs) may be applied for reduction.
- Confirm reduction with lateral fluoroscopy. Ensure adequate visualization for C2-C3 disc space entry point and odontoid tip. Shoulders pulled down with tape.
- Neuromonitoring (SSEPs, MEPs) leads placed.
- Sterile preparation and draping from the mandible to the chest.
2. Incision and Dissection
- Incision: A transverse skin incision is made approximately at the level of C5-C6, or a longitudinal incision along the anterior border of the sternocleidomastoid (SCM) muscle on the right side (to avoid recurrent laryngeal nerve injury, more common on the left). The transverse incision provides better cosmesis, while the longitudinal offers wider exposure.
- Subplatysmal Dissection: The platysma muscle is incised, and subplatysmal flaps are raised superiorly and inferiorly.
- Interval Identification: The interval between the SCM muscle (laterally) and the strap muscles (medially) is identified and entered.
- Carotid Sheath Retraction: The carotid sheath, containing the carotid artery, jugular vein, and vagus nerve, is identified and gently retracted laterally.
- Prevertebral Fascia: The prevertebral fascia is identified and incised longitudinally. The esophagus and trachea are retracted medially.
- Exposure: The anterior aspects of the C2 and C3 vertebral bodies and the C2-C3 disc space are exposed. A long, angled retractor (e.g., CASPAR or Smith-Robinson) can be helpful.
- Confirmation of Level: Lateral fluoroscopy is used to confirm the C2-C3 disc space and the odontoid fracture.
3. Reduction and K-wire Placement
- Reduction: Ensure the fracture is anatomically reduced. This may require further gentle traction, anterior pressure on C2, or slight head extension.
- Entry Point: The entry point for the K-wire (guide pin) is crucial. It is typically located at the anterior-inferior aspect of the C2 vertebral body or the superior aspect of the C2-C3 disc space, just off the midline. The exact location depends on the fracture anatomy and desired trajectory.
-
Trajectory:
Under biplanar fluoroscopic guidance (lateral and AP views), a 1.5-2.0 mm K-wire is advanced across the C2-C3 disc space, through the C2 vertebral body, across the fracture site, and into the apex of the odontoid.
- Lateral View: The K-wire should be parallel to the anterior cortex of C2, centered within the odontoid, and ending approximately 5mm subchondral to the tip.
- AP View (Open-Mouth): The K-wire should be perfectly centered in the odontoid. This is critical to avoid exiting the dens.
- Fracture Compression: If a lag screw technique is planned, the K-wire should be advanced beyond the fracture line but not fully into the odontoid tip, allowing for subsequent drilling and tapping to create a lag effect.
- Single vs. Double Screw: For improved rotational stability and biomechanical strength, two screws are often preferred, if anatomical constraints allow. If two screws are used, place the second K-wire parallel and adjacent to the first, aiming for maximal purchase.
4. Drilling, Tapping, and Screw Insertion
- Drilling: A cannulated drill bit, sized to the outer diameter of the chosen screw (e.g., 3.5 mm or 4.0 mm cortical screw), is advanced over the K-wire across the fracture, stopping short of the odontoid tip.
- Tapping: The near cortex and fracture site are tapped if a non-self-tapping screw is used. For a lag screw effect, the far fragment (odontoid process) is typically left untapped or tapped with a smaller diameter to allow the screw threads to purchase and compress.
-
Screw Insertion:
The cannulated odontoid screw (typically a partially threaded cortical screw or a specialized odontoid screw) is carefully advanced over the K-wire.
- For a lag screw effect, the threads must engage only the distal fragment (odontoid) to compress the fracture. The proximal part of the screw should glide freely through the C2 body.
- Confirm screw position and length with fluoroscopy. The screw tip should be 1-2 mm subchondral to the odontoid apex.
- Removal of K-wire: Once the screw is fully seated and fixation is satisfactory, the K-wire is removed.
- Final Fluoroscopy: Biplanar views to confirm reduction, screw position, and stability.
5. Closure
- Release retractors slowly.
- Irrigate the surgical field thoroughly.
- Layered closure of the prevertebral fascia, strap muscles, platysma, and skin.
- A drain is rarely necessary.
B. Posterior C1-C2 Fusion
Posterior atlantoaxial fusion is indicated for irreducible odontoid fractures (especially Type II), Type II nonunions, Type III fractures with significant instability or facet involvement, and cases where anterior screw fixation is contraindicated (e.g., severe comminution, osteoporosis limiting anterior purchase). It effectively eliminates atlantoaxial rotation. Modern techniques typically involve C1 lateral mass and C2 pedicle/pars screws with rod fixation (Harms technique).
1. Patient Positioning and Preparation
- Prone position with the head secured in a Mayfield head clamp, ensuring the cervical spine is in a neutral or slightly flexed position.
- Gentle skeletal traction may be used to achieve or maintain reduction.
- Confirm reduction with lateral fluoroscopy.
- Neuromonitoring (SSEPs, MEPs) leads placed.
- Sterile preparation and draping from the occiput to the upper thoracic spine.
2. Incision and Dissection
- Incision: A midline longitudinal incision is made from the inion to approximately C4-C5.
- Subperiosteal Dissection: The deep fascia is incised, and the paraspinal muscles (trapezius, semispinalis capitis, rectus capitis posterior major/minor, obliquus capitis inferior) are meticulously dissected subperiosteally off the posterior arch of C1 and the lamina, spinous process, and lateral masses of C2.
- Exposure: Wide exposure of the C1 posterior arch, C2 lamina, pars, and lateral masses is essential. Identify the C2 ganglion and greater occipital nerve.
- Vertebral Artery Caution: Extreme care must be taken during dissection of C1 lateral mass and C2 pars/pedicle regions to avoid injury to the vertebral artery, which typically exits the C1 transverse foramen and courses medially over the posterior arch of C1 before entering the foramen magnum. Its course over C1 is particularly vulnerable.
3. Reduction and Screw Placement (Harms Technique)
- Reduction: Final reduction of the odontoid fracture is achieved under direct visualization and fluoroscopy, often by adjusting head position or applying light traction/compression.
-
C1 Lateral Mass Screw Placement:
- Entry Point: The center of the posterior arch of C1, approximately 7 mm lateral to the midline, just superior to the inferior border of C1.
- Trajectory: Directed anterolaterally towards the anterior tubercle of C1. The screw should aim for the C1 lateral mass. The "safe zone" for C1 lateral mass screw placement is typically within the lateral mass itself, avoiding the anterior arch and spinal canal medially, and the vertebral artery laterally.
- Drilling: A pilot hole is drilled. The depth is typically 20-22 mm.
- Tapping: Tap the pilot hole.
- Screw Insertion: A polyaxial C1 lateral mass screw (typically 3.5 mm diameter) is inserted.
-
C2 Pedicle/Pars Screw Placement:
- Entry Point (Pedicle): The intersection of the lateral mass/pars and the superior aspect of the C2 lamina.
- Entry Point (Pars): Approximately 2-3 mm superior and 2-3 mm medial to the midpoint of the C2-C3 facet joint.
- Trajectory: Directed superomedially and slightly anteriorly into the C2 pedicle or pars interarticularis. The medial angulation is crucial to avoid the vertebral artery laterally and the C2 nerve root/spinal cord medially. Angulation can range from 20-40 degrees medially.
- Drilling: A pilot hole is drilled. Palpate pedicle walls with a probe.
- Tapping: Tap the pilot hole.
- Screw Insertion: A polyaxial C2 pedicle or pars screw (typically 3.5-4.0 mm diameter) is inserted.
- Fluoroscopy/Navigation: Biplanar fluoroscopy or intraoperative navigation is highly recommended for both C1 and C2 screw placements to ensure accurate trajectory and prevent neurovascular injury.
4. Rod Placement and Compression/Distraction
- Rod Contouring: Appropriately sized and contoured connecting rods are placed between the C1 lateral mass and C2 pedicle/pars screws.
- Compression/Distraction: Gentle compression or distraction can be applied to achieve optimal alignment and stability. Lock all set screws securely.
5. Bone Grafting
- Decortication: The posterior arches of C1 and lamina/spinous process of C2 are decorticated to promote fusion.
- Graft Application: Autologous bone graft (harvested from the iliac crest) or allograft is placed over the decorticated posterior elements and around the instrumentation to create a robust fusion bed.

6. Closure
- Irrigate the surgical field thoroughly.
- Layered closure of the deep fascia, paraspinal muscles, subcutaneous tissue, and skin.
- A surgical drain may be placed to manage postoperative hematoma.
Complications & Management
Odontoid fracture management, both operative and non-operative, carries potential complications. Understanding these risks, their incidence, and salvage strategies is crucial.
Table: Common Complications, Incidence, and Salvage Strategies
| Complication | Incidence | Salvage Strategy |
|---|---|---|
| Nonunion (Type II) | 30-70% (non-op); 5-30% (op) | Revision surgery (posterior fusion, re-do anterior screw if amenable), halo vest for non-op failure. |
| Malunion | Variable | Revision osteotomy, posterior fusion to correct deformity and instability. |
| Neurological Injury | 1-5% (iatrogenic op); 5-10% (initial presentation) | Immediate re-exploration for decompression/hematoma evacuation, adjust fixation; supportive care. |
| Vertebral Artery Injury | <1% (op) | Direct repair if possible, ligation, endovascular coiling; manage hemorrhage. |
| Infection | 1-5% (op) | Debridement, irrigation, antibiotics; possible hardware removal if persistent. |
| Hardware Failure | 5-15% (anterior screw); <5% (posterior fusion) | Revision surgery (replace hardware, stronger fixation, fusion), convert to posterior fusion. |
| Dysphagia/Hoarseness (Ant.) | 5-10% (transient); <1% (permanent) | Supportive care, speech therapy; rare vocal cord injection/surgery. |
| C2 Neuropathy (Post. approach) | 5-10% | Local nerve blocks, gabapentinoids; surgical decompression if entrapment. |
| Cerebrospinal Fluid (CSF) Leak | Rare (op) | Primary repair of dural tear, fibrin glue, lumbar drain. |
| Pseudoarthrosis Pain/Instability | Relevant to nonunion | Posterior fusion (definitive treatment for symptomatic nonunion). |
| Donor Site Morbidity | 10-20% (iliac crest) | Pain management, nerve blocks; rarely surgical intervention for neuralgia. |
Detailed Discussion of Complications
-
Nonunion:
The most significant complication of odontoid fractures, particularly Type II, due to the tenuous blood supply in the watershed area.
- Risk Factors: Anterior displacement >5-6 mm, age >50-60 years, female gender, comminution, smoking, diabetes, inadequate immobilization, inadequate surgical fixation.
- Management: For non-operative failures or symptomatic nonunion after surgery, revision surgery is typically indicated. This often involves posterior C1-C2 fusion with robust instrumentation (e.g., Harms technique) to provide stability and promote union. In select cases of anterior screw failure, a re-do anterior screw may be considered if initial issues were technique-related and anatomy is amenable.
- Malunion: Occurs when the fracture heals in a displaced or angulated position. Can lead to chronic pain, C1-C2 instability, or myelopathy. Management involves corrective osteotomy or posterior fusion, depending on the severity and symptoms.
-
Neurological Injury:
- Iatrogenic Intraoperative Injury: Can occur during screw placement (especially C2 pedicle/pars screws) or during reduction maneuvers. Neuromonitoring is crucial for early detection. Immediate re-exploration, hardware adjustment/removal, and potential decompression are warranted.
- Progressive Postoperative Neurological Deficit: May indicate hematoma, edema, or instability. Requires urgent evaluation (MRI/CT) and intervention.
-
Vertebral Artery Injury:
A rare but devastating complication, primarily associated with posterior C1-C2 instrumentation, especially C1 lateral mass and C2 pedicle/pars screws.
- Prevention: Meticulous pre-operative imaging (CTA/MRA), precise entry points, careful trajectory planning, intraoperative fluoroscopy/navigation, and palpation of drill holes.
- Management: If identified intraoperatively, direct repair (if feasible) or ligation may be necessary. Endovascular embolization can be considered. Acute management focuses on hemorrhage control and preventing stroke.
-
Infection:
Superficial wound infection or deep surgical site infection can occur.
- Management: Superficial infections usually respond to oral antibiotics. Deep infections require surgical debridement, irrigation, intravenous antibiotics, and potentially hardware removal if the infection persists or leads to osteomyelitis.
-
Hardware Failure:
Screw breakage, pullout, or migration can occur, especially with anterior odontoid screws due to high biomechanical stress and potential for nonunion.
- Management: Revision surgery, often converting to a posterior C1-C2 fusion, is usually required.
-
Dysphagia and Hoarseness (Anterior Approach):
Transient dysphagia (difficulty swallowing) and hoarseness (due to recurrent laryngeal nerve traction) are common but usually resolve spontaneously.
- Prevention: Gentle, prolonged retraction rather than forceful, intermittent retraction. Careful identification of the recurrent laryngeal nerve.
- Management: Supportive care, speech therapy, and in rare persistent cases, otolaryngology consultation.
-
C2 Neuropathy (Posterior Approach):
Irritation or injury to the C2 nerve root (greater occipital nerve) can cause occipital neuralgia.
- Prevention: Careful dissection and protection of the C2 nerve root and ganglion. Avoidance of overly medial C2 screw placement.
- Management: Medical management with neuropathic pain medications, local nerve blocks, or in refractory cases, surgical decompression.
-
Cerebrospinal Fluid (CSF) Leak:
Rare, typically from incidental dural tears during posterior exposure or screw insertion.
- Management: Primary repair of the dura, use of dural substitutes or fibrin glue, and sometimes placement of a lumbar drain to reduce CSF pressure and promote healing.
Post-Operative Rehabilitation Protocols
Post-operative care and rehabilitation are critical for optimizing outcomes after odontoid fracture management, aiming to protect the fixation, promote bone healing, prevent complications, and restore function. Protocols vary depending on the surgical approach, stability of fixation, and patient factors.
General Principles
- Pain Management: Multimodal analgesia to control pain and facilitate early mobilization.
- DVT Prophylaxis: Continued mechanical and/or chemical prophylaxis.
- Wound Care: Meticulous wound care to prevent infection.
- Early Mobilization: As tolerated, to prevent deconditioning and respiratory complications.
A. After Anterior Odontoid Screw Fixation
The goal is to achieve solid bony union while preserving atlantoaxial motion.
*
Immediate Post-Operative (Days 0-7):
*
Immobilization:
A rigid cervical collar (e.g., Miami J, Aspen) is typically used for 6-12 weeks. This provides external support and minimizes excessive motion during the initial healing phase.
*
Ambulation:
Progressive ambulation and light activity as tolerated.
*
Imaging:
Post-operative plain radiographs to confirm hardware position and initial alignment.
*
Early Phase (Weeks 2-6):
*
Collar Compliance:
Strict adherence to collar wear, removing only for hygiene.
*
Gentle Exercises:
Isometric neck exercises to maintain muscle tone, avoiding active range of motion.
*
Monitor for Displacement:
Clinical and radiographic surveillance for any signs of hardware failure or loss of reduction.
*
Mid Phase (Weeks 6-12):
*
Radiographic Assessment:
Repeat plain radiographs (AP, lateral, open mouth) and potentially a thin-cut CT scan to assess early signs of bone healing and union. Stress views may be considered with caution to assess stability if union is uncertain.
*
Collar Weaning:
If radiographic signs of union are present and there are no clinical signs of instability, the collar may be gradually weaned. This often involves transitioning to a softer collar or discontinuing altogether.
*
Physical Therapy:
Commencement of gentle, active cervical range of motion exercises and light strengthening, under therapist guidance. Avoid aggressive movements that could compromise healing.
*
Late Phase (Months 3-6 and beyond):
*
Confirmation of Union:
A CT scan is the most reliable method to confirm solid bony union. This is typically performed at 3-6 months.
*
Progressive Strengthening:
Once union is confirmed, a more aggressive physical therapy program focuses on restoring full cervical range of motion, strength, and proprioception.
*
Return to Activity:
Gradual return to normal daily activities. Avoid high-impact sports or activities with a risk of significant cervical trauma until complete union is established and muscle strength is fully recovered.
B. After Posterior C1-C2 Fusion
The primary goal is to achieve a solid arthrodesis of C1-C2. This inherently eliminates atlantoaxial rotation but provides robust stability.
*
Immediate Post-Operative (Days 0-7):
*
Immobilization:
A rigid cervical collar is typically used for 6-12 weeks, providing supplemental external support while the fusion mass consolidates. A Minerva brace or halo vest may be used in cases of significant instability or poor bone quality.
*
Ambulation:
Progressive ambulation.
*
Imaging:
Post-operative plain radiographs to confirm hardware position and alignment.
*
Early Phase (Weeks 2-6):
*
Collar Compliance:
Strict adherence to collar wear.
*
Wound Healing:
Monitor incision for infection.
*
Avoid Aggressive Neck Movements:
Prevent any movements that might jeopardize hardware or graft integration.
*
Mid Phase (Weeks 6-12):
*
Radiographic Assessment:
Repeat plain radiographs (AP, lateral) and potentially thin-cut CT scan to evaluate the hardware and monitor for early signs of fusion (e.g., bridging bone formation).
*
Collar Weaning:
If fusion is progressing well and there are no signs of instability, the collar may be gradually weaned.
*
Physical Therapy:
Initiate gentle isometric neck strengthening exercises. Avoid active rotation or lateral bending initially.
*
Late Phase (Months 3-12 and beyond):
*
Confirmation of Fusion:
A CT scan at 3-6 months, and potentially 9-12 months, is the gold standard for confirming solid bony fusion. Dynamic flexion-extension radiographs may be performed cautiously to rule out pseudarthrosis once the collar is removed.
*
Progressive Strengthening and Mobility:
Once solid fusion is confirmed, rehabilitation focuses on strengthening surrounding cervical musculature and addressing any compensatory movements from the loss of C1-C2 rotation.
*
Return to Activity:
Gradual return to activities, with caution regarding contact sports or activities involving high cervical impact, even after solid fusion. The adjacent segments (C0-C1, C2-C3) will experience increased stress, which needs to be considered.
Throughout the rehabilitation process, patient education regarding activity restrictions, proper posture, and warning signs (e.g., increasing pain, neurological symptoms) is paramount. Regular follow-up with the surgeon and physical therapist is essential to monitor progress and adjust the protocol as needed.
Summary of Key Literature / Guidelines
The management of odontoid fractures has evolved significantly with advancements in imaging, surgical techniques, and instrumentation. Key literature and guidelines provide evidence-based frameworks for clinical decision-making.
-
Anderson and D'Alonzo Classification (1974): This remains the cornerstone for classifying odontoid fractures into Type I, II, and III. Its prognostic value, particularly the high nonunion rate of Type II fractures, continues to drive treatment algorithms.
- Type I: Generally stable, good prognosis with external immobilization.
- Type II: High nonunion rate with non-operative management (30-70%), making it the most common indication for surgical intervention.
- Type III: Generally better prognosis than Type II for non-operative management due to larger cancellous surface area, but surgical fixation is indicated for significant displacement or instability.
-
Grauer's Subclassification of Type II Fractures (1995): Further refined Type II management by considering displacement and angulation (anterior, posterior, horizontal). Anteriorly displaced Type II fractures (especially > 5mm) are consistently associated with higher nonunion rates with conservative treatment and are strong candidates for surgical fixation.
-
Treatment Modality Debate for Type II Fractures:
- Anterior Odontoid Screw Fixation: Emerged as a favored technique for reducible Type II fractures, particularly in younger patients, as it preserves atlantoaxial motion. Studies by Bohler (1982) and Apfelbaum et al. (1994) demonstrated high union rates (80-90%) with appropriate patient selection. However, it requires an anatomically reducible fracture and is technically demanding. Comminution, significant osteoporosis, or an oblique fracture orientation that prevents lag screw effect are contraindications.
- Posterior C1-C2 Fusion: Historically performed with wiring techniques (Gallie, Brooks-Jenkins), now predominantly performed with C1 lateral mass/C2 pedicle screw-rod constructs (Harms technique) due to superior biomechanical stability and fusion rates (90-100%). It is the preferred option for irreducible Type II fractures, Type II nonunions, comminuted Type II fractures, Type III fractures with significant instability, and in elderly patients with poor bone quality where anterior screw fixation may be tenuous. The major drawback is the loss of C1-C2 rotation, placing increased stress on adjacent segments.
-
Management in the Elderly: Odontoid fractures in the elderly, often from low-energy falls, present unique challenges due to osteoporosis, comorbidities, and higher risks of nonunion and surgical complications.
- Literature suggests that non-operative management with a rigid collar in the elderly often results in higher nonunion rates (up to 80-90%) but similar mortality rates to surgical groups.
- Surgical fixation, particularly posterior fusion, is increasingly considered for active, healthy elderly patients to achieve stability and avoid prolonged immobilization, which can lead to complications such as pneumonia and deconditioning. Decision-making is highly individualized, balancing surgical risks with the morbidity of nonunion.
-
Role of Advanced Imaging:
- Routine use of CT with 3D reconstructions is standard for comprehensive fracture characterization and surgical planning, especially for screw trajectory.
- MRI is crucial for evaluating ligamentous injuries (e.g., transverse atlantal ligament integrity) and spinal cord compromise, which dictate stability and the need for urgent intervention.
- CTA/MRA is recommended when planning C1/C2 screw placement to delineate vertebral artery anatomy and minimize iatrogenic injury.
-
Neurological Status: Any neurological deficit associated with an odontoid fracture necessitates thorough evaluation (MRI) and often aggressive stabilization to prevent further deterioration. Prompt reduction and fixation are paramount.
In conclusion, current guidelines for odontoid fractures emphasize careful classification, assessment of reducibility and stability, and consideration of patient-specific factors. Reducible Type II fractures in younger, healthy patients are often amenable to anterior odontoid screw fixation to preserve motion. However, posterior C1-C2 fusion, particularly with modern screw-rod constructs, offers more robust fixation and higher fusion rates for irreducible, unstable, or revision cases, albeit at the cost of atlantoaxial motion. The elderly population requires a nuanced approach, weighing the risks of surgery against the morbidity of nonunion and prolonged conservative management.
Clinical & Radiographic Imaging


