Missed Lisfranc? Focus on the Base of the Second Metatarsal
Introduction & Epidemiology
Lisfranc injury, or tarsometatarsal (TMT) joint complex injury, represents a spectrum ranging from purely ligamentous sprains to fracture-dislocations. Despite its potentially devastating long-term consequences, these injuries are frequently missed or misdiagnosed in the acute setting, with reported rates as high as 20% to 40%. The subtlety of initial radiographic findings, particularly in low-energy mechanisms or in the polytrauma patient, often contributes to delayed diagnosis. A missed Lisfranc injury can lead to chronic pain, progressive deformity, functional disability, and disabling post-traumatic arthritis, making timely and accurate diagnosis paramount.
The Lisfranc joint complex is crucial for foot stability and biomechanics, connecting the midfoot to the forefoot. Injuries typically result from either direct trauma, such as a crush injury, or indirect mechanisms involving axial loading with rotational forces, common in sports or motor vehicle accidents. The base of the second metatarsal serves as the keystone of the tarsometatarsal articulation, locking into a recess formed by the medial and intermediate cuneiforms. Its unique anatomical position and strong ligamentous attachments, particularly the interosseous Lisfranc ligament connecting the medial cuneiform to the base of the second metatarsal, render it the linchpin of midfoot stability. Therefore, any disruption at the base of the second metatarsal, whether a fracture or a subtle diastasis between the medial cuneiform and second metatarsal, should immediately raise suspicion for a Lisfranc injury until proven otherwise. A high index of suspicion, coupled with a thorough clinical and radiographic evaluation, is essential to prevent these injuries from being overlooked.
Surgical Anatomy & Biomechanics
The Lisfranc joint complex is comprised of articulations between the three cuneiforms and the cuboid proximally, and the bases of the five metatarsals distally. Biomechanically, it functions as a critical transition zone, allowing limited motion between the rigid midfoot and the more flexible forefoot, contributing to the foot’s ability to adapt to uneven terrain while also providing a stable lever arm for propulsion during gait.
Key Anatomical Structures:
-
Bones:
- Medial Cuneiform (MC): Articulates with the first metatarsal (1st MT).
- Intermediate Cuneiform (IC): Articulates with the second metatarsal (2nd MT). The IC is the shortest of the cuneiforms.
- Lateral Cuneiform (LC): Articulates with the third metatarsal (3rd MT).
- Cuboid: Articulates with the fourth and fifth metatarsals (4th MT, 5th MT).
- Metatarsal Bases: Particularly the second metatarsal, which is recessed proximally between the medial and lateral cuneiforms, forming the "keystone" described by Hardcastle.
-
Ligaments:
These provide primary stability.
- Lisfranc Ligament (Interosseous Ligament): This is the most crucial stabilizer. It originates from the plantar aspect of the medial cuneiform and inserts into the plantar aspect of the base of the second metatarsal. It prevents dorsal and lateral displacement of the second metatarsal relative to the medial cuneiform. A purely ligamentous Lisfranc injury typically involves a rupture of this ligament.
- Dorsal Ligaments: Weaker and less critical for stability, connecting the TMT joints.
- Plantar Ligaments: Stronger than dorsal ligaments and contribute significantly to stability.
- Interosseous Ligaments: Connect the cuneiforms to each other and the metatarsal bases.
Biomechanical Significance of the Second Metatarsal Base:
The anatomical arrangement of the second metatarsal base, recessed between the medial and lateral cuneiforms, provides inherent osseous stability. The Lisfranc ligament, connecting the medial cuneiform to the second metatarsal, prevents separation and maintains the arch. Disruption of this ligament, whether through avulsion fracture from the second metatarsal base or a pure ligamentous tear, leads to instability of the midfoot. The first ray (medial cuneiform and 1st MT) and the second ray (intermediate cuneiform and 2nd MT) are considered the most stable components of the TMT joint complex due to strong ligamentous attachments and the recessed nature of the second metatarsal. Consequently, injury patterns often involve displacement of the lateral rays (3-5) and/or dorsal/lateral displacement of the 2nd MT, directly implicating the integrity of the Lisfranc ligament and the second metatarsal base.
Recognition of this anatomical and biomechanical critical point underscores why a fracture at the base of the second metatarsal, often an avulsion from the plantar aspect, is pathognomonic for a Lisfranc injury and an absolute indication for surgical intervention.
Indications & Contraindications
The decision for operative versus non-operative management of Lisfranc injuries hinges primarily on the stability and degree of displacement of the tarsometatarsal joints. The overarching goal is anatomical reduction and stable fixation to prevent post-traumatic arthritis and maintain foot function.
Operative Indications:
- Any degree of diastasis between the medial cuneiform and the base of the second metatarsal > 2mm on weight-bearing AP radiographs or with stress views, indicative of Lisfranc ligament disruption.
- Any displacement (dorsal, plantar, lateral) of one or more metatarsal bases relative to their respective cuneiforms or cuboid, even if minimal.
- Fracture-dislocation patterns where bony integrity is compromised in conjunction with ligamentous injury.
- Avulsion fracture from the base of the second metatarsal (fleck sign), which signifies a disruption of the Lisfranc ligament insertion.
- Gross instability on clinical examination or fluoroscopic stress views, even if radiographs appear relatively benign.
- Compartment syndrome of the foot, requiring emergent fasciotomy, often associated with high-energy Lisfranc injuries.
- Open Lisfranc injuries, requiring emergent debridement and stabilization.
- Irreducible dislocations.
- Failed non-operative management (e.g., progressive deformity, continued pain).
Non-Operative Indications (Rare for True Lisfranc Injuries):
- Stable, non-displaced Lisfranc sprains (Grade I) with no diastasis or bony displacement on standard and weight-bearing radiographs, and no instability on stress views. These are typically managed with cast immobilization for 6-8 weeks followed by progressive weight-bearing. However, true Grade I Lisfranc injuries are uncommon, and a high index of suspicion should always prompt advanced imaging (CT, MRI) to rule out subtle instability.
- Medically unstable patient for whom surgical intervention carries prohibitive risk. This would necessitate a non-operative approach with external fixation or cast immobilization, followed by delayed reconstruction if the patient's condition improves.
Summary Table: Operative vs. Non-Operative Indications
| Feature / Indication | Operative Management | Non-Operative Management (Rare) |
|---|---|---|
| Lisfranc Diastasis (MC-2MT) | > 2mm on WB AP or stress views; any instability | < 2mm, stable on WB AP & stress views |
| Metatarsal Displacement | Any degree of dorsal, plantar, or lateral displacement of MT bases | None |
| Fleck Sign (2nd MT Avulsion) | Present | Absent |
| Gross Instability | Present on clinical exam or fluoroscopy | Absent |
| Fracture-Dislocation | Present | Absent (purely ligamentous sprain, Grade I) |
| Compartment Syndrome | Emergent fasciotomy required | Not present |
| Open Injury | Emergent debridement and stabilization | Not present |
| Irreducibility | Present | Not present |
| Patient Status | Medically stable, able to tolerate surgery | Medically unstable, high surgical risk (temporary measure) |
| Outcome of Non-Op Trial | Failure (e.g., persistent pain, progressive deformity) | Successful symptom control, stability maintained |
Pre-Operative Planning & Patient Positioning
Careful pre-operative planning is crucial for achieving anatomical reduction and stable fixation, minimizing complications, and optimizing long-term outcomes.
Diagnostic Evaluation:
-
Radiographs:
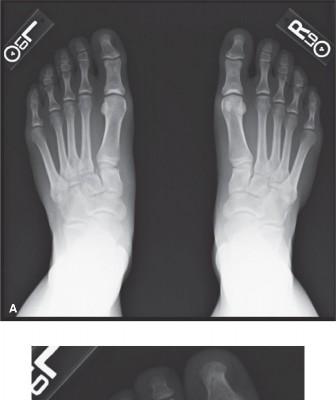
- Standard Views: AP, lateral, and 30-degree oblique views of the foot. Look for loss of alignment, incongruity, and avulsion fractures.
- Weight-bearing (WB) Views: Essential for dynamic assessment. Diastasis between the medial cuneiform and second metatarsal base > 2mm is a definitive sign of instability.
- Stress Views: If initial WB films are equivocal but suspicion remains high, manual stress views (e.g., pronation-abduction stress) under fluoroscopy with local anesthetic can reveal occult instability.
-
- Comment: This image could represent a pre-operative radiograph (e.g., an AP weight-bearing view) demonstrating subtle widening between the medial cuneiform and second metatarsal base, underscoring the diagnostic challenge and the importance of thorough interpretation.
- Computed Tomography (CT) Scan: The gold standard for bony anatomy assessment. Critical for evaluating fracture patterns, fragment comminution, articular involvement, and precise displacement in all three planes. It helps delineate the extent of injury, especially when radiographs are inconclusive or in the setting of polytrauma.
- Magnetic Resonance Imaging (MRI): Useful for assessing purely ligamentous injuries, especially the Lisfranc ligament, and soft tissue damage. Less critical than CT for acute bony dislocations but valuable for subtle sprains or chronic instability.
Surgical Strategy:
- Injury Classification: Understanding the injury pattern (e.g., Hardcastle, Myerson) guides the approach. The key principle is anatomical reduction of the second metatarsal to the medial cuneiform and then building the rest of the midfoot around this stable foundation.
-
Implant Selection:
- Screws: 3.5mm or 4.0mm cortical screws are commonly used for TMT fixation. They can be fully threaded (non-compressive) or headless compressive screws. The decision often depends on the specific joint and surgeon preference. Screws should ideally be removed 3-6 months post-operatively to prevent hardware-related arthritis and allow for normal midfoot motion.
- Plates: Dorsal bridging plates or locking plates are increasingly used, particularly for comminuted fractures or in cases where screw fixation alone is deemed insufficient. They may provide more rigid fixation and potentially allow for earlier mobilization, though implant removal remains a consideration.
- Temporary K-wires: Useful for provisional reduction and holding fragments.
- External Fixation: Occasionally used in severe open injuries, highly comminuted fractures, or in a "damage control" scenario for polytrauma patients.
- Pre-Operative Templating: Using radiographic images to plan incision placement, screw trajectories, and plate contouring.
Patient Positioning:
- Supine position: The patient is placed supine on the operating table.
- Tourniquet: A thigh tourniquet is applied to provide a bloodless field, which is critical for accurate visualization and reduction.
- Fluoroscopy: A C-arm fluoroscopy unit must be readily available and draped sterilely to allow for intraoperative imaging in AP, oblique, and lateral views. The contralateral foot should be prepped and draped to allow for comparison images, if necessary, especially for subtle injuries.
- Leg positioning: The leg is often supported on a bump or gel roll to allow for adequate access and ease of manipulation of the foot.
Detailed Surgical Approach / Technique
The goal of surgical intervention is anatomical reduction of the TMT joints, particularly the second metatarsal to the medial cuneiform, and stable internal fixation.
Incisions and Exposure:
Typically, two dorsal incisions are utilized:
-
Medial Incision (First Ray):
Longitudinal incision directly over the first TMT joint, between the tibialis anterior and extensor hallucis longus tendons.
- Internervous Plane: Between the EHL and tibialis anterior.
- Purpose: Exposes the first TMT joint and the critical area of the medial cuneiform. The first TMT joint serves as the most stable reference point.
-
Dorsal Incision (Second/Third Ray):
Longitudinal incision over the second TMT joint, often extending to expose the third TMT joint. This incision is placed between the extensor hallucis longus (EHL) and extensor digitorum longus (EDL) tendons, or specifically between the EHL and the tendon to the second toe.
- Internervous Plane: Between EHL and EDL, protecting the dorsalis pedis artery and deep peroneal nerve, which typically lie laterally to the EHL. Careful dissection is paramount to avoid neurovascular injury.
- Purpose: Provides access to the second and third TMT joints, the crucial Lisfranc ligament attachment, and the base of the second metatarsal.
- Caution: Prophylactic neurolysis or careful retraction of the deep peroneal nerve is crucial to prevent iatrogenic injury.
Debridement and Joint Preparation:
- Debride hematoma, small comminuted osteochondral fragments, and interposed soft tissue from the joint surfaces.
- Retain larger articular fragments that can be reduced and fixed.
Reduction Strategy:
Anatomical reduction is the most critical step. The philosophy is to restore the keystone function of the second metatarsal base.
- Indirect Reduction: Initial gentle traction on the toes may help realign gross dislocations.
-
Direct Reduction:
- "Top-Down" Approach: Focus on reducing the first and second TMT joints first, as they are the most stable and crucial for midfoot alignment.
- First Ray Reduction: Reduce the first metatarsal to the medial cuneiform. This joint is relatively stable. Secure with provisional K-wires.
-
Second Ray Reduction (The Cornerstone):
This is the most critical step.
- Restoring the MC-2MT alignment: Focus on anatomical reduction of the second metatarsal base into its recess within the cuneiforms. Use reduction clamps, bone-holding forceps, or joy-stick K-wires into the metatarsal head for traction and manipulation.
- Address any dorsal, plantar, or lateral displacement. This reduction should be meticulously performed to ensure there is no residual gapping or malrotation.
-
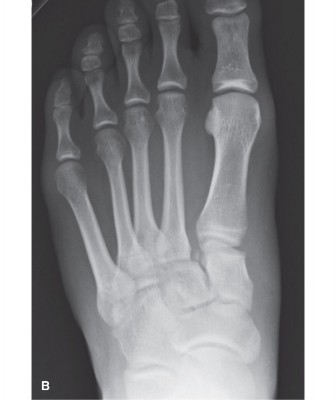
- Comment: This image could depict an intraoperative fluoroscopic view demonstrating the successful anatomical reduction of the second metatarsal base to the medial cuneiform with provisional K-wire fixation, highlighting the key alignment before definitive hardware placement.
- Third, Fourth, and Fifth Ray Reduction: Once the first and second rays are stably reduced, the remaining lateral metatarsals are reduced sequentially to their respective cuneiforms and cuboid. These are often reduced to the stable second ray or their tarsal counterparts.
- Assessment: Throughout reduction, constantly monitor alignment using fluoroscopy (AP, oblique, and lateral views). Ensure restoration of the medial and intermediate cuneiform-second metatarsal spaces, symmetrical Meary’s angle (lateral view), and the appropriate metatarsal cascade.
Fixation Technique:
The primary goal is stable internal fixation to maintain anatomical reduction until healing.
-
First Ray Fixation (1st MT to Medial Cuneiform):
- Typically fixed with a single 3.5mm or 4.0mm cortical screw, or a headless compressive screw.
- Screw placed from the dorsal aspect of the medial cuneiform, angled distally and laterally, into the base of the first metatarsal. Care should be taken to avoid the articular surface.
-
Second Ray Fixation (Critical Lisfranc Ligament Repair/Reconstruction):
- This is the most critical fixation.
- A 3.5mm or 4.0mm cortical screw (non-compressive, fully threaded preferred by many to avoid over-compression and potential cartilage damage if left in place) is placed from the dorsal aspect of the medial cuneiform into the base of the second metatarsal. This screw effectively bridges the Lisfranc joint and stabilizes the crucial MC-2MT articulation.
- The trajectory is critical: typically starting on the medial cuneiform (1cm distal to navicular), directed towards the lateral plantar aspect of the second metatarsal base.
- Alternatively, a headless compressive screw can be used, particularly in reconstructive cases where hardware removal is planned.
-
Third Ray Fixation (3rd MT to Lateral Cuneiform):
- Similar to the first ray, a 3.5mm cortical screw from the lateral cuneiform into the base of the third metatarsal.
-
Fourth and Fifth Ray Fixation (4th MT, 5th MT to Cuboid):
- These joints are often more mobile and may not require rigid fixation unless significantly displaced or fractured. K-wire fixation can be sufficient for these rays, or a screw for the 4th MT to cuboid. The 5th MT base is often fixed if fractured (e.g., Jones fracture).
- Alternatively, dorsal plates can be used to bridge unstable segments, especially in comminuted patterns. They may allow for indirect reduction and maintain length while protecting soft tissues.
Primary Arthrodesis vs. ORIF:
- Primary Arthrodesis: In severe comminuted injuries, chronic unreduced injuries, or in patients with pre-existing midfoot arthritis, primary arthrodesis of the first, second, and third TMT joints may be indicated. This aims for a stable, pain-free foot but sacrifices motion. The fourth and fifth TMT joints are often preserved due to their inherent mobility.
- ORIF with Hardware Removal: The standard of care for acute injuries. Hardware, especially transarticular screws, is typically removed 3-6 months post-operatively to allow for restoration of normal TMT joint motion and prevent hardware-related complications.
Closure:
- Irrigate thoroughly.
- Close incisions in layers, paying meticulous attention to skin closure to minimize wound complications.
-
Apply a sterile dressing and a well-padded splint, typically in a neutral position.
-
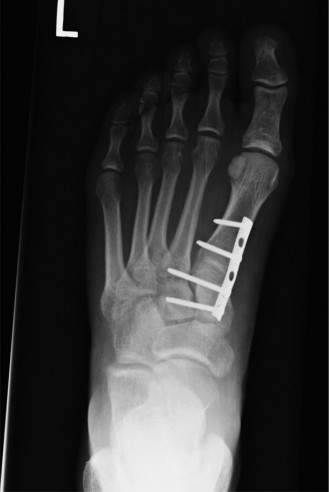
- Comment: This image could be a post-operative radiograph (e.g., AP oblique view) showing well-reduced TMT joints with appropriate screw fixation, including the critical screw stabilizing the second metatarsal base to the medial cuneiform.
-
Complications & Management
Despite meticulous surgical technique, Lisfranc injuries carry a significant risk of complications, highlighting the complex nature of these injuries and the challenges in achieving optimal long-term outcomes.
Common Complications:
-
Post-Traumatic Arthritis (PTA):
- Incidence: The most common long-term complication, occurring in 20-90% of cases, even after anatomical reduction.
- Cause: Residual articular incongruity, cartilage damage at the time of injury, or prolonged inflammation.
- Salvage: Initial management with activity modification, NSAIDs, orthotics, and injections. If conservative measures fail, surgical options include arthrodesis (TMT fusion, particularly for the painful first, second, and third rays), or joint débridement in less severe cases.
-
Malunion / Nonunion:
- Incidence: Up to 30%, especially in comminuted fractures or inadequate fixation.
- Cause: Inaccurate reduction, unstable fixation, early weight-bearing, or poor bone healing capacity.
- Salvage: Symptomatic malunion often requires corrective osteotomy or arthrodesis. Nonunion of a fracture may require revision ORIF with bone grafting or primary arthrodesis.
-
Hardware Failure / Prominence:
- Incidence: Common with screws, particularly if left in situ, due to repetitive loading. Can manifest as breakage, loosening, or pain due to prominence.
- Cause: Material fatigue, insufficient bone healing, or excessive stress on implants.
- Salvage: Symptomatic hardware requires removal, typically 3-6 months post-op. If fixation fails before healing, revision surgery with more robust fixation or arthrodesis may be necessary.
-
Infection:
- Incidence: 1-5%, higher in open injuries or with prolonged surgery.
- Cause: Contamination during surgery, compromised soft tissue envelope.
- Salvage: Superficial infections managed with antibiotics. Deep infections require surgical debridement, intravenous antibiotics, and potentially hardware removal. May necessitate staged procedures or reconstructive flaps.
-
Nerve Injury:
- Incidence: Up to 10-15%, often involving the deep peroneal nerve (dorsal incision) or sural nerve (lateral aspect).
- Cause: Iatrogenic injury during dissection, compression from hematoma or swelling, or traction.
- Salvage: Conservative management for neurapraxia. Surgical exploration and neurolysis for persistent pain or motor deficit.
-
Complex Regional Pain Syndrome (CRPS):
- Incidence: Up to 10%.
- Cause: Unclear etiology, often triggered by trauma or surgery.
- Salvage: Multidisciplinary approach involving physical therapy, pain management (nerve blocks, medications), and psychological support. Early recognition is key.
-
Delayed Union / Prolonged Recovery:
- Incidence: Common due to the nature of the injury and the demands on the foot.
- Cause: Biological factors, inadequate rehabilitation, patient non-compliance.
- Salvage: Extended non-weight-bearing, aggressive physical therapy, psychosocial support.
Table of Common Complications and Salvage Strategies
| Complication | Incidence (%) | Primary Cause(s) | Salvage Strategy |
|---|---|---|---|
| Post-Traumatic Arthritis (PTA) | 20-90 | Residual incongruity, cartilage damage, prolonged inflammation | Conservative (NSAIDs, orthotics), Arthrodesis (TMT fusion), Joint débridement |
| Malunion / Nonunion | Up to 30 | Inaccurate reduction, unstable fixation, early WB, poor healing | Corrective osteotomy, Revision ORIF with bone graft, Primary Arthrodesis |
| Hardware Failure / Prominence | 10-20 | Material fatigue, insufficient bone healing, excessive stress | Hardware removal (symptomatic), Revision ORIF with stronger implants, Arthrodesis (if joint unstable) |
| Infection | 1-5 | Contamination, compromised soft tissue | IV antibiotics, Surgical debridement, Hardware removal (if infected), Staged reconstruction |
| Nerve Injury | 10-15 | Iatrogenic during dissection, compression, traction | Conservative for neurapraxia, Surgical exploration & neurolysis for persistent deficits |
| Complex Regional Pain Syndrome (CRPS) | Up to 10 | Unclear, often trauma/surgery-triggered | Multidisciplinary (PT, pain management, nerve blocks, medications, psychological support) |
| Delayed Union / Prolonged Recovery | Common | Biological factors, inadequate rehab, non-compliance | Extended NWB, aggressive physical therapy, psychosocial support |
Post-Operative Rehabilitation Protocols
Post-operative rehabilitation is a critical component of successful Lisfranc injury management, aiming to restore function, minimize complications, and facilitate return to activity. Protocols vary based on injury severity, fixation stability, and surgeon preference, but generally follow a phased approach.
Phase 1: Immobilization and Non-Weight Bearing (0-6/8 Weeks Post-Op)
- Goals: Protect fixation, control pain and swelling, promote soft tissue healing.
-
Immobilization:
- Immediately post-op: Well-padded splint in neutral position.
- After wound inspection (1-2 weeks): Non-weight-bearing (NWB) cast or CAM boot (Controlled Ankle Motion).
- Weight Bearing: Strict NWB for the entire period. Crutches or a knee scooter are used.
- Elevation: Keep the foot elevated above the heart as much as possible to reduce swelling.
- Cryotherapy: Apply ice regularly.
-
Range of Motion (ROM):
- Toe ROM exercises (flexion/extension) may be initiated early if not restricted by pain or swelling.
- Ankle ROM exercises (dorsiflexion/plantarflexion, inversion/eversion) are encouraged, avoiding any motion that stresses the midfoot.
- Monitoring: Regular wound checks. Radiographs at 2 and 6 weeks to assess for reduction maintenance and early signs of healing.
Phase 2: Progressive Weight Bearing and Early Motion (6/8-12 Weeks Post-Op)
- Goals: Gradually introduce weight-bearing, restore protected joint motion, begin gentle strengthening.
- Hardware Removal (Optional, 3-6 months): If transarticular screws were used, they are often removed around 3-6 months post-operatively. This allows for restoration of natural midfoot motion and minimizes the risk of hardware-related arthritis or failure. The decision is patient-specific and depends on radiographic evidence of bone healing. If hardware is removed, a period of protected weight-bearing may be reinstituted.
-
Weight Bearing:
- Begin partial weight-bearing (PWB) in a CAM boot, gradually increasing tolerance.
- Transition to full weight-bearing (FWB) in the boot as tolerated, typically by 10-12 weeks.
-
ROM:
- Gradually increase active and passive midfoot and ankle ROM exercises.
- Focus on gentle, controlled movements, avoiding forceful manipulation.
-
Strengthening:
- Isometric exercises for ankle and foot musculature (e.g., gastroc-soleus complex, tibialis anterior).
- Theraband exercises for ankle inversion/eversion, dorsiflexion/plantarflexion.
- Balance: Begin gentle balance exercises (e.g., single leg stance with support).
- Gait Training: Focus on proper gait mechanics with the use of assistive devices as needed.
Phase 3: Advanced Strengthening and Proprioception (12-24 Weeks Post-Op)
- Goals: Restore full strength, endurance, and proprioception. Improve dynamic stability and prepare for activity-specific demands.
- Weight Bearing: Full weight-bearing without assistive devices or boot. Transition to supportive footwear (e.g., athletic shoes with arch support).
-
Strengthening:
- Progress to more advanced resistance exercises for all foot and ankle musculature.
- Calf raises, toe raises, stair climbing.
- Eccentric strengthening.
-
Proprioception/Balance:
- Balance board exercises, uneven surfaces, single-leg hopping drills.
- Agility drills, if appropriate for the patient's intended activity level.
- Cardiovascular: Non-impact cardiovascular activities (e.g., swimming, cycling).
- Monitoring: Radiographs at 3-6 months to assess for healing and stability after hardware removal (if performed).
Phase 4: Return to Activity (6 Months + Post-Op)
- Goals: Gradual return to desired activities, including sports, as tolerated.
-
Sport-Specific Training:
- Progress from light jogging to running, cutting, and jumping, guided by pain and function.
- Emphasis on proper technique and progressive loading.
- Orthotics: Custom foot orthoses may be beneficial for long-term support and alignment.
- Long-Term Monitoring: Patients should be counseled on the potential for long-term complications, particularly post-traumatic arthritis, and encouraged to seek early intervention for any persistent symptoms. Return to high-impact activities should be cautious and guided by objective functional assessment.
Summary of Key Literature / Guidelines
Management of Lisfranc injuries has evolved significantly over recent decades, with a growing consensus on the importance of anatomical reduction and stable fixation, especially concerning the critical second metatarsal base.
-
Anatomical Reduction is Paramount: The fundamental principle underscored by numerous studies is that anatomical reduction of the TMT joint complex is the strongest predictor of good long-term outcomes and reduced incidence of post-traumatic arthritis. Residual displacement greater than 1-2mm is associated with significantly poorer results. Hardcastle's early work and subsequent classification systems (e.g., Myerson) highlighted the importance of recognizing the distinct patterns of injury, emphasizing that displacement of the second metatarsal is often indicative of severe instability.
- Reference: Hardcastle, P. H. (1977). Injuries to the tarsometatarsal joint. Journal of Bone and Joint Surgery. British volume , 59(3), 329-335.
- Reference: Myerson, M. S., et al. (1986). Lisfranc's fracture-dislocation: a multicenter study of operative management. Foot & Ankle , 6(5), 225-242.
-
Focus on the Second Metatarsal Base: The interosseous Lisfranc ligament, connecting the medial cuneiform to the base of the second metatarsal, is the primary stabilizer. Injury to this ligament or an avulsion fracture from the second metatarsal base (the "fleck sign") is pathognomonic for an unstable Lisfranc injury requiring surgical intervention. This anatomical keystone dictates the reduction sequence, focusing on restoring the second metatarsal's relationship to the medial cuneiform first.
-
Role of Weight-Bearing Radiographs and CT: The literature consistently advocates for routine weight-bearing radiographs to diagnose subtle instability, especially when non-weight-bearing films appear normal. CT scans are considered essential for detailed assessment of fracture patterns, articular involvement, and precise displacement, guiding surgical planning. MRI is useful for purely ligamentous injuries.
- Reference: Nunley, J. A., & Vertullo, C. J. (2002). Classification, investigation, and management of midfoot sprains: Lisfranc injuries in the new millennium. Foot & Ankle Clinics , 7(1), 1-19.
-
Operative vs. Non-Operative Management: There is strong evidence supporting operative fixation for all unstable Lisfranc injuries. Non-operative management is reserved for truly stable, non-displaced sprains (Grade I), which are rare and require rigorous confirmation with weight-bearing and stress radiographs/imaging. Even in these cases, prolonged immobilization is necessary.
-
Fixation Modalities:
- Transarticular Screws: Historically, dorsal transarticular screw fixation (e.g., 3.5mm or 4.0mm cortical screws) from the medial cuneiform to the second metatarsal is the gold standard for ligamentous injuries or simple fracture-dislocations. These screws are typically removed at 3-6 months post-operatively to prevent hardware-related complications and allow for movement.
- Dorsal Plating: Increasingly, dorsal plating systems are used, particularly for comminuted injuries or cases where more rigid fixation is desired. Plates may offer more stability and allow for earlier range of motion in some protocols. Studies comparing screws versus plates show mixed results, with some suggesting similar outcomes but potentially fewer reoperations for hardware removal with plates (if not crossing joints).
- Reference: Coetzee, J. C. (2008). Surgical management of Lisfranc injuries. Techniques in Foot & Ankle Surgery , 7(2), 79-88.
- Reference: Choo, K. J., et al. (2018). Surgical outcomes of Lisfranc injury: a systematic review. Journal of Foot and Ankle Research , 11(1), 38.
-
Primary Arthrodesis: For severely comminuted fracture-dislocations, chronic injuries, or cases with pre-existing degenerative changes, primary arthrodesis of the involved TMT joints (typically 1st, 2nd, and 3rd) is a recognized option. This approach aims to provide a stable, pain-free foot, albeit at the expense of motion. Comparative studies with ORIF have shown mixed results regarding functional outcomes and rates of reoperation, suggesting arthrodesis may lead to a lower reoperation rate but potentially equivalent functional outcomes to ORIF with hardware removal.
- Reference: Henning, R., et al. (2009). Primary arthrodesis vs. open reduction and internal fixation for Lisfranc injury: a meta-analysis. Journal of Orthopaedic Trauma , 23(7), 512-517.
-
Complication Rates: The high incidence of post-traumatic arthritis remains a significant concern, emphasizing the need for meticulous surgical technique and vigilant post-operative management. Ongoing research continues to explore ways to minimize this debilitating complication, including optimal reduction strategies, hardware choices, and advanced biological augmentation.
In summary, the academic literature strongly advocates for a high index of suspicion for Lisfranc injuries, particularly when evaluating the base of the second metatarsal. Early, accurate diagnosis and anatomical reduction with stable fixation remain the cornerstones of management to optimize patient outcomes and mitigate the risk of long-term disability.
