Surgical Management of Severe Forearm Contractures: Excision, Neurolysis, and Free Gracilis Transfer
Key Takeaway
Severe ischemic contractures of the forearm require meticulous two-stage surgical reconstruction. The first stage involves radical excision of necrotic volar musculature and neurolysis of the median and ulnar nerves. The second stage utilizes a free functioning gracilis muscle transfer, reinnervated by the anterior interosseous nerve, to restore digital flexion. Concomitant management of intrinsic hand contractures via Littler release or tenotomy is often necessary to optimize functional outcomes.
PATHOPHYSIOLOGY AND PREOPERATIVE EVALUATION
Severe contractures of the forearm and hand, most classically presenting as Volkmann’s ischemic contracture, represent the devastating sequelae of an untreated or inadequately decompressed compartment syndrome. The ischemic cascade leads to irreversible myonecrosis, subsequent fibrotic replacement, and profound neurologic compromise due to both primary ischemic nerve injury and secondary compression by surrounding fibrotic tissue.
The management of these severe contractures requires a highly structured, evidence-based approach. When the deep volar compartment musculature (flexor digitorum profundus [FDP] and flexor pollicis longus [FPL]) is entirely necrotic and replaced by unyielding scar tissue, simple tendon lengthening or tenolysis is futile. In these advanced cases, a two-stage reconstructive protocol—pioneered and refined by Oishi and Ezaki—is indicated. This consists of an initial radical debridement and neurolysis, followed by a delayed free functioning gracilis muscle transfer (FFGMT) to restore active digital flexion.
Clinical Pearl: Preoperative electromyography (EMG) and nerve conduction studies (NCS) are mandatory to assess the viability of the median and ulnar nerves, as well as the availability of a functional donor nerve (typically the anterior interosseous nerve [AIN]) for the second-stage muscle transfer.
STAGE ONE: EXCISION OF NECROTIC MUSCLES AND NEUROLYSIS
The primary objective of the first stage is to convert a scarred, contracted, and neurologically compromised extremity into a supple bed with optimized neurovascular structures, preparing it for future reconstruction.
Surgical Anatomy and Positioning
The patient is positioned supine with the affected upper extremity extended on a radiolucent hand table. A sterile tourniquet is applied high on the brachium. The surgical approach must allow extensile exposure of the entire volar forearm, from the medial epicondyle to the carpal tunnel.
Surgical Technique (Oishi and Ezaki)
-
Incision and Exposure:
Make a curvilinear, extensile incision beginning proximal to the elbow at the medial epicondyle, crossing the antecubital fossa obliquely, and extending distally along the volar forearm to the wrist. Elevate thick fasciocutaneous flaps to widely expose the volar forearm compartments. -
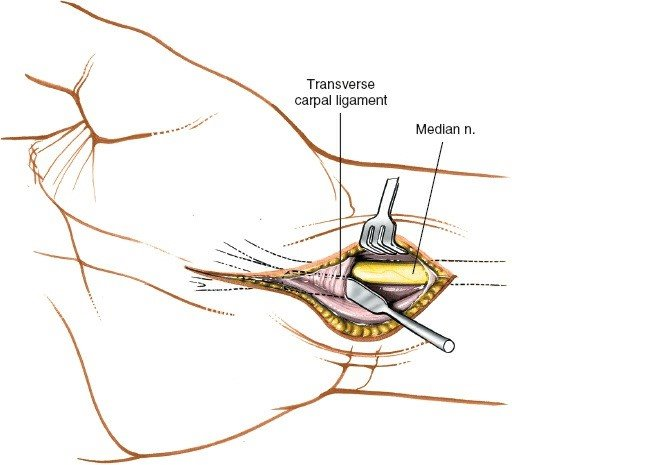
Neurovascular Identification and Neurolysis:
Identify and mobilize the ulnar nerve at the elbow, tracing it distally. In the antecubital fossa, isolate and protect the median nerve and the brachial artery. Meticulously dissect the median and ulnar nerves, along with the major vascular structures, from the elbow to the wrist. This requires freeing them from dense adherences to the fibrotic, necrotic muscle bellies.
Surgical Warning: The nerves are often encased in dense scar tissue and may be structurally attenuated. Use loupe magnification or an operating microscope to avoid iatrogenic transection during neurolysis.
-
Radical Debridement:
Débride all involved necrotic and fibrotic muscle, paying special attention to the deep layers (FDP, FPL, pronator quadratus). In severe cases, the debridement must be radical; frequently, the only structures remaining in the volar forearm are the median and ulnar nerves, the brachial/radial/ulnar arteries, and the distal tendon stumps. -
Vascular and Neural Reconstruction:
If segmental nerve defects or arterial occlusions are identified during debridement, perform necessary nerve grafting (e.g., sural nerve cable grafts) or vascular reconstruction at this stage. -
Tendon Management:
Preserve the proximal ends of the flexor tendons as long as possible. Suture the proximal ends of the FDP and the FPL together. This creates a unified tendinous unit for easy identification during the second stage. In young or small children, suture these ends to an area proximal to the carpal tunnel to prevent them from retracting distally into the canal. -
Closure and Immobilization:
Release the tourniquet, achieve meticulous hemostasis, and close the skin over closed-suction drains. Immobilize the arm in a well-padded long-arm cast for 3 weeks to allow the extensive soft-tissue wounds to heal.
Post-Stage One Rehabilitation
After cast removal at 3 weeks, initiate an aggressive passive range of motion (PROM) protocol for the fingers, wrist, and elbow. The patient is observed over the ensuing 6 months to monitor for spontaneous muscle recovery and sensory return following the neurolysis.
STAGE TWO: FREE FUNCTIONING GRACILIS MUSCLE TRANSFER
Once soft-tissue equilibrium is achieved and passive joint mobility is maximized (typically 3 to 6 months post-Stage One), the second stage is performed. A two-team approach is highly recommended to minimize ischemia time and overall operative duration. Team A prepares the recipient forearm, while Team B harvests the gracilis muscle.
Recipient Site Preparation (Team A)
- Re-exploration: Re-open the previous volar forearm incision. Identify the brachial artery and follow it distally to determine its suitability for microvascular anastomosis. Identify a robust recipient vein; venae comitantes or deep veins are preferred, as superficial subcutaneous veins may be inadequate due to previous scarring.
- Nerve Preparation: Identify the anterior interosseous nerve (AIN) branch of the median nerve. Under the operating microscope, cut the AIN back proximally until healthy, bleeding fascicles are visualized.
- Tendon Preparation: In the distal forearm, identify the previously tagged ends of the FDP and FPL tendons and free them from surrounding adhesions.
Donor Site Harvest (Team B)
- Gracilis Exposure: Expose the gracilis muscle in the medial thigh. If a skin paddle is required for forearm coverage or postoperative monitoring, design it over the proximal two-thirds of the muscle.
Surgical Warning: The blood supply to the distal third of the skin overlying the gracilis is highly unreliable. Do not rely on a distal skin paddle for coverage.
- Tension Marking: Before detaching the muscle, place marking sutures on the anterior surface of the gracilis at exactly 2-cm intervals. This step is critical for restoring the muscle's physiological resting tension during inset.
- Neurovascular Dissection: Identify and dissect the dominant neurovascular pedicle (medial circumflex femoral artery branches and the anterior branch of the obturator nerve). Careful dissection is mandatory, as the obturator nerve runs superiorly and can be easily injured.
- Harvest: Once the recipient site is fully prepared, divide the neurovascular pedicle, release the muscle origin and insertion, and transfer the flap to the forearm.
Microvascular Anastomosis and Nerve Coaptation
- Proximal Inset: Suture the proximal origin of the gracilis to the medial epicondyle using heavy nonabsorbable sutures. Ensure the ulnar nerve is protected during this step. Position the muscle belly to allow the neurovascular pedicle to reach the recipient vessels without undue tension or kinking.
- Microvascular Anastomosis: Using the operating microscope, perform the arterial and venous anastomoses. If a vein graft is necessary due to a zone of injury, it can be anastomosed to the gracilis artery on the back table prior to transfer. Place an implantable Doppler probe around the arterial anastomosis for continuous postoperative monitoring.
- Nerve Coaptation: Perform an epineurial coaptation between the AIN and the obturator nerve. The closer this coaptation is to the muscle belly, the shorter the distance required for axonal regeneration, thereby accelerating reinnervation.
Tenodesis and Tensioning
- FDP Weave: After confirming adequate flap perfusion, weave the distal end of the gracilis tendon into the unified FDP tendons. Tension the muscle until the previously placed 2-cm marking sutures return to exactly 2 cm apart, re-establishing the optimal length-tension relationship.
- FPL Weave: Suture the FPL tendon to a separate, distinct portion of the gracilis muscle (or to the FDP mass if independent thumb flexion is not prioritized). Set the tension with the wrist in 10 to 20 degrees of extension, aiming for a slight overcorrection of the normal digital flexion cascade.
- Tenodesis Check: Passively flex and extend the wrist to ensure the tenodesis effect allows appropriate finger extension and flexion.
Postoperative Protocol
The patient is transferred to a warm microvascular monitoring unit and started on a daily baby aspirin. The extremity is elevated to prevent venous congestion, which could jeopardize flap viability. The implantable Doppler is monitored continuously and removed at 6 to 7 days under brief anesthesia.
The upper extremity is immobilized in a protective splint for 4 weeks to protect the tendon weaves. Following this, guided range-of-motion exercises begin. Protective splinting continues between exercises for the first few months. Patients must be counseled that functional muscle contraction relies on nerve regeneration, which may take up to 6 months to become clinically apparent.
MANAGEMENT OF ESTABLISHED INTRINSIC MUSCLE CONTRACTURES
Severe forearm ischemia is frequently accompanied by intrinsic muscle ischemia within the hand. The proper surgical release of established intrinsic muscle contractures depends entirely on their severity and the remaining viability of the interosseous and lumbrical muscles.
Clinical Evaluation
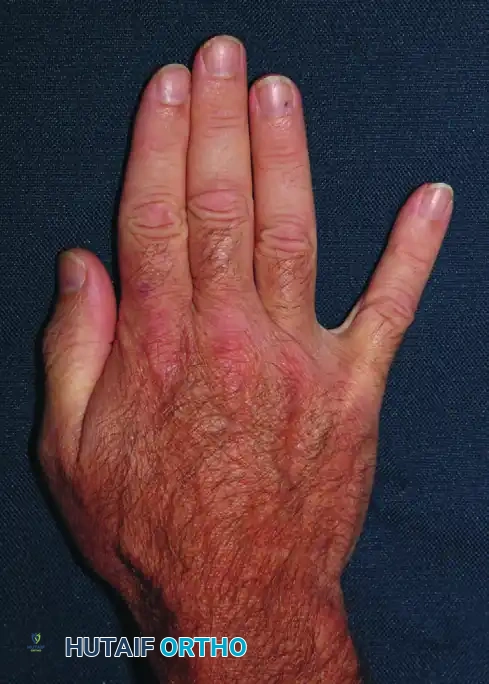
FIGURE 74-9: Abduction contracture of the fifth finger in a patient who developed fibrosis in the abductor digiti quinti, likely secondary to ischemic myositis from a compressive bandage.
The hallmark of intrinsic contracture is a positive intrinsic tightness test (Bunnell test). When the metacarpophalangeal (MCP) joints are held in passive extension, the proximal interphalangeal (PIP) joints cannot be passively flexed. Conversely, when the MCP joints are flexed (relaxing the intrinsics), PIP flexion is easily achieved.
Mild Contractures: The Littler Release
In mild contractures, the intrinsic muscles retain function but are adaptively shortened. The intrinsic tightness test is positive, but there is no severe fixed deformity. In these cases, the distal intrinsic release described by Littler is indicated.
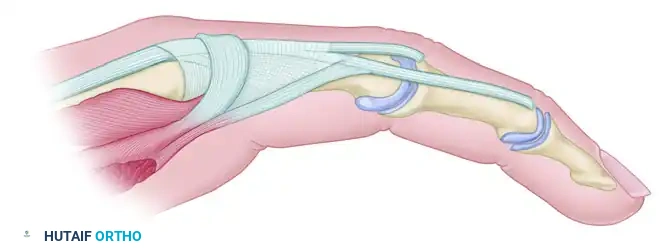
FIGURE 74-10A: Extensor aponeurosis at the level of the metacarpophalangeal joint. It consists of the long extensor tendon, transverse fibers (which flex the MCP joint), and oblique fibers (which extend the IP joints). The crosshatched part represents the oblique fibers to be resected.
Technique: The goal is to release the oblique fibers of the extensor hood (which cause the PIP extension contracture) while preserving the transverse fibers (which allow for MCP flexion). Through dorsal longitudinal incisions over the affected digits, the lateral bands are identified. The oblique fibers of the intrinsic wing are sharply excised from the extensor mechanism on both sides of the hood.

FIGURE 74-10B: Appearance of the aponeurosis after the Littler release. The transverse fibers and sagittal bands remain intact.
Moderate Contractures: Interosseous Muscle Sliding
In more severe contractures where the interosseous muscles are viable but significantly contracted, active spreading of the fingers may still be possible, but the intrinsic tightness is profound.
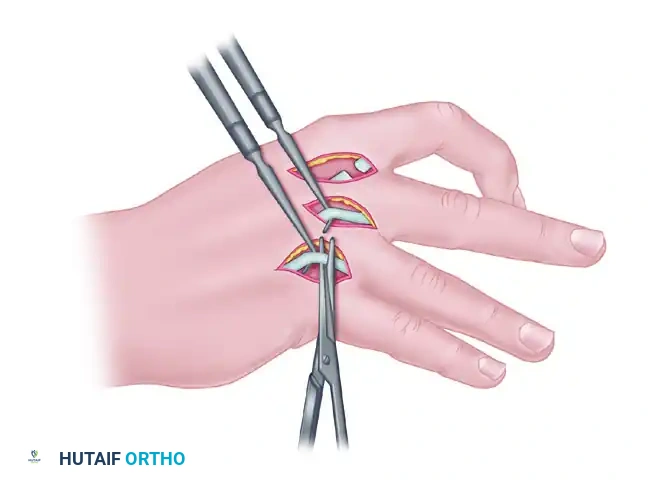
FIGURE 74-11A: Method of stripping and advancing interosseous muscles to slacken them, allowing proximal finger joints to extend and distal joints to flex. This is performed only when muscles retain considerable function. The nerve supply must be meticulously spared.
Technique: A muscle sliding operation is performed. The contracted interosseous muscles are subperiosteally elevated and released from their origins on the metacarpal shafts. This allows the muscle bellies to slide distally, effectively lengthening the musculotendinous unit without destroying active function. Extreme care must be taken to preserve the deep branch of the ulnar nerve during this proximal release.
Severe Contractures: Complete Intrinsic Tenotomy
In the most severe manifestations of ischemic contracture, the intrinsic muscles are not only contracted but completely necrotic and replaced by dense fibrosis. Useful muscle excursion is entirely absent, rendering sliding procedures or selective releases ineffective.
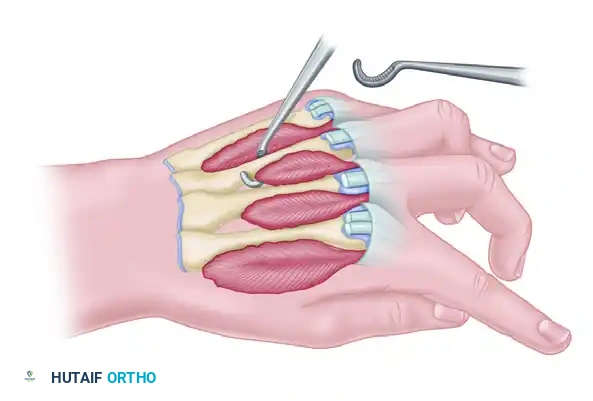
FIGURE 74-11B: Complete intrinsic tenotomy for severe intrinsic contractures in which nonfunctioning, fibrotic interosseous muscle remains.
Technique: A complete intrinsic tenotomy is required. The lateral bands and the tendinous insertions of the fibrotic interossei and lumbricals are completely divided at the level of the proximal phalanx. This radical release abolishes the tethering effect on the PIP joints, allowing passive flexion. In these end-stage hands, additional procedures such as dorsal capsulotomies of the MCP joints or subsequent tendon transfers (e.g., FDS lasso procedures) may be necessary to restore a functional resting posture and pinch kinematics.
You Might Also Like