Introduction to Endoscopic Cubital Tunnel Release
Cubital tunnel syndrome represents the second most common compression neuropathy of the upper extremity, following carpal tunnel syndrome. While open in situ decompression and anterior transposition (subcutaneous, intramuscular, or submuscular) have historically been the gold standards of surgical management, Endoscopic Cubital Tunnel Release has emerged as a highly efficacious, minimally invasive alternative.
Pioneered to reduce the morbidity associated with extensive open incisions, the endoscopic approach (often utilizing the Cobb technique) offers significant advantages. By utilizing a minimal 2-cm incision, surgeons can achieve complete decompression of the ulnar nerve from the arcade of Struthers proximally to the deep flexor-pronator aponeurosis distally. This technique preserves the extrinsic vascular supply to the ulnar nerve, minimizes the risk of iatrogenic injury to the medial antebrachial cutaneous (MABC) nerve, and significantly reduces postoperative scar tenderness, allowing for accelerated rehabilitation.
Surgical Anatomy and Biomechanics
A profound understanding of the medial elbow anatomy is paramount for safe endoscopic navigation. The ulnar nerve traverses multiple potential sites of compression:
1. The Arcade of Struthers: A fascial band extending from the medial head of the triceps to the medial intermuscular septum, located approximately 8 cm proximal to the medial epicondyle.
2. The Medial Intermuscular Septum: Can become a tethering point, especially if the nerve subluxates or is transposed.
3. The Medial Epicondyle: The bony prominence where the nerve enters the retrocondylar groove.
4. Osborne’s Ligament (Fascia): The primary roof of the cubital tunnel, spanning from the medial epicondyle to the olecranon.
5. The Deep Flexor-Pronator Aponeurosis: The fascial leading edge of the flexor carpi ulnaris (FCU) muscle bellies.
Biomechanical Considerations
During elbow flexion, the cubital tunnel undergoes significant morphological changes. The distance between the medial epicondyle and the olecranon increases, drawing Osborne’s ligament taut and decreasing the cross-sectional area of the tunnel by up to 55%. Simultaneously, intraneural pressure rises exponentially. Endoscopic release effectively abolishes this dynamic compression by dividing the retinacular roof without destabilizing the nerve's native bed.
💡 Clinical Pearl
The presence of an anconeus epitrochlearis muscle—an anomalous muscle present in up to 16% of individuals—can act as a dynamic compressor over the ulnar nerve. If encountered during endoscopic visualization, it must be completely divided to ensure adequate decompression.
Indications and Contraindications
Indications
- Mild to moderate idiopathic cubital tunnel syndrome refractory to conservative management (splinting, activity modification).
- Positive electrodiagnostic studies (EMG/NCS) correlating with clinical symptoms (e.g., intrinsic weakness, sensory deficits in the ulnar distribution).
- Patients prioritizing rapid return to work or sport with minimal cosmetic deformity.
Contraindications
- Absolute: Documented symptomatic ulnar nerve subluxation or dislocation over the medial epicondyle during elbow flexion. (These patients require a stabilization procedure, such as anterior transposition).
- Absolute: Prior surgical intervention at the medial elbow (e.g., previous open release, fracture fixation) due to distorted anatomy and scarring.
- Relative: Severe cubital tunnel syndrome with profound intrinsic atrophy and clawing, where extensive neurolysis or transposition may be preferred by the surgeon.
- Relative: Post-traumatic cubital valgus deformity (tardy ulnar palsy).
Preoperative Planning and Patient Positioning
Optimal patient positioning is critical for unimpeded endoscopic instrumentation.
- Anesthesia: The procedure is typically performed under regional anesthesia (supraclavicular or axillary block) or general anesthesia, depending on patient preference and comorbidities.
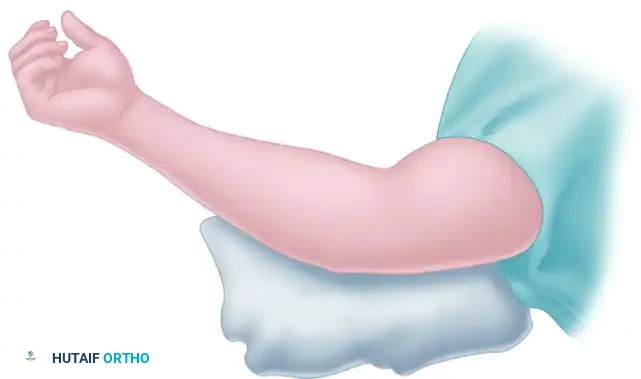
- Positioning: Place the patient supine on the operating table. The operative shoulder should be abducted to 90 degrees and externally rotated.
- Arm Support: Rest the arm on a radiolucent arm table. Elevate the arm off the table sufficiently (often using a sterile bump or specialized arm holder) to facilitate the unrestricted passage of the endoscope and instrumentation both proximally and distally.
- Tourniquet: Place a sterile pneumatic tourniquet high on the brachium. Ensure it is positioned proximally enough so as not to interfere with the proximal extent of the surgical release (the arcade of Struthers).
Step-by-Step Surgical Technique (The Cobb Method)
1. Incision and Superficial Dissection
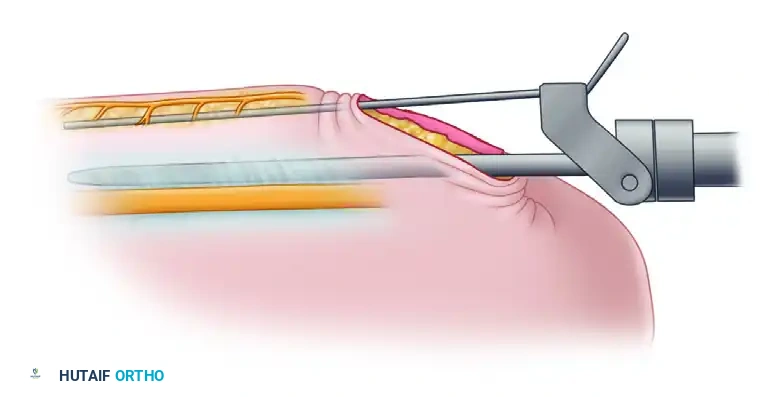
After standard exsanguination and elevation of the tourniquet to 250 mm Hg, identify the medial epicondyle and the olecranon.
Make a precise 2-cm longitudinal incision through the skin directly over the cubital tunnel, positioned just posterior to the medial epicondyle. Carry the dissection down through the subcutaneous tissue using blunt scissors.
🚨 Surgical Warning
Protect the MABC Nerve: The branches of the medial antebrachial cutaneous (MABC) nerve cross the operative field in the subcutaneous fat. Avoid violating the deep fascia during this initial exposure. Do not develop multiple layers through the adipose tissue, as this increases the risk of iatrogenic neuroma formation.
2. Fascial Preparation and Spatula Insertion
Identify the medial epicondyle by palpation. Using blunt scissors, dissect directly down to the deep fascia. Carefully develop the areolar space between the deep adipose tissue and the deep fascia. Dissect the adipose tissue and superficial nerves off the deep fascia both proximally and distally along the anticipated course of the ulnar nerve.
Palpate the ulnar nerve directly posterior to the medial epicondyle. Make a small, controlled incision through the roof of the canal (Osborne's fascia) to expose the nerve. This opening must be sufficient to allow the endoscopic instrumentation to be introduced without binding or excessive friction.
Insert a specialized surgical spatula into the space between the ulnar nerve and the roof of the canal. Pass the spatula both proximally and distally to confirm the anatomical course of the ulnar nerve and to ensure that the overlying adipose tissue and superficial nerves have been sufficiently elevated away from the cutting trajectory.
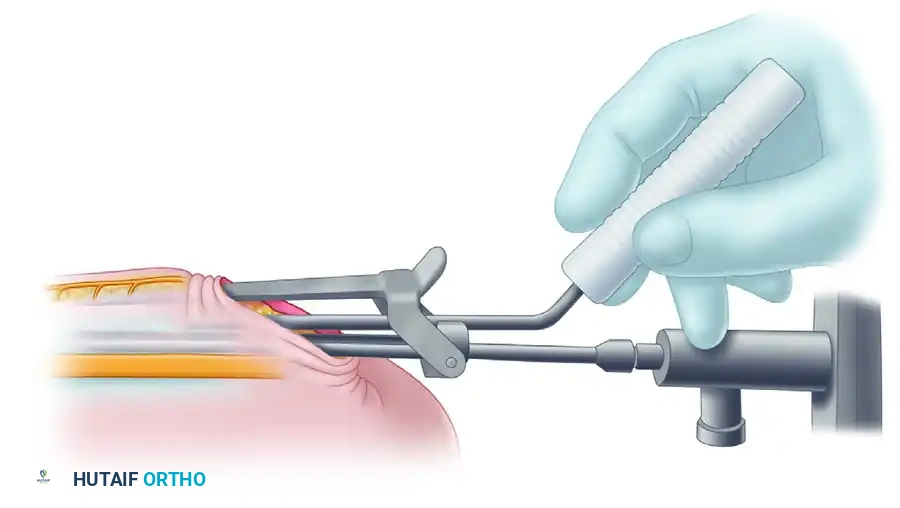
3. Cannula and Trocar Introduction
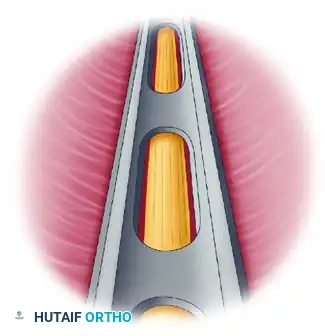
Assemble the endoscopic cannula and trocar. Insert the cannula/trocar assembly into the canal, advancing it proximally between the superficial surface of the ulnar nerve and the deep surface of the canal's roof.
The instrumentation features an attached retractor that slides on the external surface of the fascia. This design atraumatically elevates the superficial nerves and subcutaneous tissues out of harm's way.
💡 Clinical Pearl
If resistance is encountered while advancing the trocar, do not force it. Remove the instrumentation immediately and use the spatula to confirm that the superficial tissue is sufficiently elevated off the fascia and that you are in the correct anatomical plane.
4. Endoscopic Visualization
Once the cannula has been safely seated proximally, remove the inner trocar. Before inserting the endoscope into the cannula, place the scope briefly between the cannula and the external retractor to visually confirm that no superficial nerve branches (MABC) are trapped in the path of the blade.
Next, introduce the endoscope into the cannula. Rotate the cannula to view the inferior slots. You must clearly identify the ulnar nerve through these inferior slots along the entire course of the cannula. This visual confirmation guarantees that the nerve is safely positioned below the cutting mechanism.
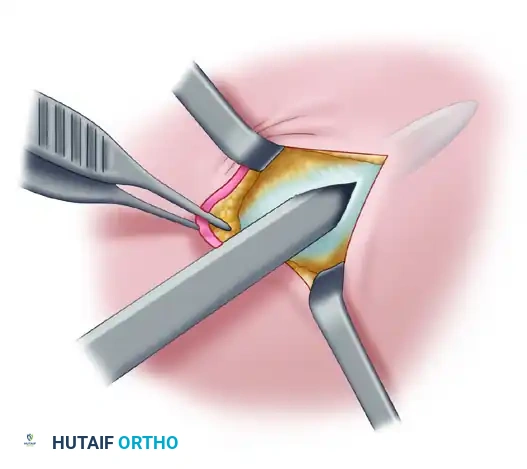
5. Proximal Fascial Release
After the ulnar nerve has been unequivocally identified and protected, prepare to divide the fascia. Deploy the specialized cutting blade along the superior slot of the cannula.
Under direct endoscopic visualization, advance the blade to divide the roof of the canal (the fascia and the arcade of Struthers proximally). The superior slot guides the blade, ensuring a precise, linear cut through the compressive structures while the cannula shields the underlying nerve.
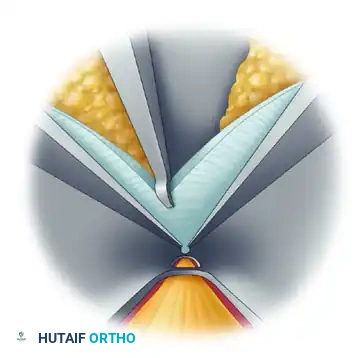
Check for the completeness of the release by pulling the cannula back slightly while viewing with the scope. The divided edges of the fascia should spring apart, revealing the decompressed nerve. If the release cannot be definitively confirmed via the cannula, place a narrow retractor into the incision to expose the nerve, and hold the endoscope under the retractor to directly view the proximal extent of the nerve.
6. Distal Fascial Release
Withdraw the instrumentation to the primary incision site. Reinsert the cannula/trocar assembly into the canal, this time advancing it distally toward the forearm, using the exact same technique described above.
Visualize the ulnar nerve through the inferior slots. The flexor-pronator mass and its aponeurosis will be visible through the superior slot. Deploy the blade to release the distal fascia.
🚨 Pitfall
While the deep flexor-pronator mass can be released endoscopically, aggressive division of the muscle belly itself is not strictly necessary for nerve decompression and often results in unnecessary, difficult-to-control bleeding. Limit the distal release to the fascial aponeurosis compressing the nerve.
7. Verification and Hemostasis
Once both proximal and distal releases are complete, deflate the pneumatic tourniquet. Apply direct pressure to the wound for several minutes to allow reactive hyperemia to subside.
With a retractor in place, reintroduce the endoscope to view the surgical field both proximally and distally.
* Confirm Complete Release: Ensure there are no remaining fascial bands tethering the nerve.
* Confirm Hemostasis: Identify any bleeding vessels. Bipolar electrocautery may be used meticulously if necessary, taking extreme care to avoid thermal injury to the ulnar nerve.
* Assess Stability: Take the elbow through a full range of flexion and extension to ensure the ulnar nerve does not subluxate over the medial epicondyle now that the roof has been released.
Closure and Postoperative Protocol
Wound Closure
Thoroughly irrigate the wound with sterile saline. Place a 20-gauge angiocatheter through the skin directly into the surgical wound bed.
Close the 2-cm skin incision using interrupted or running subcuticular absorbable sutures (e.g., 4-0 Monocryl). Once the skin is closed, inject 15 to 20 mL of 0.5% bupivacaine with epinephrine through the angiocatheter to bathe the nerve and surrounding tissues, providing excellent postoperative analgesia and assisting with local hemostasis. Remove the angiocatheter.
Apply a sterile, non-adherent dressing followed by a mildly compressive soft dressing (e.g., Webril and an ACE wrap). Do not splint the elbow.
Postoperative Rehabilitation
The primary goal of postoperative care following endoscopic cubital tunnel release is the immediate restoration of motion to prevent perineural adhesions.
- Days 1-7: Patients are instructed to begin gentle, active range of motion (ROM) of the elbow, wrist, and fingers immediately. The expectation is that full ROM will be obtained within 5 to 7 days. Patients are permitted to debulk the outer compressive dressing after 48 hours to facilitate unrestricted motion.
- Weeks 2-4: Suture ends (if any) are trimmed at the 10-14 day mark. Strengthening exercises for the grip and intrinsic hand muscles are initiated. Heavy lifting and repetitive elbow flexion under load should be avoided.
- Return to Activity: Most patients can return to light duty or desk work within 1-2 weeks. Return to heavy manual labor or strenuous athletics is typically permitted at 4-6 weeks, guided by the resolution of symptoms and the recovery of grip strength.
Complications and Management
While endoscopic cubital tunnel release is highly safe, surgeons must be prepared to manage potential complications:
- Incomplete Decompression: The most common cause of persistent postoperative symptoms. Usually occurs due to failure to release the arcade of Struthers proximally or the deep flexor-pronator aponeurosis distally. Meticulous endoscopic visualization is required to prevent this.
- MABC Nerve Injury: Results in painful neuromas or numbness over the medial forearm. Prevented by strictly avoiding the development of multiple subcutaneous planes and utilizing the external retractor of the cannula system.
- Hematoma Formation: Can cause acute postoperative compression of the ulnar nerve. Prevented by deflating the tourniquet prior to closure, achieving meticulous bipolar hemostasis, and utilizing a compressive dressing.
- Ulnar Nerve Subluxation: If the nerve is found to be unstable post-release, the procedure must be converted to an open anterior transposition to prevent friction neuritis over the medial epicondyle.
Conclusion
Endoscopic cubital tunnel release represents a sophisticated evolution in the surgical management of ulnar nerve entrapment. By combining a thorough understanding of medial elbow pathoanatomy with precise endoscopic instrumentation, orthopedic surgeons can achieve excellent clinical outcomes. The technique maximizes nerve decompression while minimizing collateral soft tissue damage, ultimately providing patients with a rapid, less painful return to optimal upper extremity function.
