INTRODUCTION TO ENDOSCOPIC CARPAL TUNNEL RELEASE
Carpal tunnel syndrome (CTS) remains the most prevalent compression neuropathy in the upper extremity. While open carpal tunnel release (OCTR) has historically been the gold standard, Endoscopic Carpal Tunnel Release (ECTR) has gained significant traction due to its ability to minimize iatrogenic trauma to the palmar fascia and overlying skin. The two-portal technique, pioneered and popularized by Dr. James C.Y. Chow, allows for complete transection of the transverse carpal ligament (TCL) from within the carpal canal.
The primary biomechanical and clinical advantage of the two-portal ECTR is the significant reduction in postoperative "pillar pain" and a demonstrably faster return to activities of daily living and occupational duties. By leaving the superficial palmar aponeurosis and palmar skin intact, the structural integrity of the hand is better preserved, and tender palmar scarring is avoided.
SURGICAL ANATOMY AND BIOMECHANICS
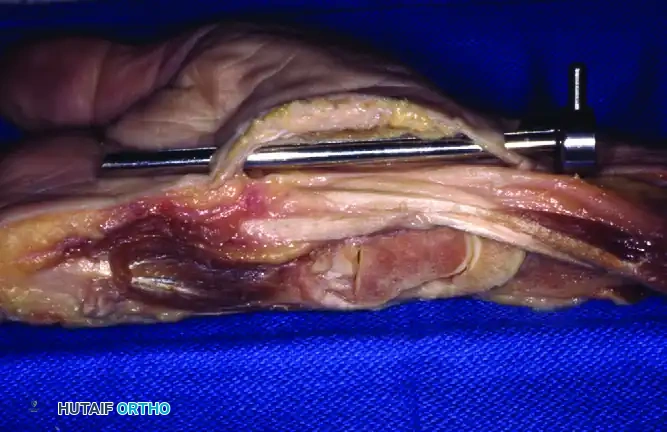
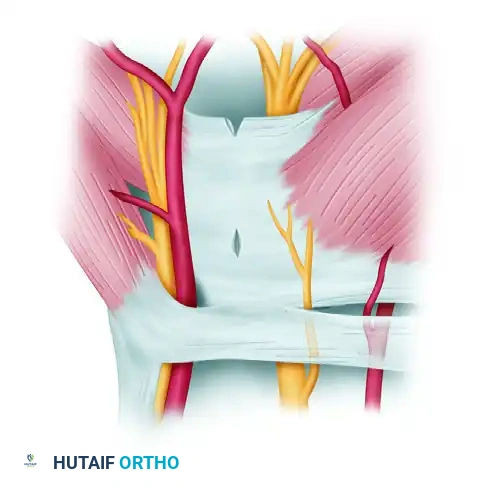
A profound understanding of the volar wrist and hand anatomy is non-negotiable when performing ECTR. The carpal tunnel is an inelastic fibro-osseous canal.
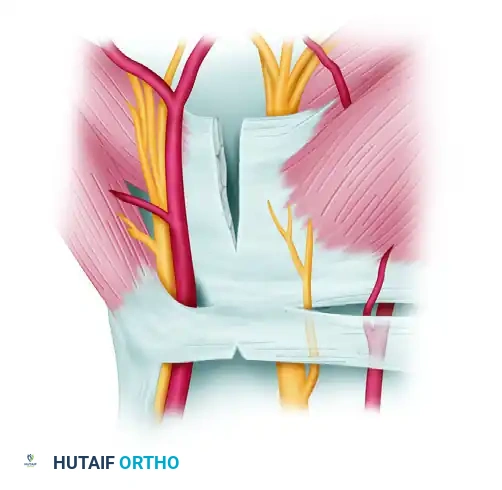
* Roof: Transverse carpal ligament (flexor retinaculum).
* Floor and Walls: The carpal arch (scaphoid and trapezium radially; pisiform and hook of hamate ulnarly).
* Contents: Nine flexor tendons (four flexor digitorum superficialis, four flexor digitorum profundus, one flexor pollicis longus) and the median nerve.
The "Safe Zone"
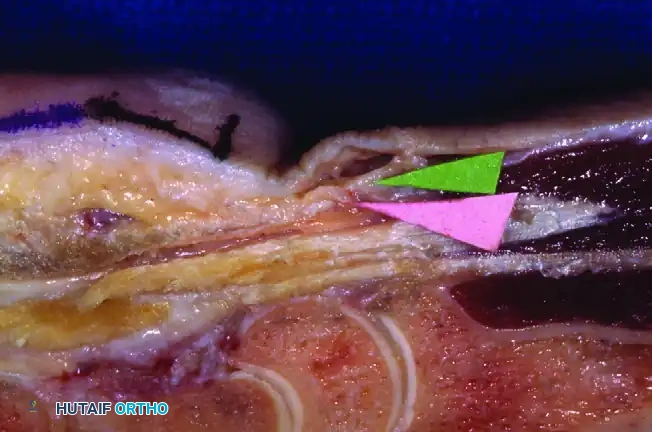
The endoscopic approach relies on navigating a precise "safe zone." The slotted cannula must be positioned ulnar to the median nerve and radial to the ulnar bursa and Guyon's canal. Distally, the superficial palmar arch crosses the palm and represents the absolute distal limit of dissection. Proximally, the antebrachial fascia must be addressed, as failure to release it can result in persistent proximal compression.
Surgical Warning: Anatomical variations of the median nerve, particularly the recurrent motor branch (extraligamentous, subligamentous, or transligamentous), must be anticipated. Aberrant branches crossing the ulnar aspect of the tunnel are rare but present a severe risk of iatrogenic transection if the visual field is not meticulously cleared.
PREOPERATIVE PREPARATION AND POSITIONING
Anesthesia Selection
The procedure should be performed using the anesthetic modality deemed most appropriate through shared decision-making between the patient, surgeon, and anesthesiologist.
* Local Anesthesia with IV Sedation (MAC): This is the most commonly utilized and preferred method. It allows the patient to remain comfortable while retaining the ability to report sudden paresthesias, which serves as a critical real-time feedback mechanism indicating potential median nerve irritation.
* Regional Block or General Anesthesia: May be indicated for highly anxious patients, those with severe movement disorders, or when concurrent procedures are planned.
Patient Positioning and Operating Room Setup
- Positioning: Place the patient supine with the operative upper extremity extended onto a standard hand table.
- Surgeon Ergonomics: The primary surgeon typically sits on the axillary side of the arm. However, because the endoscopic dissection proceeds from proximal to distal, the surgeon may elect to sit on the cephalad side depending on hand dominance and ergonomic preference. The surgical assistant is positioned opposite the surgeon.
- Tourniquet: Apply a well-padded pneumatic tourniquet to the proximal arm. While the procedure can sometimes be performed under wide-awake local anesthesia no tourniquet (WALANT), a tourniquet is highly recommended to ensure a bloodless field, which is critical for endoscopic visualization.
- Video Integration: At least one high-definition television monitor should be placed on the extremity side opposite the surgeon (toward the head of the table). For optimal ergonomics, the Chow technique advocates for a two-monitor setup—one dedicated to the surgeon and the other to the assistant.
STEP-BY-STEP SURGICAL TECHNIQUE
1. Portal Mapping and Incision Planning
Precise surface marking is the foundation of a safe two-portal ECTR. The entry and exit portals must be mapped with a surgical marker prior to exsanguination.
The Proximal (Entry) Portal:
* Palpate the proximal pole of the pisiform.
* Depending on the size of the patient's hand, draw a transverse line extending 1.0 to 1.5 cm radially from the pisiform.
* From the radial end of this line, extend a second line 0.5 cm proximally.
* From the proximal end of the second line, draw a third line extending approximately 1.0 cm radially. This third line represents the exact location of the proximal entry portal incision.
The Distal (Exit) Portal:
* Passively and fully abduct the patient's thumb.
* Draw a line along the distal border of the fully abducted thumb, extending transversely across the palm toward the ulnar border of the hand (Kaplan's cardinal line equivalent).
* Draw a second longitudinal line extending proximally from the web space between the long and ring fingers.
* Mark the intersection of these two lines.
* Measure approximately 1.0 cm proximal to this intersection and draw a 0.5 cm transverse line. This marks the distal exit portal.
2. Proximal Dissection and Fascial Release
Make a transverse incision through the skin only at the previously marked proximal entry portal.
- Superficial Dissection: Use blunt dissection (e.g., with tenotomy scissors or a hemostat) to spread the subcutaneous fat down to the transverse fibers of the antebrachial (forearm) fascia.
- Palmaris Longus Management: If the palmaris longus tendon is present, identify it and retract it radially. The dissection must remain ulnar to the palmaris longus to avoid the median nerve.
- Fascial Incision: Gently elevate the forearm fascia with forceps and make a longitudinal incision strictly through the fascial layer. Typically, only the distal 2.0 cm of the forearm fascia requires release. Extend this release distally until you palpate the thick, proximal edge of the transverse carpal ligament.
3. Developing the Subligamentous Space
Gently lift the distal edge of the proximal entry incision using a small right-angle retractor (e.g., Senn or Ragnell). This maneuver reveals the critical anatomical plane: the potential space between the deep surface of the transverse carpal ligament and the superficial surface of the ulnar bursa.
- Blunt Dissection: Introduce a blunt elevator or synovial resector to gently develop this space. Push the bursal tissue volarly (deep) to free it from the deep surface of the TCL.
4. Cannula Insertion and Trajectory
Assemble the curved dissector obturator within the slotted cannula.
- Insertion: Introduce the assembly into the proximal portal with the pointed side of the obturator directed volarly (toward the TCL).
- The "Washboard" Effect: Use the curved dissector to palpate the deep surface of the TCL. Move the dissector back and forth longitudinally. You must feel a distinct "washboard" or corrugated sensation. This tactile feedback is pathognomonic for the transverse fibers of the TCL and confirms that you are in the correct plane (superficial to the bursa, deep to the ligament).
Clinical Pearl: Apply a gentle lifting (dorsal-to-volar) force to the dissector assembly. This tests the tightness of the ligament and definitively ensures the instrument is deep to the TCL. If the instrument moves too freely or tents the skin excessively without resistance, you may be in the subcutaneous plane superficial to the ligament.
- Distal Advancement: Ensure the assembly is perfectly aligned with the longitudinal axis of the forearm. Touch the hook of the hamate with the tip of the assembly to confirm your ulnar boundary.
- Wrist Extension: Lift the patient’s hand above the hand table, extending the wrist and fingers over the hand holder. This maneuver pulls the median nerve proximally and dorsally, further protecting it.
- Exit: Gently advance the slotted cannula assembly distally, directing it precisely toward the marked exit portal. Palpate the tip of the assembly in the palm.
Make a second small incision through the skin at the marked exit portal. Pass the assembly through this exit portal and secure the hand firmly to the hand holder.
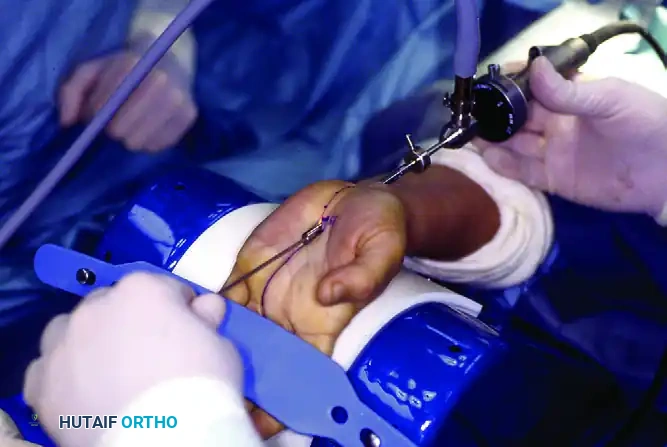
5. Endoscopic Visualization and Tissue Clearance
Remove the obturator, leaving the slotted cannula in place. Insert the endoscope into the proximal opening of the cannula.
- Visual Inspection: Examine the entire length of the slotted cannula opening. The transverse fibers of the TCL should be clearly visible across the slot.
- Tissue Clearance: Ensure there is absolutely no tenosynovium, fat, or nerve tissue interposed between the slotted cannula and the TCL.
Surgical Warning: If the visual field is obscured by tissue, or if there is any doubt regarding the identity of the structures visualized, do not proceed with the release. Remove the tube, re-establish the subligamentous plane with blunt dissection, and reinsert the cannula.
6. The Sequential Ligament Release (Chow Technique)
The Chow technique utilizes a highly specific sequence of cuts using specialized endoscopic knives to ensure a complete and safe release.
Phase 1: Distal Release
1. Identify Distal Edge: With the endoscope inserted from the proximal portal, insert a probe through the distal portal. Palpate and visually identify the distal edge of the transverse carpal ligament. Fat from the palm will typically be seen dropping into the slot just distal to the ligament.
2. First Cut (Probe Knife): Insert the probe knife from the distal portal. Engage the distal edge of the TCL and cut from distal to proximal, releasing the distal-most portion of the ligament.
- Second Cut (Triangle Knife): Withdraw the probe knife. Insert the triangle knife from the distal portal and push it upward to cut through the midsection of the transverse carpal ligament.
- Third Cut (Retrograde Knife): Insert the retrograde knife from the distal portal. Position the blade into the defect created by the second cut. Draw the retrograde knife distally to join the first cut. This completely releases the distal half of the transverse carpal ligament.

Phase 2: Proximal Release
5. Switch Portals: Remove the endoscope from the proximal opening and re-insert it into the distal opening of the cannula. You are now looking from distal to proximal.
6. Identify Proximal Edge: Insert the instruments through the proximal opening. Visually identify the uncut proximal section of the ligament.
7. Fourth Cut (Probe Knife): Use the probe knife to engage and release the proximal edge of the TCL.
8. Fifth Cut (Retrograde Knife): Insert the retrograde knife, engage the ligament, and draw it proximally to complete the transection of the remaining proximal TCL.
9. Final Inspection: Choose the appropriate knife to make any additional minor cuts needed to ensure complete transection. The divided edges of the ligament should spring apart, and the underlying palmar fat or muscle fascia should herniate slightly into the cannula slot, confirming a full-thickness release.
7. Hemostasis and Closure
- Reinsert the blunt trocar into the cannula and carefully remove the entire assembly from the hand.
- If a pneumatic tourniquet was utilized, deflate it at this stage.
- Apply direct pressure for several minutes, then irrigate the portals and meticulously ascertain hemostasis. Ensure there is no pulsatile bleeding (which would indicate an arterial injury) or excessive venous oozing.
- Close the skin of both the proximal and distal portals using non-absorbable monofilament sutures (e.g., 4-0 or 5-0 Nylon) or fast-absorbing sutures based on surgeon preference.
- Apply a sterile, soft, bulky compressive dressing. Do not apply a rigid splint, as this restricts tendon gliding.
POSTOPERATIVE CARE AND REHABILITATION
The postoperative protocol is designed to minimize edema, prevent tendon adhesions, and facilitate a rapid return to function.
- Immediate Postoperative Phase (Days 0-3):
- Active, full-excursion movement of the fingers and thumb is encouraged immediately in the recovery room. Tendon gliding exercises (straight, hook, fist, tabletop, and straight fist) should be performed hourly while awake.
- Strict elevation of the hand above the level of the heart is mandatory to control swelling.
- The bulky surgical dressing is typically removed by the patient at home 2 to 3 days after the procedure, replacing it with light adhesive bandages over the portals.
- Short-Term Follow-Up (Days 10-14):
- The patient returns to the clinic for the first postoperative visit.
- Sutures are removed.
- Incision sites are assessed for healing and signs of infection.
- Activity Modification (Weeks 1-3):
- Patients may use their hand for light activities of daily living (eating, dressing, typing) immediately.
- Direct pressure to the palmar area (e.g., pushing up from a chair, gripping a steering wheel tightly) and heavy lifting (>5 lbs) must be strictly avoided for 2 to 3 weeks, or until palmar discomfort completely resolves.
- Return to heavy manual labor or repetitive gripping tasks is typically cleared between 3 to 6 weeks, depending on individual recovery and occupational demands.
COMPLICATIONS AND PITFALLS
While ECTR boasts a high success rate and rapid recovery, the learning curve is steep, and complications, though rare, can be devastating.
- Incomplete Release: The most common complication of ECTR. Failure to completely divide the distal edge of the TCL or the proximal antebrachial fascia will result in persistent CTS symptoms. Meticulous visual confirmation of the divided ligament edges springing apart is mandatory.
- Median Nerve Injury: Can occur if the cannula is placed too radially, if aberrant motor branches are not recognized, or if the surgeon cuts blindly without a clear visual field. The "washboard" tactile feedback and clearing the synovial tissue are the primary defenses against this.
- Ulnar Nerve/Artery Injury: Occurs if the cannula is directed too far ulnarly into Guyon's canal. The trajectory must aim toward the third web space, remaining radial to the hook of the hamate.
- Superficial Palmar Arch Injury: The distal portal and the distal extent of the cannula must not violate the superficial palmar arch. Adhering to Kaplan's cardinal line as the distal boundary prevents this vascular catastrophe.
By adhering strictly to the anatomical landmarks, respecting the tactile feedback of the instruments, and maintaining uncompromising endoscopic visualization, the two-portal Chow technique provides a highly effective, minimally invasive solution for carpal tunnel syndrome.
