INTRODUCTION TO DISTAL FEMORAL FRACTURE FIXATION
The management of complex, highly comminuted distal femoral fractures (AO/OTA Type 33-C2 and 33-C3) remains one of the most formidable challenges in orthopedic trauma surgery. Historically, the advent of lateral locking plate technology revolutionized the treatment of these injuries, providing a fixed-angle construct capable of bridging metaphyseal comminution while maintaining alignment. However, very low distal femoral fractures with extensive articular and metaphyseal comminution may not be stabilized adequately by lateral plating alone.
When the medial column is severely deficient, a single lateral plate acts as a load-bearing cantilever, subjecting the hardware to immense cyclical bending forces that can lead to varus collapse, hardware failure, or nonunion. If instability persists after lateral plating, or if anatomic reduction of the articular block cannot be achieved from a lateral approach, the application of an additional medial plate is strongly indicated.
Clinical Pearl: The primary biomechanical goal of double plate fixation is to convert bending forces into compressive forces by restoring the medial cortical buttress. This dual-column stabilization is critical for permitting early functional range of motion, which is essential for preventing knee stiffness and optimizing cartilage nutrition.
BIOMECHANICS AND INDICATIONS FOR DOUBLE PLATE FIXATION
Biomechanical Rationale
The distal femur is subjected to complex multiplanar forces during weight-bearing and knee range of motion. The anatomical mechanical axis passes through the center of the knee joint, but the anatomical axis of the femur is in approximately 5 to 7 degrees of valgus. This creates a natural tendency for varus stress at the distal femur.
In the presence of medial comminution, a lateral locking plate must resist these varus moments entirely on its own. While locking screws provide excellent pull-out resistance, the plate itself can undergo fatigue failure if the "working length" (the span of unsupported plate over the fracture gap) is subjected to excessive strain. A medial plate functions as an anti-glide or buttress plate, neutralizing varus moments and sharing the load, thereby significantly increasing the overall stiffness and fatigue life of the construct.
Primary Indications
- Severe Medial Comminution: Lack of medial cortical contact following lateral plate application.
- Medial Hoffa Fractures: Coronal shear fractures of the medial femoral condyle that cannot be adequately captured or compressed with lateral-to-medial lag screws.
- Very Low Articular Fractures: Fractures where the distal fragment is too small to accommodate an adequate number of locking screws from the lateral side alone.
- Periprosthetic Fractures: Specifically around total knee arthroplasties (Vancouver Type B or C) where the femoral component limits lateral screw trajectory, necessitating medial fixation for adequate distal purchase.
- Nonunion/Malunion Revision: Cases of varus collapse following isolated lateral plating.

Preoperative radiograph demonstrating a highly comminuted distal femoral fracture in a pedestrian struck by a high-speed vehicle. Note the very low fracture involvement of the medial femoral condyle. Lateral-based constructs alone would typically fail to provide adequate fixation into this specific fragment.
PREOPERATIVE PLANNING AND LATERAL FIXATION PRINCIPLES
Before proceeding to medial fixation, the surgeon must first address the lateral column. Preoperative planning requires high-quality orthogonal radiographs and a fine-cut computed tomography (CT) scan with 2D and 3D reconstructions to map the articular fracture lines accurately.
The Lateral Approach and LISS Plating
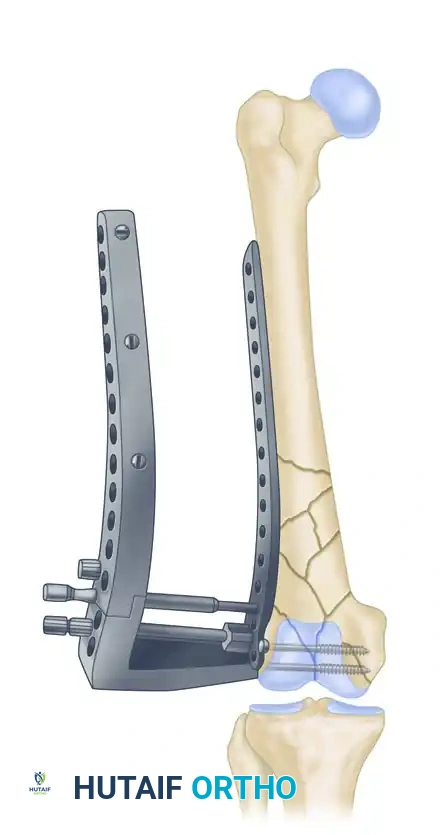
The Less Invasive Stabilization System (LISS) or modern equivalent lateral locking plates are typically applied first.
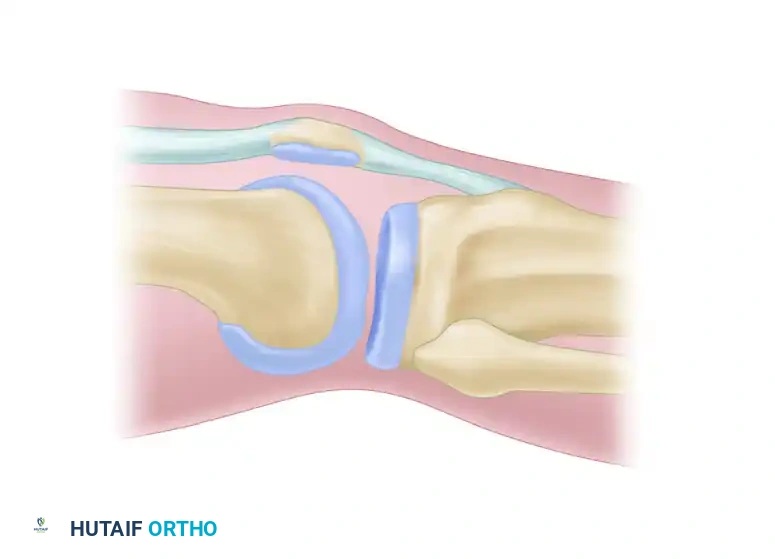
Less invasive stabilization technique (LISS) plate. Letters are used to identify distal plate holes; numbers are used to identify diaphyseal plate holes.
The lateral approach can be performed minimally invasively for extra-articular fractures or via a formal lateral parapatellar approach for complex intra-articular involvement.
Standard lateral incision for distal femoral exposure.
In complex intra-articular fractures, a lateral parapatellar approach is necessary to visualize the joint surface and ensure anatomic reduction of the condyles.
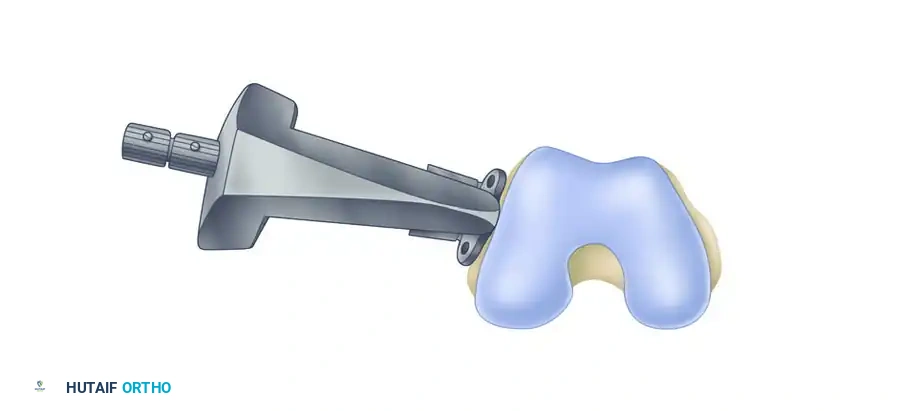
Proper positioning of the lateral plate is paramount. The insertion guide must be aligned correctly with the femoral shaft to prevent malreduction.
The insertion guide has a tendency to tilt toward the floor. When positioned properly on the lateral condyle, the insertion guide is internally rotated approximately 10 degrees relative to the femoral shaft. Plate position is adjusted if necessary.
A Kirschner wire is inserted through the stabilization bolt to provisionally hold the plate to the distal condylar block.
Once lateral fixation is provisionally or definitively applied, the surgeon must intraoperatively assess whether the fracture stabilization is sufficient to permit early functional range of motion. If instability persists, or if the medial condyle remains malreduced, the surgeon must proceed with the application of medial fixation through a separate longitudinal medial approach.
SURGICAL TECHNIQUE: THE MEDIAL APPROACH AND DOUBLE PLATING
A separate medial incision is preferred over an extensile anterior approach to reduce the amount of soft tissue stripping required for plate application, thereby preserving the delicate periosteal blood supply crucial for fracture healing.
Step 1: Patient Positioning and Setup
The patient is positioned supine on a radiolucent operating table. A sterile bump or a radiolucent triangle is placed under the ipsilateral knee to maintain approximately 30 to 60 degrees of flexion. This relaxes the posterior neurovascular structures and the gastrocnemius muscles, preventing posterior angulation of the distal articular block (recurvatum deformity). A sterile tourniquet may be applied high on the thigh but is often left uninflated unless severe hemorrhage occurs.
Step 2: The Medial Subvastus (Southern) Approach
Make an anteromedial incision starting from the anterior margin of the pes anserinus, extending proximally and following the trajectory of the adductor canal.
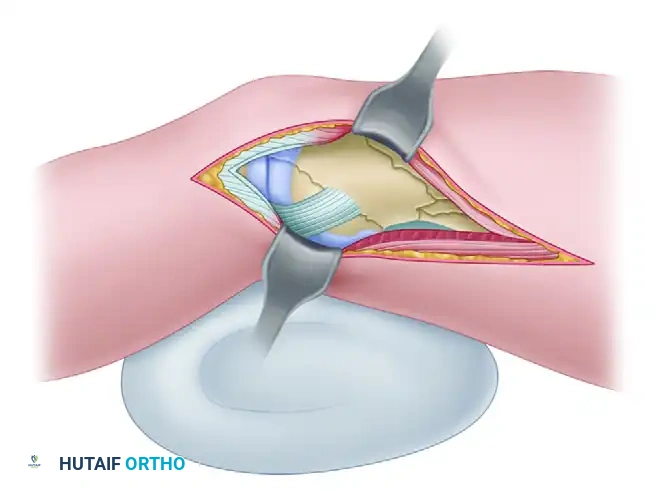
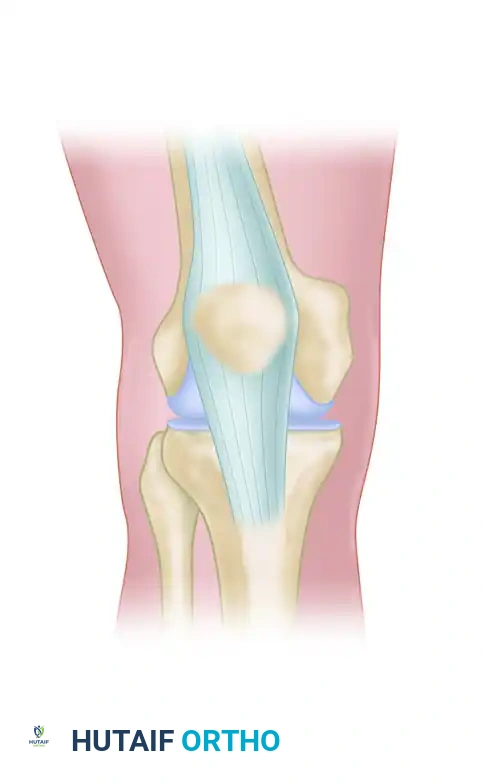
Diagrammatic representation of the Subvastus (Southern) approach, highlighting the elevation of the vastus medialis to expose the medial distal femur.
The deep dissection follows the subvastus approach. Incise the fascial envelope surrounding the vastus medialis along the posterior margin of the muscle belly. Use blunt dissection to elevate the muscle off the periosteum and the intermuscular septum, working from the adductor tubercle proximally to the intact femoral shaft.
Distally, sharply incise the 2- to 3-cm wide tendinous insertion of the vastus medialis into the medial capsule to allow adequate mobilization.
Surgical Warning: Do not aggressively strip the periosteum from the medial femoral shaft. The goal is extra-periosteal elevation of the muscle envelope to preserve the vascularity of the underlying bone fragments.
Step 3: Arthrotomy and Neurovascular Protection
Expose the joint through a medial parapatellar arthrotomy. This approach is highly advantageous as it does not require formal dissection of the superficial femoral artery; the artery is safely retracted posteriorly along with the sartorius muscle.
However, meticulous care must be taken to protect the descending genicular artery and the saphenous nerve. Bluntly dissect the posterior margin of the vastus medialis and retract the artery and nerve anteriorly. Leave the superficial and deep fibers of the medial collateral ligament (MCL) attached to the femoral condyle to prevent iatrogenic medial instability.
Step 4: Addressing Posterior Medial Fragments
If a posterior medial condylar fragment (medial Hoffa fragment) is present, make an additional arthrotomy just posterior to the medial collateral ligament to allow direct access to this portion of the articular surface. Flexion of the knee and posterior retraction of the sartorius and adductor longus muscles significantly facilitate this exposure.
Inspect the medial compartment thoroughly. Evaluate the medial meniscus for concomitant tears and remove any osteochondral loose fragments or hematoma from the joint space to prevent third-body wear and post-traumatic arthrofibrosis.
Step 5: Articular Reduction and Provisional Fixation
Continue posterior exposure until the intact medial femoral shaft is visible, strictly minimizing soft tissue stripping during dissection and retraction.
Reduce and provisionally stabilize each of the femoral condyles. The medial and lateral femoral condyles must be reduced and fixed to each other, incorporating any intercalary fragments to restore the anatomical width of the distal femur. Use Kirschner wires, pointed reduction tenaculums, or large periarticular clamps for temporary stabilization.
Once the reconstructed distal articular block is anatomically restored, provisionally fix it to the femoral shaft. Position the lateral plate and temporarily fix it to the distal femur. When the reduction is confirmed to be satisfactory via orthogonal fluoroscopy, secure the lateral plate with two to four proximal and distal screws.
Step 6: Medial Plate Application
With the lateral column stabilized, attention is turned to the medial side. Bend a medial buttress plate to match exactly the contour of the medial femur. Typically, small fragment fixation (e.g., 3.5 mm reconstruction plates, one-third tubular plates, or dedicated medial distal femur plates) is preferred to minimize soft tissue irritation beneath the vastus medialis.
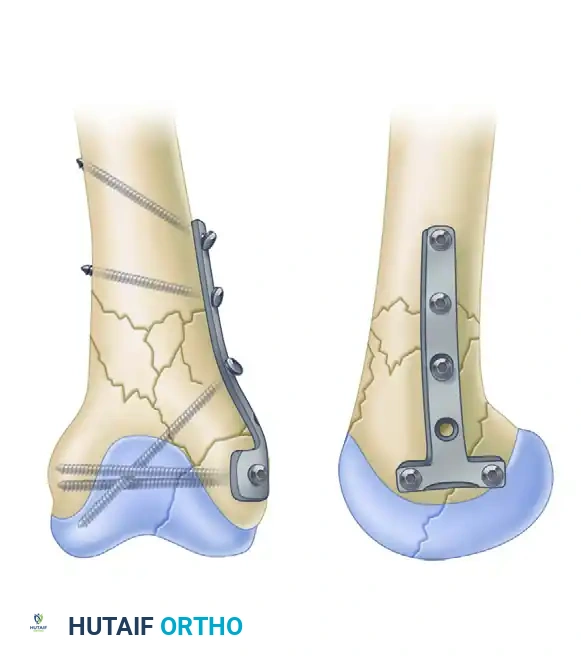
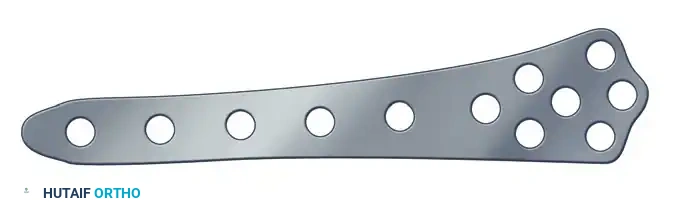
Application of a large fragment T-plate or contoured small fragment plate to the medial column.
Place the transverse portion of the plate distally so that the screw holes allow the placement of screws into both the anterior and posterior portions of the femoral condyles. The most anterior screw should ideally permit bicondylar-transcondylar fixation, crossing from medial to lateral to tie the entire condylar block together.
For the proximal end of the medial plate, ensure that at least four cortices of fixation are achieved in the intact medial femoral diaphysis to provide adequate working length and pull-out strength.

Postoperative radiograph demonstrating small fragment fixation of the medial femoral condyle through a subvastus approach, acting as a biomechanical adjuvant to the more typical lateral-based fixation construct.
Step 7: Defect Management and Closure
After all screws are placed and final fluoroscopic images confirm anatomic reduction and appropriate hardware length, assess the metaphyseal void. In closed injuries, consider filling significant bone defects with autologous cancellous bone grafts (e.g., from the iliac crest or Reamer-Irrigator-Aspirator system) or osteoinductive allografts.
In open injuries with massive contamination or bone loss, the placement of antibiotic-impregnated polymethylmethacrylate (PMMA) cement spacers is advisable to manage dead space, deliver local antibiotics, and induce a pseudo-membrane in preparation for future staged bone grafting (Masquelet technique).
Thoroughly irrigate the wound. Repair the medial parapatellar arthrotomy meticulously to ensure a watertight seal. Close the vastus medialis fascia, subcutaneous tissues, and skin in a routine, layered fashion over a closed suction drain if deemed necessary.
MANAGEMENT OF SUPRACONDYLAR FRACTURES OF THE FEMUR
While double plating is reserved for the most complex intra-articular and highly comminuted distal fractures, the broader category of supracondylar fractures of the femur offers multiple fixation modalities depending on fracture morphology and patient physiology.
Intramedullary Nailing vs. Plating
Most extra-articular supracondylar fractures (AO/OTA 33-A) can be treated effectively with retrograde interlocking intramedullary (IM) nailing or plate-and-screw devices. Even those with simple intra-articular fracture components (AO/OTA 33-C1) often can be treated with IM nail fixation, provided the articular block can be anatomically reduced and compressed with independent lag screws prior to nail passage.
Distal screw configurations vary among modern IM nails and are often the primary determinants of whether a supracondylar femoral fracture can be adequately stabilized with an intramedullary device. Nails offering multiplanar distal locking options provide superior stability in short distal segments.
Damage Control Orthopedics and External Fixation
In polytraumatized patients who are poor operative risks (e.g., those in extremis, severe head trauma, or hemodynamic instability), nonoperative treatment with acute skeletal traction followed by cast bracing is a historical option, though rarely used today due to the high morbidity of prolonged bed rest.
Temporary rapid external fixation of femoral fractures is the gold standard for unstable, severely injured polytraumatized patients, especially if further blood loss is a major concern (e.g., in Jehovah’s Witnesses or patients with coagulopathy). Half-pin fixators have proved highly effective, especially for massively contaminated open fractures and fractures requiring rapid skeletal stabilization prior to vascular repair.
Most commonly, a uniplanar external fixator is applied anteriorly or anterolaterally. For diaphyseal fractures, the knee joint rarely is immobilized; however, more distal fractures of the supracondylar or intercondylar variety most frequently require spanning the knee joint with fixation extending into the proximal tibia.
Pitfall: Infections have occurred in patients after definitive IM nailing of fractures previously treated with external fixation. To mitigate this risk, after soft tissue wound coverage is achieved, early conversion (within 10 to 14 days) of external fixation to internal fixation is recommended to decrease the incidence of pin-tract colonization leading to deep infection.
POSTOPERATIVE CARE AND REHABILITATION
The postoperative protocol following double plate fixation is fundamentally similar to that of isolated locking condylar plate fixation, with the distinct advantage that the dual-plate construct often provides superior immediate stability.
- Weight-Bearing: Patients are typically maintained strictly non-weight-bearing (NWB) or toe-touch weight-bearing (TTWB) on the operative extremity for the first 6 to 8 weeks, depending on the degree of comminution and radiographic evidence of early callus formation.
- Range of Motion (ROM): The primary benefit of double plating is the ability to initiate early, aggressive functional range of motion. Continuous Passive Motion (CPM) machines or active-assisted ROM exercises are initiated on postoperative day one, provided the fracture repair is deemed biomechanically stable intraoperatively. The goal is to achieve 0 to 90 degrees of flexion within the first 4 weeks to prevent arthrofibrosis.
- Thromboprophylaxis: Standard deep vein thrombosis (DVT) prophylaxis (e.g., Low Molecular Weight Heparin or direct oral anticoagulants) is mandatory, given the high risk associated with major lower extremity trauma, and should be continued for at least 28 to 35 days postoperatively.
-
Radiographic Follow-up: Serial orthogonal radiographs are obtained at 2, 6, 12, and 24 weeks to monitor for maintenance of alignment, hardware integrity, and progression of fracture union. Progression to full weight-bearing is permitted only after bridging callus is visible on at least three out of four cortices.
