Rectus Abdominis Free Tissue Transfer: Surgical Dissection and Flap Harvest
Key Takeaway
The rectus abdominis free tissue transfer is a highly versatile and robust musculocutaneous flap utilized in complex orthopedic reconstructions. This guide details the meticulous surgical dissection required for flap harvest, emphasizing the isolation of the inferior epigastric vascular pedicle, safe division of transverse inscriptions, and secure donor site closure to prevent abdominal wall herniation. Mastery of this technique ensures optimal graft viability and minimizes donor site morbidity.
INTRODUCTION TO RECTUS ABDOMINIS FREE TISSUE TRANSFER
The rectus abdominis free tissue transfer remains a cornerstone in the armamentarium of reconstructive microsurgery, particularly within orthopedic oncology and severe trauma reconstruction. Renowned for its robust vascularity, significant muscle volume, and the ability to carry a large cutaneous paddle, this flap is highly versatile. It is frequently indicated for the coverage of massive soft tissue defects, such as those resulting from high-energy open tibial fractures (Gustilo-Anderson Type IIIB and IIIC), chronic osteomyelitis debridement, and extensive sarcoma resections.
The success of this free flap hinges upon a profound understanding of abdominal wall anatomy and the execution of a meticulous surgical dissection. The primary objective during harvest is the safe isolation of the deep inferior epigastric artery (DIEA) and its venae comitantes, while simultaneously preserving the structural integrity of the abdominal wall to prevent postoperative herniation. This comprehensive guide delineates the step-by-step surgical dissection required for a successful rectus abdominis transfer, expanding upon foundational operative principles to provide a masterclass in flap harvest.
SURGICAL ANATOMY AND VASCULAR BIOMECHANICS
A thorough comprehension of the rectus abdominis anatomy is non-negotiable for the reconstructive surgeon. The rectus abdominis is a paired, strap-like muscle extending from the pubic symphysis to the costal cartilages of the fifth, sixth, and seventh ribs.
Mathes and Nahai Classification
The rectus abdominis is classified as a Type III muscle flap according to the Mathes and Nahai classification system. It possesses two dominant vascular pedicles:
1. The Superior Epigastric Artery (SEA): A terminal branch of the internal mammary (internal thoracic) artery.
2. The Deep Inferior Epigastric Artery (DIEA): Arising from the external iliac artery.
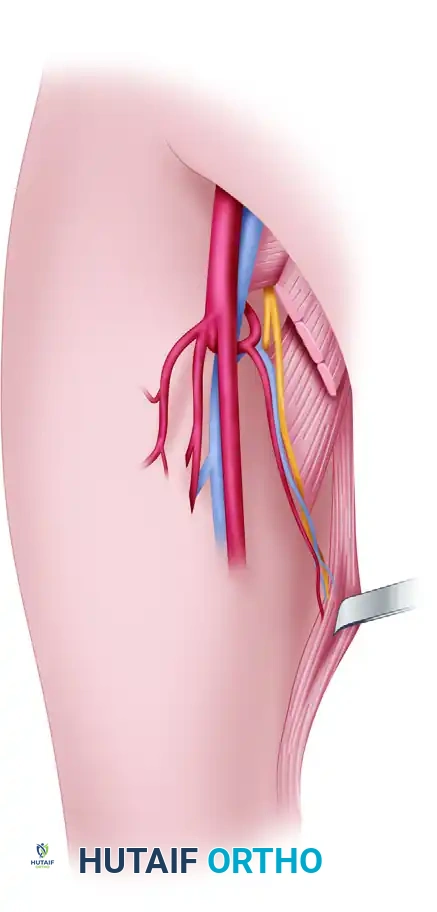
For free tissue transfer in orthopedic reconstruction, the DIEA is almost exclusively utilized due to its larger caliber (typically 2.5 to 3.0 mm at its origin), longer pedicle length (8 to 12 cm), and superior perfusion characteristics. The DIEA enters the lateral aspect of the muscle at the junction of its middle and distal thirds, arborizing into a rich intramuscular network that anastomoses with the superior epigastric system above the umbilicus.
The Rectus Sheath and the Arcuate Line
The muscle is enveloped by the rectus sheath, formed by the aponeuroses of the external oblique, internal oblique, and transversus abdominis muscles. A critical anatomical landmark is the arcuate line of Douglas, located approximately midway between the umbilicus and the pubic symphysis.
* Above the arcuate line: The posterior rectus sheath is robust, formed by the posterior leaflet of the internal oblique and the transversus abdominis aponeurosis.
* Below the arcuate line: The posterior sheath is absent; the muscle rests directly on the transversalis fascia and peritoneum. This anatomical transition makes the lower abdomen particularly susceptible to herniation if the anterior sheath is not meticulously reconstructed.
Clinical Pearl: The anterior rectus sheath is firmly adherent to the muscle at three or four transverse tendinous intersections (inscriptions). These inscriptions do not penetrate the posterior sheath, allowing the muscle to be mobilized freely from its posterior bed once the anterior attachments are sharply divided.
PREOPERATIVE PLANNING AND PATIENT POSITIONING
Preoperative Assessment
Patient selection is paramount. Absolute contraindications include previous abdominal surgeries that have transected the DIEA pedicle (e.g., certain transverse abdominal incisions or previous pedicled TRAM flaps). Relative contraindications include severe obesity, significant pulmonary disease (due to the risk of postoperative splinting), and a history of multiple abdominal hernias. Preoperative computed tomography angiography (CTA) of the abdomen and pelvis is highly recommended to map the perforators and confirm the patency and caliber of the DIEA.
Positioning and Preparation
- Positioning: The patient is placed in a strict supine position. The arms are typically abducted to 90 degrees to allow simultaneous access by the extirpative/orthopedic team and the reconstructive microsurgery team.
- Preparation: The abdomen is shaved and prepped widely, from the nipple line to the mid-thighs, extending laterally to the mid-axillary lines.
- Marking: The midline (linea alba), the lateral border of the rectus muscle (linea semilunaris), the costal margin, and the pubic symphysis are marked. If a skin paddle is required, it is designed obliquely or transversely (as in a VRAM or TRAM flap) centered over the periumbilical perforators.
SURGICAL TECHNIQUE: STEP-BY-STEP DISSECTION
1. Incision and Anterior Sheath Exposure
The procedure commences with the skin incision, which varies depending on whether a muscle-only or musculocutaneous flap is planned. For a muscle-only flap, a paramedian or midline incision is utilized.
- Deepen the incision through the subcutaneous tissues using electrocautery until the glistening white fibers of the anterior rectus sheath are identified.
- Incise the anterior rectus sheath longitudinally. If a skin paddle is included, the anterior sheath is incised circumferentially around the perforators supplying the skin island.
- Begin dissecting the underlying rectus muscle from the anterior rectus sheath. This is primarily achieved using gentle, blunt dissection to sweep the sheath away from the epimysium.
2. Management of the Transverse Inscriptions
As the dissection proceeds cranially, the surgeon will encounter the transverse tendinous inscriptions. These are areas where the anterior sheath is densely fused to the muscle fibers.
- In the areas of the anterior transverse inscriptions, blunt dissection must be abandoned.
- Use meticulous sharp dissection (using a No. 15 scalpel blade or fine tenotomy scissors) to divide the inscriptions off the overlying anterior rectus sheath.
Surgical Warning: When dividing the transverse inscriptions, apply continuous upward traction on the anterior sheath and angle the scalpel blade slightly toward the fascia. Care must be taken not to incise into the muscle belly itself, which can cause troublesome intramuscular bleeding, hematoma formation, and localized muscle necrosis.
3. Control of Fasciocutaneous Perforators
Throughout the anterior dissection, multiple perforating fasciocutaneous vessels will be encountered, particularly concentrated in the periumbilical region.
* If a muscle-only flap is being harvested, these perforators must be systematically clamped, ligated, or cauterized using bipolar electrocautery to prevent hematoma.
* If a musculocutaneous flap is planned, the dominant periumbilical perforators must be meticulously preserved and protected within a cuff of anterior rectus sheath.
4. Identification of the Vascular Pedicle
Once the anterior surface of the muscle is completely freed, the lateral border of the rectus muscle is mobilized.
* Retract the muscle medially using blunt retractors (e.g., Army-Navy or Richardson retractors).
* Using blunt scissor dissection, carefully separate the lateral edge of the muscle from the linea semilunaris.
* Identify the vascular pedicle (the deep inferior epigastric artery and its paired venae comitantes). The pedicle is consistently located lateral and deep to the rectus muscle, running within the extraperitoneal fat in the inferior portion of the sheath.
* The pedicle enters the posterior aspect of the rectus muscle approximately at the junction of its middle and distal thirds.
5. Pedicle Dissection and Tracing
Once identified, the pedicle must be skeletonized to achieve adequate length for the microvascular anastomosis.
* Trace the inferior epigastric artery and its venae comitantes laterally and inferiorly.
* The dissection proceeds toward the preperitoneal space, following the vessels to their origin on the external iliac artery and vein, just superior to the inguinal ligament.
* Small side branches supplying the abdominal wall musculature and peritoneum must be carefully ligated with fine silk ties or surgical clips. Bipolar cautery should be used judiciously near the main pedicle to avoid thermal injury or vasospasm.
6. Muscle Sectioning and Perfusion Assessment
With the pedicle isolated and protected, the muscle can be released from its superior and inferior attachments.
* Section the muscle proximally (near the costal margin) using electrocautery. The superior epigastric vessels are ligated and divided at this stage.
* Section the muscle distally, just superior to the pubic symphysis, taking extreme care to protect the mobilized vascular pedicle.
* Once the muscle is completely islanded on the DIEA pedicle, allow it to perfuse in situ.
* Observe the muscle to ensure it is being adequately perfused throughout its length by the inferior epigastric vessels only. The muscle should appear uniformly pink, and the cut edges should demonstrate active, bright red bleeding. A handheld Doppler can be used to confirm robust arterial inflow and venous outflow within the pedicle.
Clinical Pearl: Allowing the flap to perfuse in situ for 15 to 20 minutes prior to pedicle division acts as a brief period of ischemic preconditioning. This time should be utilized by the co-surgeon to finalize the preparation of the recipient site vessels.
7. Pedicle Ligation and Flap Transfer
Communication with the recipient site team is critical at this juncture. The flap should not be subjected to ischemia until the recipient bed and vessels are fully prepared for immediate anastomosis.
* When the recipient bed is ready, ligate the DIEA and its venae comitantes near their origin on the external iliac vessels. Use secure surgical clips or heavy silk ties.
* Divide the pedicle sharply.
* Transfer the flap immediately to the recipient site and commence the microvascular anastomosis to minimize warm ischemia time.
DONOR SITE MANAGEMENT AND CLOSURE
The closure of the abdominal donor site is as critical as the flap harvest itself. Failure to achieve a secure closure will result in significant donor site morbidity, most notably ventral herniation or abdominal wall eventration.
1. Inspection and Repair of the Posterior Sheath
- Carefully inspect the posterior rectus sheath and the underlying transversalis fascia/peritoneum.
- If the posterior sheath or peritoneum has been violated during the dissection, it must be repaired immediately. Use a strong, continuous nonabsorbable suture (e.g., 0 or 1 Prolene) to close any defects. This is particularly critical below the arcuate line, where the posterior sheath is naturally deficient.
2. Anterior Sheath Closure
The integrity of the abdominal wall relies entirely on the secure closure of the anterior rectus sheath.
* Place a closed-suction drain (e.g., Jackson-Pratt) in the dead space left by the harvested muscle.
* Close the anterior rectus sheath meticulously. The standard of care dictates the use of heavy, nonabsorbable sutures (e.g., 1 or 0 Prolene, or 1 PDS if a slowly absorbing monofilament is preferred).
* The raw text suggests 3-0 nonabsorbable sutures; however, in modern practice, heavier sutures (0 or 1) are strongly preferred for the primary fascial closure to withstand the biomechanical forces of the abdominal wall. A continuous running technique or interrupted figure-of-eight sutures may be utilized, ensuring bites are taken at least 1 cm from the fascial edge to prevent pull-through.
* If the anterior sheath cannot be closed primarily without excessive tension (often the case when a large skin paddle is harvested), the use of a synthetic mesh (e.g., polypropylene) or biologic matrix is mandatory to bridge the defect and prevent herniation.
3. Subcutaneous and Skin Closure
- Irrigate the subcutaneous tissues thoroughly.
- Complete the subcutaneous closure in multiple layers using absorbable sutures (e.g., 2-0 and 3-0 Vicryl) to eliminate dead space and reduce tension on the skin edges.
- Close the skin with staples or a running subcuticular suture, depending on surgeon preference and the presence of any remaining tension.
POSTOPERATIVE PROTOCOL AND REHABILITATION
Flap Monitoring
Postoperative monitoring of the transferred rectus abdominis flap is intensive. For the first 48 to 72 hours, the flap is assessed hourly.
* Clinical Assessment: Evaluate color, capillary refill, tissue turgor, and temperature. A pale, cool flap with sluggish refill suggests arterial thrombosis. A swollen, purple flap with brisk, dark capillary refill indicates venous congestion.
* Instrumental Monitoring: An implantable venous Doppler or handheld acoustic Doppler is utilized to confirm continuous, multiphasic flow within the pedicle.
Donor Site Care
- Abdominal Binder: An elastic abdominal binder is applied immediately postoperatively and should be worn continuously for 4 to 6 weeks. This provides external support to the fascial closure, reduces pain during mobilization, and minimizes the risk of seroma formation.
- Drain Management: The closed-suction drain in the abdomen is maintained until output is less than 30 cc over a 24-hour period, which typically occurs between postoperative days 3 and 5.
- Mobilization: Patients are encouraged to mobilize early to prevent deep vein thrombosis and pulmonary complications. However, they are instructed to avoid heavy lifting, straining, or exercises that engage the core musculature (e.g., sit-ups) for a minimum of 8 to 12 weeks to allow the fascial repair to achieve maximum tensile strength.
COMPLICATIONS AND PITFALLS
While the rectus abdominis free flap is highly reliable, complications can occur at both the donor and recipient sites.
- Ventral Hernia or Bulge: The most feared donor site complication. It is directly related to inadequate closure of the anterior sheath, unrecognized tears in the posterior sheath, or denervation of the remaining abdominal musculature. Meticulous fascial closure and the judicious use of mesh when tension is present are the best preventative measures.
- Flap Failure: Total flap loss is rare (typically <5% in experienced centers) but is usually secondary to technical errors at the microvascular anastomosis, pedicle kinking, or unrecognized hypercoagulable states.
- Donor Site Seroma: A common complication due to the large dead space created. Prolonged use of closed-suction drains and an abdominal binder significantly mitigates this risk.
- Intramuscular Hematoma: Often caused by aggressive blunt dissection or inadvertent entry into the muscle belly during the division of the transverse inscriptions. Meticulous hemostasis prior to pedicle division is essential.
CONCLUSION
The dissection for a rectus abdominis free tissue transfer requires a masterful blend of anatomical knowledge, precise surgical technique, and respect for the biomechanics of the abdominal wall. By adhering to the principles of careful pedicle isolation, sharp division of tendinous inscriptions, and robust fascial reconstruction, the orthopedic microsurgeon can reliably harvest this workhorse flap. The resulting robust tissue coverage is instrumental in salvaging limbs and restoring function in the face of catastrophic orthopedic defects.
You Might Also Like