Posterior Interosseous & Abdominal Flaps: Surgical Technique
Key Takeaway
The posterior interosseous flap is a versatile, reverse-flow axial pattern flap ideal for covering dorsal hand and wrist defects. Relying on the distal anastomosis between the anterior and posterior interosseous arteries, it provides robust coverage without sacrificing major source vessels. This guide details the precise flap design, step-by-step surgical dissection, and critical anatomical considerations to prevent posterior interosseous nerve injury and venous congestion.
INTRODUCTION TO UPPER EXTREMITY SOFT TISSUE RECONSTRUCTION
The reconstruction of complex soft tissue defects in the hand and upper extremity demands a rigorous understanding of vascular anatomy, flap biomechanics, and meticulous surgical execution. When local tissue rearrangement or skin grafting is insufficient due to exposed bone, tendon, or neurovascular structures, the reconstructive surgeon must ascend the reconstructive ladder.
This comprehensive guide details the surgical application of two highly reliable coverage options: the Posterior Interosseous Artery (PIA) Flap and Abdominal Pedicle Flaps. The PIA flap serves as a workhorse regional, reverse-flow axial flap for dorsal hand and wrist defects. Conversely, when local or regional options are exhausted, or when massive defects dictate, distant pedicled flaps from the abdomen remain an indispensable salvage technique in the orthopedic surgeon's armamentarium.
THE POSTERIOR INTEROSSEOUS FLAP
The posterior interosseous flap is a fasciocutaneous flap based on the posterior interosseous artery (PIA). It is most commonly utilized as a distally based (reverse-flow) pedicled flap to cover defects of the dorsal hand, the first web space, and the thumb. Its primary advantage is that it provides durable, pliable skin without sacrificing a major artery to the hand (such as the radial or ulnar artery).
Vascular Anatomy and Biomechanics
The PIA arises from the common interosseous artery, passing deep to the supinator muscle to enter the posterior compartment of the forearm. It travels distally in the intermuscular septum between the extensor digiti minimi (EDM) and the extensor carpi ulnaris (ECU).
The biomechanical foundation of the distally based PIA flap relies on a constant distal anastomosis with the anterior interosseous artery (AIA). This anastomotic network is typically located approximately 2 cm proximal to the distal radioulnar joint (DRUJ). When the PIA is ligated proximally, arterial inflow is provided via retrograde flow from the AIA through this distal communication. Venous drainage occurs via the venae comitantes, which must overcome valvular resistance through collateral bypass channels or valvular incompetence induced by the reverse pressure gradient.
💡 Clinical Pearl: Venous Congestion
Venous congestion is the most common complication of the reverse-flow PIA flap. To mitigate this, observe the critical recommendations of Chen et al.:
1. Dissect a cutaneous vein proximally to allow for a supercharged venous anastomosis if required.
2. Meticulously note anatomical variations in the size, location, and relationship of the PIA to the posterior interosseous nerve (PIN).
3. Observe the flap closely for venous congestion immediately after inset; if severe, consider venous supercharging or adjusting the pedicle geometry to relieve kinking.
Preoperative Planning and Flap Design
Flap design is a geometric exercise that must be executed with precision to ensure adequate pedicle length and tension-free inset.
- Axis Marking: On the dorsal surface of the forearm, draw a longitudinal line connecting the lateral epicondyle to the distal radioulnar joint. This line represents the anatomical course of the PIA and the intermuscular septum between the EDM and ECU. The flap will be centered on this axis to capture the septocutaneous perforators.
- Identifying the Pivot Point (Point A): Mark Point A exactly 2 cm proximal to the ulnar styloid. This represents the distal anastomosis between the anterior and posterior interosseous arteries and serves as the rotation point (pivot point) of the vascular pedicle.
- Determining Pedicle Length (Point B): Measure the distance from Point A to the most distal edge of the cutaneous defect on the hand. Mark this as Point B. The distance A-B dictates the minimum required length of the vascular pedicle.
- Positioning the Flap (Point C): Transfer the A-B distance proximally along the longitudinal axis starting from Point A. Mark this new proximal location as Point C. Point C represents the most proximal extent of the pedicle before the cutaneous paddle begins.
- Sizing the Flap (Point D): Measure the longitudinal length of the defect. Transfer this length proximally from Point C along the axis to establish Point D. The distance C-D represents the total length of the cutaneous flap.
- Flap Width: Measure the maximum width of the defect and center this measurement over the C-D segment on the longitudinal axis.
Step-by-Step Surgical Technique
The dissection of the PIA flap requires meticulous hemostasis and a deep respect for the posterior interosseous nerve, which intimately crosses the vascular pedicle.
- Initial Incision: Begin the skin incision at the distal pivot point (Point A) and extend it proximally along the radial (lateral) border of the designed flap.
- Radial Elevation: Incise only the skin and subcutaneous tissue on the radial side. Do not incise the deep fascia at this stage. Elevate the skin radially to identify the cutaneous perforators emerging from the septum.
- Fascial Incision and Septal Identification: Once the perforators are visualized, incise the deep fascia longitudinally over the EDM and ECU muscles. Dissect medially toward the central axis, carefully protecting the cutaneous branches.
- Deep Dissection: Utilize gentle, blunt dissection to separate the EDM and ECU. Retract these muscles to expose the deep compartment. The PIA and its venae comitantes will be visualized running along the floor of this interval.
- Nerve Protection: Identify the posterior interosseous nerve (PIN). The PIN typically crosses the PIA in the proximal third of the forearm and gives off multiple motor branches. Preserving the PIN is paramount. Carefully separate the artery from the nerve using micro-instruments.
- Proximal Ligation: Identify the muscular branches of the PIA and electrocauterize or ligate them with fine surgical clips. Trace the PIA proximally to its origin near the distal edge of the supinator muscle. Ligate and section the PIA and its venae comitantes at this proximal level.
- Ulnar Elevation: Open the ulnar (medial) border of the flap with a skin incision. Incise the fascia and elevate the flap toward the central septum, isolating the cutaneous paddle on its vascular pedicle.
- Pedicle Mobilization: Gently elevate the flap and its pedicle from proximal to distal. Dissect the vascular pedicle as far distally as possible (toward Point A) to maximize reach and minimize tension. Ensure the distal anastomosis with the AIA remains completely undisturbed.
- Rotation and Inset: Rotate the flap 180 degrees to cover the recipient wound. Ensure the pedicle is not kinked or twisted. A wide subcutaneous tunnel or an open incision should be used to pass the pedicle to the defect to prevent compression.
- Donor Site Management: If the donor defect is less than 3 to 4 cm in width, it can often be closed primarily. If primary closure creates excessive tension (which can lead to compartment syndrome or delayed healing), cover the donor site with a split-thickness skin graft.
🚨 Surgical Warning: Pedicle Kinking
The most vulnerable segment of the reverse-flow PIA flap is the pivot point. Avoid acute angles during rotation. If the pedicle appears kinked, extend the incision distally or release the surrounding fascia to allow a more gentle, sweeping curve into the defect.
ABDOMINAL PEDICLE FLAPS
While free tissue transfer has largely superseded distant pedicled flaps for upper extremity reconstruction, abdominal flaps remain a critical fallback. They are indicated when the defect size exceeds the capacity of regional flaps, when the required flap thickness necessitates abdominal adipose tissue, or when the patient is not a candidate for microvascular free flaps (e.g., severe peripheral vascular disease, lack of recipient vessels, or systemic instability).
Axial vs. Random Pattern Flaps
Understanding the vascular basis of abdominal flaps is essential for safe flap design:
- Random Pattern Flaps: These flaps rely on the subdermal vascular plexus rather than a named anatomical vessel. Because their blood supply is non-directional and pressure-dependent, they are strictly limited in their dimensions. It is rarely safe to design a random pattern flap with a length-to-width ratio that exceeds 1:1.
- Axial Pattern Flaps: These flaps incorporate a defined, anatomically consistent arteriovenous system running along their longitudinal axis (e.g., the superficial inferior epigastric artery [SIEA] or the superficial circumflex iliac artery [SCIA]). The inclusion of a direct axial vessel allows for a much safer length-to-width ratio of at least 3:1. This permits the creation of a longer pedicle, facilitating easier arm positioning and reducing the need for staged delays.
Flap Selection and Patient Positioning
Abdominal flaps can be broadly categorized by their base location and vascular supply:
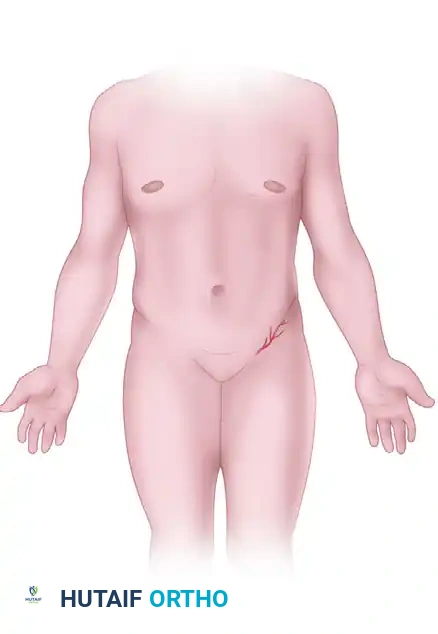
- Infraumbilical Flaps (Distally Based): These flaps are based inferiorly toward the groin, capturing the superficial epigastric vessels or superficial circumflex iliac vessels. They are typically raised on the same side as the affected hand.
- Consideration: The infraumbilical region is a primary fat storage area. Flaps harvested from this region will transfer significant adipose bulk to the hand, which may require subsequent debulking procedures.
- Supraumbilical Flaps (Proximally Based): These flaps are based superiorly, above the umbilicus, relying on the thoracoepigastric vascular network. They are usually raised on the side opposite to the affected hand to allow for comfortable cross-chest positioning.
- Consideration: Supraumbilical flaps generally contain less subcutaneous fat, providing a thinner, more pliable coverage option.
🚨 Pitfall: Patient Selection in Supraumbilical Flaps
Supraumbilical flaps should not be used in patients with a "barrel chest" associated with chronic obstructive pulmonary disease (COPD). The altered chest wall mechanics and hyperinflation make positioning the arm across the upper abdomen/chest highly restrictive and uncomfortable, significantly increasing the risk of pedicle avulsion or respiratory compromise.
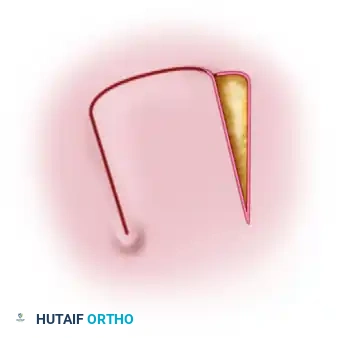
Figure 65-30: Example of abdominal flaps. The lower abdominal flap may be designed narrower in relation to its length (axial pattern) if it incorporates the superficial circumflex iliac artery and vein or the superficial epigastric artery and vein.
Surgical Technique: Tubed vs. Direct Flaps
Historically, abdominal flaps were utilized as Tubed Pedicle Flaps. This multi-stage technique involves creating a bipedicled flap, suturing the edges together to form a tube, and allowing 6 weeks of maturation (ischemic preconditioning). One end is then detached and sutured to the hand. After another 3 to 6 weeks of neovascularization from the hand bed, the final abdominal pedicle is divided, and the flap is completely inset. While highly reliable, the prolonged immobilization makes this technique largely obsolete for acute trauma.
Direct Abdominal Flaps are preferred for acute coverage.
1. The defect is templated, and the pattern is transferred to the selected abdominal donor site.
2. The flap is incised and elevated in the plane deep to the Scarpa's fascia, ensuring the subdermal plexus (or axial vessels) remains intact.
3. The hand is brought to the abdomen, and the flap is inset into the defect.
4. The arm is securely immobilized to the torso using a custom orthosis or strapping to prevent any tension on the pedicle.
5. Division and final inset are typically performed at 3 to 4 weeks, once capillary refill and bleeding from the flap edges confirm adequate neovascularization from the recipient site.
POSTOPERATIVE CARE AND REHABILITATION
The survival of any pedicled flap—whether a regional posterior interosseous flap or a distant abdominal flap—hinges on meticulous postoperative management.
Flap Monitoring
Flap circulation must be monitored continuously for at least the first 24 hours. Assess color, capillary refill, tissue turgor, and temperature.
* Arterial Insufficiency: Characterized by a pale, cool flap with sluggish or absent capillary refill.
* Venous Congestion: Characterized by a swollen, violaceous, or blue flap with brisk (less than 1 second) capillary refill and dark bleeding on pinprick.
If flap viability is uncertain, the patient must remain admitted for close observation until the vascular status stabilizes.
Environmental and Systemic Control
Strict measures must be taken to prevent vasospasm, which can critically compromise the delicate microcirculation of the pedicle:
* Absolute smoking cessation is mandatory, as nicotine is a potent vasoconstrictor.
* Maintain a warm ambient room temperature.
* Avoid cold drinks and limit emotional distress or pain, which can trigger sympathetic vasoconstriction.
* Ensure adequate hydration and maintain normotension.
Wound Care and Mobilization
Inspect the inset site carefully. Any sutures that appear excessively tight and threaten to strangulate the dermal edges must be removed immediately to relieve tension.
Skin sutures are typically removed at approximately 10 to 14 days postoperatively, depending on the rate of healing. Once the flap is stable and (in the case of distant flaps) divided, aggressive rehabilitation tailored to the specific underlying orthopedic injury (e.g., tendon repair, fracture fixation) is initiated. Early, controlled mobilization is critical to prevent joint stiffness and tendon adhesions beneath the newly reconstructed soft tissue envelope.
You Might Also Like